

Blue View – Tipi Technology
/
A Lakota Tipi
During our roadtrip to Nebraska and South Dakota, we had the opportunity to camp on the Lakota Reservation for almost a week. (Marcie will talk more about that adventure in her upcoming blogs.) We have a 10’x10’ “instant tent”, which supposedly takes less than 60 seconds to erect. This is sort of true… it takes less than a minute to erect the basic tent, once it’s extracted from its carry bag, but it takes another 15 minutes or so to stake it down, install the rain fly and secure the guy lines. Still, that’s a lot quicker than it used to take to erect a tent; assembling the poles, figuring out where they go, fishing the poles through the loops, then staking it, etc., usually while it was raining.

Our 10’x10’ Instant Tent
While we were camping in our high-tech, modern tent, a few of the Lakota men were using traditional tipis for their shelters. It had always been my naive impression that living in a tipi would be an uncomfortable version of long term tent camping. I thought there would be all kinds of issues. Isn’t it hot in the summer and cold in the winter? With a dirt floor and an opening in the roof, doesn’t it get wet and muddy inside? In a hard rain, wouldn’t you have a river running through the tent? How do you keep the bedding dry? I know heat rises and the smoke makes its way out the vent at the top, but doesn’t it still get really smoky inside from the fire? How the heck do you erect and lash all those poles together without using a ladder? Ditto getting the covering lifted into place and attached?
It turns out that the Plains Indians solved all these problems. Tipi living can actually be quite comfortable… if it is designed and built properly. To learn more, I talked to the Lakota men about their tipis. I also found two excellent references on the proper way to build a tipi -The Indian Tipi: Its History, Construction, and Use, by Reginald and Gladys Laubin, and the Mother Earth News: How To Make A Tipi. Here’s what I discovered:
Basic Design
There are two basic types of tipis: those constructed using three main support poles and those using four. The Lakota, like most Plains Indians, use the three pole design. The diameter of the tipis varies from about ten feet for hunting parties to more than thirty feet for large lodges. A typical, three pole family tipi would be about 18-20 feet in diameter, and would require 17 poles; the three main poles, two poles to control the vent/rain opening a the top, and twelve poles around the circumference of the base. For an 18-20 foot diameter tipi, each pole is roughly 25 feet in length.
Traditionally, as you’d suspect, bison hides were cleaned and tanned, then cut to size and sewn together to make the tipi cover. This resulted in a creamy white cover that was often adorned with paintings. Towards the later half of the 19th century, however, canvas was substituted for bison hides. Typically, canvas in light, bright colors is still used today.
If I were to construct a tipi using the 17 poles, wrapped it in canvas, then staked it down around the outside, I’d have a tent that was all the things I thought it would be: cold and drafty in the winter and hot in the summer - just like my modern tent. Even worse, because the tipi has no floor and I’d probably have a fire inside, it would be smoky most of the time and wet and muddy whenever it rained. The Plains Indians were smart folk, however, and figured out some brilliant innovations that solved all these issues.
The Direction
The prevailing winds on the western plains are from the west or southwest. Because of this, tipis were usually erected with the door facing the rising sun in the east, which helped reduce drafts, dust and rain from entering through the door.
The Shape
A tipi is constructed with a rain/vent flap at the top that can be opened or closed as desired. If the base of the tipi was constructed in a circle, however, the vent flap would center around the poles and would be impossible to close completely during a rain. By placing the poles in an oval shape and tilting the entire tipi away from the door and towards the prevailing winds, the point where the poles cross each other is shifted off-center. This allows the vent to be more elongated on the front of the tent, making it larger when open and more rainproof when closed.

The shape of the base of the tipi is more oval than round

The oval shape causes the tipi to lean to windward
Adding a Liner
Changing the orientation and shape, and tilting the tipi improved the living conditions somewhat, but not all that much. It would still be too hot, too cold and/or too smoky, and when it rained, water would still run down the poles and drip or collect on the floor. Wind would blow in under the tipi covering and dew would condense on the sides and drip during cool nights.
One major, but simple modification was the addition of a liner. “The liner, which might be described as a tipi without a top within a tipi”, changes all that. It attaches to the inside of the poles and is folded under about 6 inches at the bottom to make a seal. Air comes in under the outer covering, then flows up between the cover and liner, creating an upward draft. The result is that the tipi becomes warm and snug in winter and cool and dry in summer. A fire built in the center draws properly. The amount of dew that condenses is reduced, and what dew there is drips onto the outside of the liner, runs down and is diverted outside the tipi. Finally, even with the rain vent closed, raindrops can still run down the poles and drip inside, but as long as the poles are smooth, the rain will run down the poles outside the liner and, again, be diverted outside. The floor is often covered with hides or canvas that overlaps the folded bottom of the liner, so “there's no draft, no dampness and no more dirt in the living area than in the average summer cottage. A liner, in other words, almost magically transforms the tipi from a tent into a home.”

A liner makes a big difference. (Courtesy of Instructables.com)
Lastly, a Trench
The final improvement is something I learned as a boy scout – digging a shallow trench around the perimeter of the tent. In a heavy rain, the trench will direct water around and away from the tipi instead of letting it run into it.
Erecting the Tipi
“How the heck do you erect and lash all those poles together without using a ladder? Ditto getting the covering lifted into place and attached?” It turns out that 2-3 people can erect a tipi in 30-60 minutes once they know how.
The three main poles are lashed together using one end of a 45 foot, 1/2” rope. One or two people steady the poles while another uses the rope to pull the poles upright, then the base of the poles are moved out to form a tripod. Next, eleven poles are leaned against the tripod. After each pole is positioned, one wrap of the rope is made around the tipi to secure the pole in place. Once all eleven poles are in position, four more wraps around the tipi are made with the rope (four is a sacred number to the Lakota), and the end is brought inside the tipi and staked down.
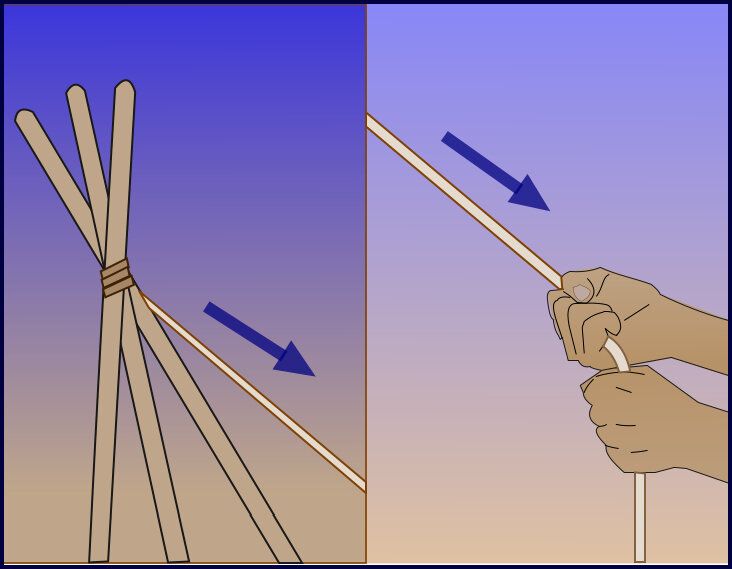
The poles are lashed together then pulled upright
The twelfth pole is used to lift the cover in place. The cover is stretched out on the ground with the inside facing down, and each side is folded inward to meet in the center. This is repeated several times until the bundle is about four feet wide at the base. The bundle is folded in half, and the pole is lashed to the top of the bundle. Next, the pole and cover are lifted and placed against the tripod, rotating as necessary so that the bundle stays on top. The cover is then unfolded and wrapped around the poles.

The twelfth pole is used to move the cover into place
One of the two remaining poles is temporarily lashed to the tripod to stand on in order to lace the ends of the cover together above the door. Once the cover is lashed together, the final steps are to stake the cover down, configure the two poles used to open and close the vent, and attach the door covering. All in all, a tipi can be erected in less time than it takes to position, unhook, level, extend all the slide-outs, unroll the awnings and make all the electrical, water and drain hook-ups on a modern fifth wheel trailer, and a tipi owner never has to worry about a slide-out jamming or a water pump dying.
Still, given all the arguments in favor of a tipi, we’ll be sticking to our little “instant tent”. While it may not be as comfortable, we can still erect our tent faster than a tipi. Then there’s the problem of carrying those seventeen 25’ long poles on top of our 16’ Kia: highway driving would definitely be interesting; maneuvering through a grocery parking lot or a McDonalds drive-thru could be tricky; and I would undoubtedly smack my head on them at least a dozen times a day.
See you next week...