The Blue View - Life Rafts

life raft  

We have a lot of gear aboard that we have never used. Some was purchased because we thought it was a good idea at the time, but turned out to be things we didn't need. Some of it was purchased as spares and are good things to have aboard but haven't been used yet. And some are for last resort emergencies that we hope we never to have to use.

Our life raft falls into the last category. It is a four person, offshore rated life raft that is housed in a canister, and is secured to a cradle on deck. The life raft has a 30' painter that secures it to Nine of Cups. Most of the painter is tucked away inside the sealed canister. If we should ever need to deploy it, the process is to pull out 20 or so feet of the painter. The webbing that holds the life raft in its cradle is held in place with a quick release pelican hook, and this is opened. The entire canister is then picked up and thrown overboard. Once it is in the water, the remaining painter is pulled out of the canister. The painter not only attaches the life raft to the boat, but also triggers a CO2 tank that inflates the buoyancy tubes on the raft. The expanding tubes exert enough pressure to force the canister open. The canister sinks or floats away and the life raft is left floating at the end of the painter. The life raft isn't actually boarded and cut loose until there is no hope for Cups. There is an old adage that states that it's not time to move to the life raft until you need to step up to it.


life raft canister


Our life raft spends 98.6% of its life inside the canister on deck. During the other 1.4% of the time, it gets treated to an annual trip off the boat to get inspected, resupplied and repacked. Since all ships carry life rafts that must be inspected annually, we have rarely been in a port that didn't have one or more companies that provided this service. It is not cheap – the basic inspection usually runs between $100 - $200. There is almost always something that needs replacing, however, like flares or gaskets or the patch kit, and it always seems to end up costing closer to $500 each year. Some of the newer life rafts only need to be inspected every three years, and would save a lot of money over the usual 10 or 12 year lifetime of the life raft.
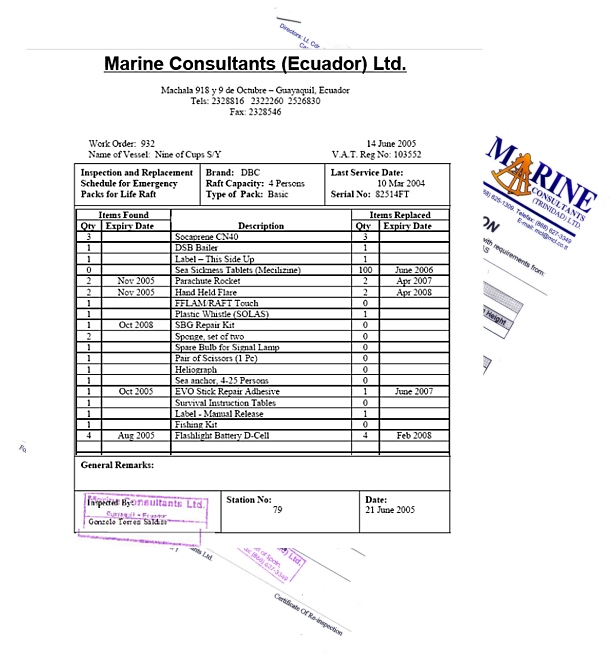
 

recertification


Another way to save money is to provide the items we want to replace or update to the company doing the inspection. We have our own seasickness meds, for example, and the inspection company is usually amenable to letting us provide them instead of selling us some very expensive alternatives. On completion of the inspection, we are given a list of everything in the life raft and its expiration date. We always review the previous year's list so we know what will reach its expiration soon, and we provide replacements for what we can when we deliver the life raft. We have been able to provide food rations, meds, and the occasional replacement part for considerably less money than we would have been charged by the inspection company. We don't cut corners, however. Saving five dollars on a patch kit that may or may not adhere to the life raft fabric is pretty foolish.
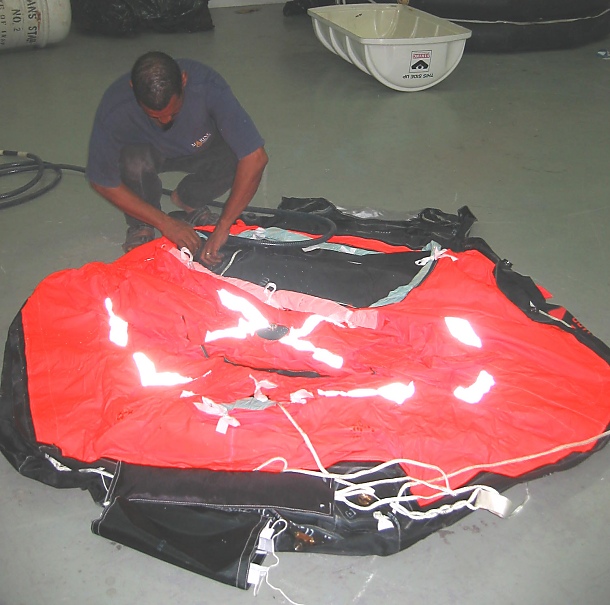
 

unfolding and inflating


As part of the inspection, the life raft is inflated with room air, and left inflated for a day to check for leaks and to let the fabric stretch out. The flares are checked and replaced as needed, and everything is inspected. While the process can be done in two days, we usually ask that it be left inflated for a few more days.

We try to visit our life raft while it is inflated. Most people never see this important survival gear deployed and inflated until it is needed in an emergency. We like to reacquaint ourselves with it each year. We check out all the gadgets it has, like the sea anchor, signal mirror, and flares, and how they are used. We climb inside and figure out how best to board it when we are soaking wet, wearing foul weather gear and PFDs. We sit in it for a few minutes and imagine how it would be to live in it for a few weeks - and what we would need to survive. Then it is repacked and sealed back in its canister, and we return it to its home on the deck.

The survival gear that is kept in the life raft is pretty minimal. We keep a Ditch Bag on board that has the majority of the things we would need to stay alive in the life raft until we were, hopefully, either rescued or made landfall. We used to keep more gear in the life raft, but since we can only access it during the annual inspection, it is difficult to service, inspect and update the gear and supplies ourselves. For those that are interested, I plan to devote a Blue View on our Ditch Bag in the near future.

We have four friends that were saved by their life rafts. One couple hit a rock off New Zealand, and their sailboat sunk in just a few minutes. Another boat was holed by a whale, and one suffered major damage after a propane explosion in the galley. The fourth vessel had a petroleum fire aboard, and while the steel vessel did not sink, the crew could not remain aboard. We hope not to join this elite group, but having the life raft on board is good security – just in case.

The Blue View - Staying Afloat

life ring  

There was a news item a few days ago about an experienced lobster man who fell overboard, and stayed afloat for 12 hours without benefit of a PFD. Apparently, he was pulling on the handle of a heavy cooler, trying to move it, when the handle suddenly broke, and he fell over the side. He resurfaced and watched his boat slowly motoring away, while he slowly drifted out to sea.

He was eventually spotted by a Coast Guard helicopter about 40 miles from where he had fallen in, and he was plucked out of the ocean by a rescue swimmer. These are the guys that jump into the ocean from a helicopter, swim over to people in distress, calm them down, hook them up to a harness, and assist in hoisting them up into the helicopter. In this world, there are many people who routinely risk their lives in selfless attempts to save others. All are real heroes in my book, but rescue swimmers are right up at the top of my list.


lobsterman with boots


It's interesting to learn how the lobster man managed to stay afloat for 12 hours. He was wearing tall rubber boots. He removed them, dumped the water out, and turned them upside down. Then he pushed them down into the water. Being upside down, they held the air. He held one under each of his arms, and lodged the soles of the boots in his armpits. Absolutely brilliant. Instead of panicking, he figured out a clever way to make water wings.


navy recruitment poster


I wonder if he was a former navy guy. When I was a boy, I wanted to join the Navy and sail around the world. I couldn't wait to graduate from high school, so I could enlist. When I did, the Navy had other plans, and I never spent one day aboard a ship. But even though I wasn't destined to sail anywhere courtesy of the U.S. Navy, I did get some “survival at sea” training in boot camp.


navy bell bottoms


They first made sure we could swim and tread water. Then we were taught how to jump off sinking ships and how to improvise flotation devices. Most navy sailors don't wear boots, but it turns out that trousers work almost as well. Did you ever wonder why U.S. Navy trousers are bell bottoms? It was never a style statement. Bell bottoms are much easier to remove over the shoes, especially when wet, than traditionally cut trousers. Once removed, you tie a knot in the end of each leg, swing them over your head to inflate them with air, then hold the waist closed to make a rudimentary flotation device. It's not great, but sufficient to give you just enough buoyancy to survive.

On board Nine of Cups we know that if one of us goes overboard on a passage, unless the other person is right there watching when it happens, the chances of being found are pretty remote. Having a PFD or being able to fashion an improvised flotation device will make very little difference in the outcome. There won't be any rescue divers or helicopters to look for us a thousand miles offshore.

Instead, we work hard at staying on the boat. We wear PFDs with built in harnesses when the weather is rough or if one of has to leave the cockpit when alone on watch. We use tethers with the harnesses to keep ourselves attached to the boat. If the weather is really bad, neither of us leaves the cockpit without the other watching.

So far, so good. Neither of us has had to see whether inflating our pants really will keep us afloat or for how long. And we plan to keep it that way. Hence, the reason I never pee overboard when I'm alone on watch. (#1 reason for men to fall overboard!)

The Blue View - Storms at Anchor

stormy anchor  

Before we moved aboard Nine of Cups and were just learning the basics about sailing and cruising, we frequently chartered boats in the Caribbean. We could afford to do it more frequently if we did our chartering off season when the rates were lower. The lowest rates were during hurricane season. We rationalized that the odds of a hurricane occurring where we were during any 10 day period were quite low and worth the risk.

The odds caught up with us one summer while we were chartering a sailboat in the British Virgin Islands. The charter company had us move the boat into a secure marina on Virgin Gorda, and we battened her down and stayed aboard as Hurricane Bertha moved over the area. It was quite the adventure as the wind shrieked, coconuts flew past like cannonballs and trees were uprooted. We saw it as a positive experience. After all, we had the opportunity to experience some of the worst weather mother nature has to offer in a semi-sheltered environment, and even though we did everything we could to look after and protect the boat, it still belonged to someone else. In the end, the boat was just fine and the charter company even gave us a credit towards another bareboat charter.

Now that we live aboard our own boat, we stay well clear of the hurricane/typhoon/cyclone regions when they are in season. We have had some near misses as a few of these cyclonic systems wandered out of their usual areas, but we have, so far, managed to avoid a direct hit.


hurricane winds


Storms and gales are a different matter. In a recent Blue View, I talked about encountering storms at sea and how we prepare for them. For every gale or storm we've encountered at sea, however, we have seen many more while anchored. Two of these actually had hurricane force winds in excess of 64 knots (119 km/hr or 74mph). Just as at sea, it is important to be prepared for a storm while anchored. For us, the preparation starts with knowing what to expect and having the right gear aboard to begin with, followed by the steps we take to prepare Nine of Cups for a blow.

First in importance is what the weather is going to do. Which direction(s) will the wind come from and how strong will it be. Will it be primarily from one direction or will it swing around? If the forecast is wrong, are there contingency plans? Take a look at the local topography. Are there notches in the hills or mountains surrounding the anchorage? These will often funnel the wind and it will be much more intense there. Look at the trees – are they bent in one direction in certain areas? That's a good sign of where the wind will be the strongest. Check the chart. Is it best to anchor in the middle of an anchorage with lots of swinging room or would it be better to find a tight little cove to tuck into? Maybe the anchorage is just too risky, too open, or the holding is not good – it might be better to head out to sea and weather the storm offshore.

Just as important is having the right ground tackle. We have the biggest anchor our bow roller will handle, a 110 pound (50kg) Bruce anchor. This is more than twice the recommended size for our size boat. The extra 50 or 60 pounds it adds to the weight forward is minor compared to the weight of the 300 feet (90m) of chain we carry in the chain locker. If we are expecting a big blow, we add a second anchor in series with our Bruce for even more holding power.


anchor sketch


There are two philosophies regarding the placement of anchors in series. Some feel that it is best to put the big anchor down first and shackle the second, smaller anchor to the anchor chain 20 feet (6m) or so closer to the boat. The second anchor acts more like a weight or chum on the chain and greatly increases the holding power of the main anchor. The second philosophy is to attach the small anchor to the main anchor with 20 feet (6m) or so of chain so that it extends beyond the main anchor and sets first. The primary anchor is still the main holding force, while the second anchor adds to its holding power. We use a 35 pound Danforth as our secondary anchor. We have tried both methods and have not had issues with dragging with either method. We prefer the latter method however, and have used it many more times.

An important part of the ground tackle is the snubber we use with an all chain anchor rode. It's such an important issue, I wrote an entire blog post on the subject. We have a 5/8” (16mm), three-strand, 60 feet (18m) long line that we use as our heavy duty snubber. We attach it in any kind of bad weather, but especially for the “batten the hatches, lash everything down, take the seasick medicine” kind of weather. When I secure the snubber to the cleat, I leave several feet of line between the bitter end and the cleat. In a storm, the snubber will sometimes start chafing against the bow roller. I check on it frequently, and if it shows any signs of chafe, I let out some of the extra line to prevent the snubber from chafing through.

Depending on the anchorage, this is often all we need to keep Cups safely anchored. If the anchorage is small and/or there is limited swinging room, we sometimes run lines ashore. We use heavy 3/4” (18mm) line, and carry two, 300' (90m) lengths. Polypropylene is good for this purpose. It floats, so towing it ashore in the dinghy is easier, and it is quite chafe resistant. Since we may be attaching to rocks ashore, we also have two 15 foot (5m) lengths of chain with shackles on board.

The procedure to run the lines ashore takes a little practice. We first deploy the dinghy and flake the line out on the aft deck. We pass one end through an aft hawse hole and tie it to the dinghy. Then we drop the anchors and set them, and attempt to back Cups up towards the shore, deploying more chain as needed. When we get as close as we can, I hop into the dinghy and tow the end of the line towards shore while Marcie feeds the line out. I find a place to go ashore and then secure the line to a stout tree or large rock. If there is any chance of chafing the line on the rock, I wrap a length of chain around the rock, shackle the ends together, and attach the line to the chain. The end of the line on the boat is wrapped around a winch, and we use the winch to pull the boat towards shore. Often, we then run another line to shore from the other side of the boat. By winching in the lines and letting out more chain, we can get the boat quite close to shore, often in some tiny cove that is completely protected. When we are all set, we attach the snubber.


alone in the anchorage


Fortunately, we were alone in the anchorage the first time we tried this. I've left out the part about how I kept the dinghy from drifting away as I tried to clamber up those mossy, slippery rocks, dragging two hundred feet of line and carrying 15 feet of chain wrapped around my neck. It took us well over two hours of sweating and swearing to get everything just right. After a dozen or so times, however, we were completing the task in about 20 minutes and with hardly any swearing.

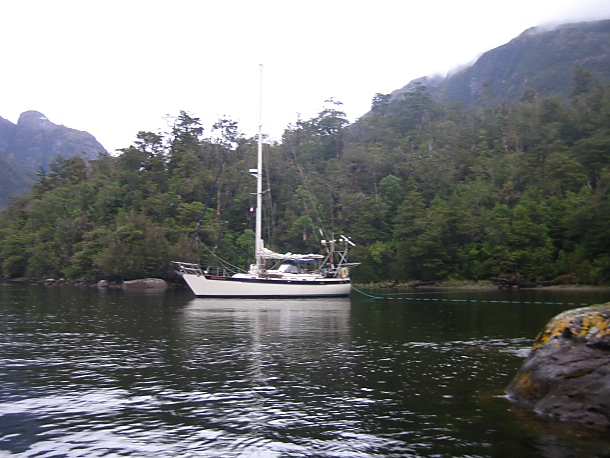
We have used this technique in numerous anchorages, especially in Patagonia, Tierra del Fuego and Fiordland, in southern New Zealand. On occasion, we have run as many as four lines ashore, and sometimes we would be so close to shore we needed to avoid the tree limbs. Marcie always enjoys picking flowers without leaving the boat. Often it seemed that there were more gales and storms than good weather. Even when the weather forecast was for good weather, however, there were frequent katabatic winds called williwaws, often generating hurricane force winds for short periods of time and sounding like a railroad train barreling towards us. Neptune, with his endearing sense of humor, usually saw fit to send these to us around 3AM. Being securely tied to shore made these williwaws more of an annoyance rather than a major adrenaline rush.

Once we are as securely anchored as we can be, we pull out our checklist and go through the remaining steps to prepare for the blow. We have one checklist for prepping the boat for a storm at sea and one for prepping the boat at anchor. We have printed copies and keep them both in a notebook under the Nav station. If you would like a copy, email us and we will happily send you an electronic copy. Let us know whether you would prefer a .pdf format or in MS Word format.

Once the storm arrives, if we have any question about the anchor holding or the swinging room, or if our confidence in the anchoring skills of the other boats in the anchorage isn't real high, we stand watch in three hour shifts. We have had a number of near misses by other boats dragging, including one rather large ship. Usually by the second day, if everybody seems to be holding their position and all is well, we will rely on the electronic anchor alarm to alert us if we start dragging, and will go back to a normal sleep schedule. There's usually not much sleep to be had during a storm, at anchor or at sea, but knowing we're as prepared and safe as can be goes a long way towards peace of mind.