The Blue View - Clifford Ashley

clifford ashley

“When I arrived at a proper age I went to sea and served my apprenticeship in knots aboard the whaling bark Sunbeam. My chief instructor and the most quoted man in this volume was Captain Charles W. Smith, then acting mate. Under Captains Smith's tutorship I progressed rapidly in knots and marlinspike seamanship to a point where even my teacher admitted that if I persevered and maintained my health I might someday hope to grasp the rudiments of the art.” Ashley Book of Knots

Almost two decades ago, when sailing off into the sunset was still a distant dream for us, I read the book The Shipping News by Annie Proulx. Something that was quite intriguing to me was that each chapter began with a quote from Clifford Ashley's The Ashley Book Of Knots. Usually the quote was a couple of sentences that described a particular type of knot, like a bend or hitch, and perhaps a little about its history or its use. The quotes were interesting and I think they were meant to be allegories to the story as it was unfolding.


ABOK cover


I had never heard of The Ashley Book of Knots. I found a copy at a bookstore, browsed through it and was quickly hooked. It is a compendium of over 3000 knots and 7000 illustrations, but what makes it much more than just a huge collection of knots is Ashley's narratives about the history and uses of all those knots and the life of the sailor. Marcie bought a copy for my birthday 18 years ago. It is now battered and weathered from hard use and its exposure to life aboard Nine of Cups for all those years. Not unlike the crew (or this half of it, anyway), I suppose.


sketch


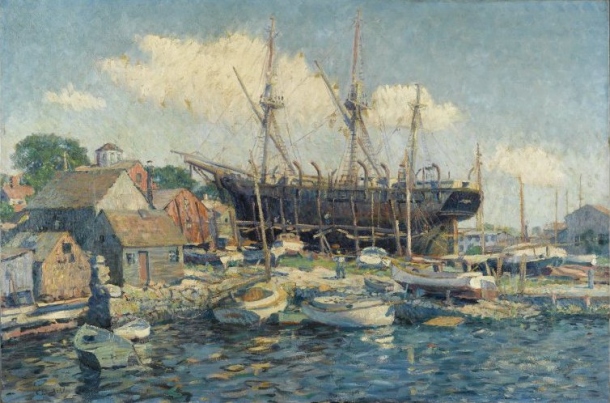
When we visited the historic whaling town of New Bedford and were wandering through the whaling museum there, we saw a number of nautical paintings by Clifford W. Ashley. Until then, I didn't know Ashley was remembered for anything other than his well known book. What I discovered was this native son of New Bedford is just as well known for his hundreds of paintings and sketches.

He also wrote and illustrated two other books that described whaling and the life aboard a whaler. While I am in no way a proponent of the mass slaughter of whales that began in the mid 1800's, I do have an admiration for the hardships and dangers the typical whaler endured. Ashley probably did as much as anyone to preserve and record this heritage, and he did so in a manner that was as interesting as it was beautiful.


ashley painting


I also have an appreciation for the patience and craftsmanship of the sailors' arts over the centuries, especially the practical knots as well as decorative knots and rope work. I remain optimistic that if I study hard, persevere and maintain my health, even I might someday hope to grasp the rudiments of the art.

The Blue View - Lazy Jacks

As my years start to catch up with me, I am beginning to realize that making Nine of Cups easier to handle by “senior sailors” is a worthwhile objective. Our lazy jacks are a case in point. When we first started cruising, I didn't think twice about going forward in 30+ knots of wind to manhandle the main and secure it in place with sail ties while Marcie kept Cups pointing into the wind for the ten or so minutes the process took. Holding on dearly with one hand, as the roll of the boat tried to fling me overboard,was just part of the adventure. Now, as I most assuredly fall into the “senior” category, I can certainly see the advantages to such things as a lazy jack system. Lazy jacks are a network of lines that are rigged to contain the mainsail when it is lowered. These lines run from a point high up on the mast to several points along the boom. As the mainsail is lowered, these lines make a cradle of sorts to keep the main from drooping down onto the deck. Sailors were once referred to as tars, and British sailors were called “jack tars” because of the union jack on the British flag. Legend has it that these types of sail taming lines were first employed by the British navy, and since the jack tars no longer had to work as hard as other tars to lower or reef the sails, these systems became known as “lazy jacks”.

I looked at what a multitude of other cruising boats had done. There seemed to be an even mix of commercially purchased systems and custom, owner built systems. I first looked into purchasing one of the commercially available lazy jack systems. Most were undersized for our size vessel, many were more complicated than I wanted, and all were more expensive than if I did it myself. After talking to several other yachties who had built their own systems, I decided to do the same.

The lazy jack system we devised for Cups is quite simple. It is retracted out of the way for most of its life. It is only in place when it is time to drop the main, and it remains in place only until we have the opportunity to secure the main with sail ties. We can only retract or engage the system at the mast, which means one of us must leave the cockpit when we drop the main. Our main has partial battens and simple plastic sail slides, and since it does not always drop all the way without a bit of help, one of us is usually at the mast anyway, so this is a minor inconvenience.


figure 1


Figure 1 shows the basics of the starboard side of our system. The port side is the mirror image. Each side consists of several lengths of line (color coded in the figure for clarification), blocks, thimbles, eye straps, and one cleat. The system we implemented on Cups uses four line segments as shown. The foot of our mainsail is 15' 8”(4.8m). If the foot of your main is significantly shorter, you may only need three line segments. Likewise a longer foot may require an additional line segment.

The first decision is where the upper block is to be attached. Considerable vertical height is needed if the system is going to contain the sail. On a double spreader rig, the upper spreader is about the right height, and a small block can be attached to the underside of both upper spreaders with eye straps. The eye straps should be located aft of the center line of each spreader, and about 9” (23 cm) from the mast, although the distance is not all that critical.

For a single spreader rig, a cheek block should be attached to both sides of the mast somewhere around 70%-75% of the mast height. If the base of the cheek block is stainless and the mast is aluminum, the two metals should be insulated from each other to prevent the inevitable corrosion. The paint or anodizing on the mast is not sufficient. I keep a small roll of the heavy clear plastic used for dodger windows as insulating material. It can be cut to size with scissors and I use a small hole punch to make holes for the mounting screws.

The mast or spreader should be drilled and tapped, and the eye straps or cheek blocks mounted with stainless machine screws. The screws should be gooped-up with an anti-corrosion compound like lanacote or TefGel, and the cheek block or eye strap should be insulated from the aluminum surface.

To determine how much line is needed, I started with the hoist (the blue line in Figure 1). The line needed is about twice the “H” dimension plus about 5 feet to allow room for an eye splice and enough line to cleat off the end. On Nine of Cups, the height of the block from the boom was 37' (11.4m), so the hoist length was 2*37 +5 = 79', which I rounded to 80' (24.6m). Each of the other line segments were about ¼ of this length, or 20', plus about 3 feet to allow for eye splices for a total of 23' (7m) each. So the total line for the starboard side was 80'+23'+23'+23' = 149' (45.8m). The same amount of line was needed for the port side, for a total of 298' (91.6m). I used 1/4” (6mm) polyester double braid. Cut each line to length and whip one end.

Next the cleats are mounted on the mast. The best location is near the end of the boom, but if there are other lines or hardware interfering with this location, locate them elsewhere. The holes should be drilled and tapped as for the blocks, and the mounting screws and cleats insulated from the aluminum mast.

It took me three iterations to get the combination of blocks and thimbles right. On the first iteration of the lazy jacks, I spliced stainless thimbles onto the ends of the lines instead of using blocks. The crews of several cruising boats I talked with used this approach and were satisfied with it. It didn't work well on Cups. I think the reason was that we used four line segments, and while thimbles may have worked on a three-segment system, there was too much friction on a four-segment system to draw the aftmost lines tight. On the next iteration, I used small blocks on the end of each line segment, but this approach also had problems. It deployed and retracted very well, but the upper blocks hit against the mast. After the first good blow with them in place, not only were they noisy, but they removed an amazing amount of paint from the mast. On the third and final iteration, I used stainless thimbles on the highest connections and small blocks on the other three, and this has worked well.

As a starting point, I used equal spacings along the boom for the eye strap positions. Then I temporarily attached the ends of the lines to the boom at the measured eye strap locations. I pulled the lines taut and hoisted the mainsail and let it drop a few times to make sure the lazy jacks would contain the sail without too much spilling out. I needed to move the eye straps to get it right, and when I was finally happy with the positioning, I remarked their locations with tape.


figure 2


The next adjustment is the height of each of the blocks. I retracted the starboard lazy jacks and hooked the lines under the reefing hook at the forward end of the boom as shown in Figure 2. Then I pulled the hoist line tight, cleated it off, and made sure the blocks and thimble did not interfere with anything. I adjusted the lengths of the lines as necessary. Then I adjusted the port side lines to the same lengths.

I removed the lines and tape from the boom, then drilled and tapped holes for the eye straps and attached them with stainless machine screws. I used plenty of anti-corrosion compound on each screw. After putting the end of each line through its eye strap, I tied a stopper knot to keep it in place. I deployed it, retracted it, and raised and lowered the mainsail a couple of times to make sure it worked well.

Now, after at least three iterations and several more tweaks, I am happy with the system. When we are ready to drop the main, one or both of us goes forward to deploy the lazy jacks. This takes only a minute or two. Then Marcie turns Cups into the wind and lets the main halyard go. The mainsail usually comes down on its own, but frequently needs a little help in the form of a tug or two. The sail stays contained in the lazy jacks until we have anchored. Then I secure it with sail ties, retract the lazy jacks and put the sailcover on. Much easier for this senior sailor.

I have a longer, more detailed version of how we made our own lazy jacks which we will be happy to send along on request.

The Blue View - Polishing the Fuel

baja filter  

In our early years of cruising, we learned the hard way about how important clean fuel is. I didn't worry about the fuel as long as the primary fuel filter looked clean. On one offshore passage, however, the seaways were a bit rough which churned the fuel enough to mix up all the sediment that had been lying benignly in the bottom of the tank. As we motored into a tight marina full of very expensive boats, I discovered how quickly the fuel filters could clog up, starving the engine of fuel. The old adage about aiming for the cheapest boat came to mind, but fortunately we managed to secure a line to a t-dock before damaging anything other than our pride.

As soon as we could, we hired a service to clean the tanks and polish the fuel. There was nothing magical about the process. They simply pumped the fuel out of each tank, processed it through a rather large industrial version of a marine diesel filter, then discharged it into another tank. They cleaned the inside of my tanks with a wand, and pumped the fuel back in, all for a rather outrageous price.

Since that expensive lesson, we have been a lot more careful about our fuel, and do what we can to prevent getting contamination into the tank. Our first line of defense is our old reliable Baja filter. We almost always use it when refueling at a marina or fuel dock. This increases the time needed to refuel, however, and there are times when the attendant gets a bit cranky when we insist on using it, especially at a busy fuel dock. Usually we can reach a compromise by using the filter for a minute or two, then doing a quick check of the filters to see whether we are getting water or other contaminants. Only once has an attendant flatly refused to allow us to use it.

Even with the best of precautions, however, we still get water in the fuel tanks. I have replaced the o-ring on the fuel cap, thinking this might be the source, but that didn't eliminate the problem. I suspect it comes from condensation forming inside the metals tanks as the ambient temperature varies. If not removed or treated, the water will allow algae to grow, which in turn will clog the filters. To combat this, I built a small fuel polishing system and routinely clean the fuel and tanks. While not my favorite chore, it isn't difficult and I do this annually, or any time I see any signs of sediment build-up in the primary filter.


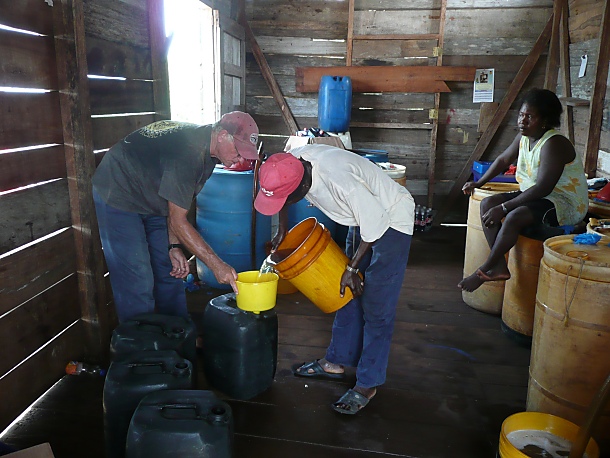
refueling in the panama jungle


As we travel to more remote areas, fuel docks become rare and “jerry canning” is the usual method of obtaining fuel. The photo shows a fuel station in the Darien Jungle, up a Panamanian river. Another notable instance was in Ushuaia at the southern tip of Argentina, where fuel was rolled down to the dock in rusty 55 gallon drums. We were rafted up with four other boats between us and the dock. The process was to carry empty eight gallon fuel cans across the other four boats, siphon fuel out of the rusty drums, lug the fuel cans back one at a time to Cups, and decant them. After repeating the process for a total of 26 trips, I was definitely ready for a beer.

When I decant diesel from fuel cans, especially when it is as suspect as that fuel in Ushuaia or Panama, I usually use the fuel polishing system to transfer the fuel. It is a bit slower than the Baja filter, but eliminates any chance of spilling fuel, and is probably more effective in removing contaminants and water. In addition, the Baja filter must be cleaned after each use, which takes about 15 minutes and is messy, while the fuel polishing system requires no cleaning after use.

The polishing system is quite straightforward as shown in Figure 1. The intake is via a wand that is long enough to reach to the lowest point of the fuel tank. I used stainless tubing for the wand, but PVC or aluminum tubing would work just as well.


block diagram


This is connected to a Racor diesel filter. Any quality automotive or truck diesel filter will work, but I like the Racor Turbine Series with a clear see-thru bowl. I had a spare Racor onboard, but if I didn't already have it, I would expect to pay $180 to $200 online for a Racor 500 series filter assembly and about $8 to $10 for each filter.

The outlet of the filter is connected to an electric fuel pump. I found this at an automotive parts store by asking for a small universal diesel fuel pump. The least expensive one I found was $38.00, and this included a mounting bracket and hose fittings. The fuel pump is connected via a switch to 12 volts. I use a standard 12 volt plug for the connection.

I mounted everything on a piece of plywood to make it portable. That way, I can use it for either of the fuel tanks below, take it up on deck to decant fuel from the fuel cans, or even loan it out to other cruising friends with fuel problems. I use a bolt inserted into the discharge hose and clamp, and clamp a short hose with a similar plug to cap the intake wand. This seals the system when not in use.


fuel polishing


To polish the fuel, I try to plan ahead and wait until the fuel levels in the tanks are less than half full. I remove the inspection hatch from both tanks, insert the wand into the one, the discharge hose into the other and start the pump. To begin with, I position the wand so that it is an inch or two higher than the lowest spot in the tank. I monitor the fuel rate and water level in the filter bowl. The water can be drained from the bowl periodically as necessary, and when the fuel flow begins to slow down, I change the filter. When the tank has only an inch or two of liquid left, I get a flashlight out and take a look at what is left. If it looks relatively clean, I continue pumping the tank as dry as possible, then get a bucket and sponge out whatever is remaining. If it is mucky, or there is a lot of debris or water remaining in that last inch or two, rather than consuming two or three more filters, I sponge out all the remaining liquid, muck and sediment. Next, I wipe the entire inside of the tank with rags or paper towels. Hopefully, one tank will hold all the fuel. If not, I use fuel cans to hold the excess.

Next, I repeat the entire process on the second tank, pumping it back into the first tank. Again, I sponge out whatever remains in the bottom of the tank and wipe the inside of the tank. Lastly, I dispose of the bucket of muck in a responsible manner.

The entire cost of the project was about $150 (~$350 if I didn't already have the filter), and it rarely uses more than one $10 filter to polish both tanks. This is less than what it cost to have our fuel polished the one time by a service. In addition, I use it frequently for decanting diesel from my fuel cans.