The Blue View - The Ubiquitous Bungee Cord

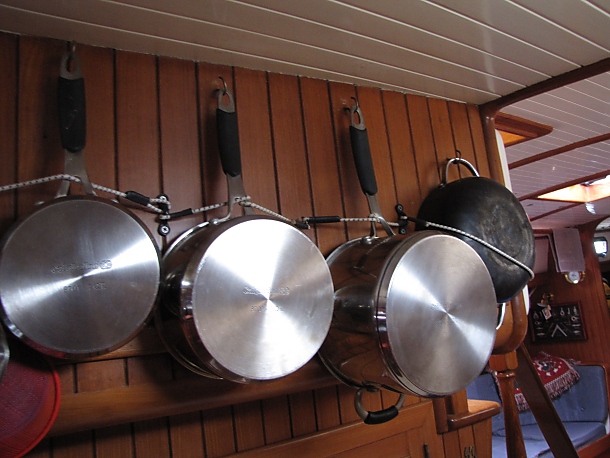
bungee pans  

I must have a hundred uses for bungee cords aboard Nine of Cups, but my appreciation for them was slow to evolve. When we first moved aboard, I bought a bag of various sized bungee cords, each pre-constructed with hooks on the ends. Quite frankly, I didn't use them very much. It always seemed they were too long or too short for the particular application I had in mind, and if they were left unhooked for even a short period of time, they soon disappeared overboard.

I discovered that you could buy locking hooks that could be attached to the ends of any length bungee cord. The locking hooks stayed in place when the bungee wasn't under tension, so the bungee cord didn't get swept overboard, and it could be made to any length I needed. The downside was that the hooks are somewhat expensive and are a bear to assemble.
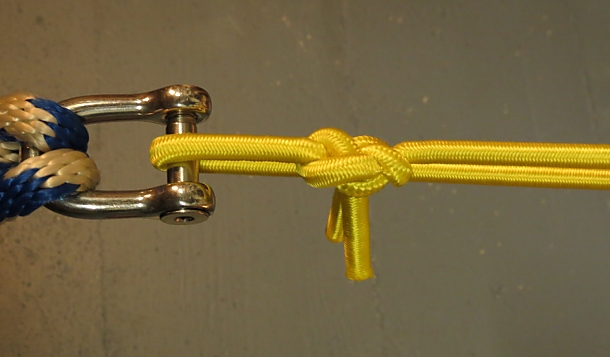
 

bowline


Then one day I realized that while many knots will not stay secure, there are several knots that do work well with bungee cord. I use two in particular: the common bowline works well to form a loop in the end of a bungee cord, and the Ashley Bend (see directions for tying this knot here) does a fine job of tying the two ends of a bungee cord together. If I want a hook on the end, I can attach a carabiner with a bowline. If, once it is tied, I pull the knot as tight as I can, it stays in place quite well. Quite the revelation, and it only took me about 4 years to discover it. (More evidence that anyone with even the meanest of intelligence can do this.)

I now carry two spools of bungee cord aboard, one 1/4” diameter and one 3/8” diameter. These two sizes handle most any application. When I need a bungee cord, I cut the necessary length from the spool, burn the ends with a lighter, and tie whatever knot is called for. It couldn't be simpler.


ashley bend


I use bungee cords for a myriad of applications. Here are some of them:

  • Securing floorboards. The floorboards aboard the typical boat are removable to gain access to the bilge. We use this area to store spare parts, canned goods and heavy tools. If the boat were to be knocked down or, heaven forbid, rolled or pitch-poled, the floorboards as well as anything stored underneath could inflict some serious damage to the boat and crew. Thus, it is important to secure them in place. Bungee cords work well for this application (see a previous post on the subject of securing floorboards).
  • Securing our pots and pans. We hang several pots and pans from hooks in the galley. When we are in a quiet port, they stay nicely in their places. When we are underway, however, the motion of the boat soon has them swinging and banging against the bulkhead and each other. I attached an eye pad on one side of each pan and a cup hook on the other. Using short lengths of bungee with a bowline tied in the ends, each pan is securely and quickly contained, yet easily accessed when needed.
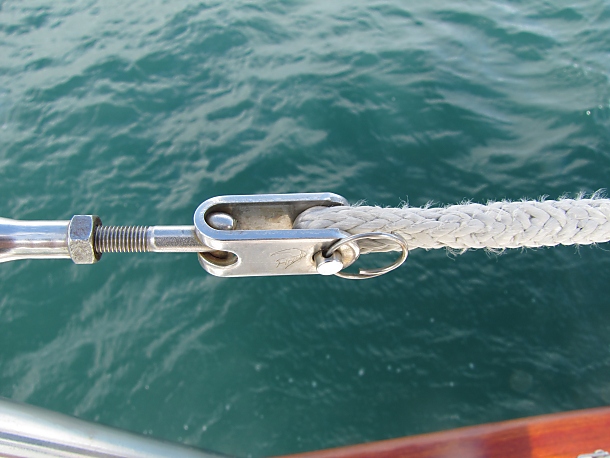
  • Securing halyards. We really dislike the sound of our halyards slapping against the mast and spreaders, especially down below. While is is not at all unpleasant to hear halyards clanging against a mast on someone else's boat as we walk through a marina, it is annoying onboard Cups. The sound seems to get magnified below deck, especially in the evening when we are trying to get to sleep. To prevent the clanging, we use bungee cords. For some of the halyards, we use a bungee cord permanently attached to a shroud with a bowline that has a carabiner attached to the halyard end. In other cases, we have a loop made up using an Ashley bend. The loop is attached to the mast pulpit, and the main halyard shackle clips to the loop and is tensioned.
  • Fishing line shock-cord. When we fish, we usually troll with a lure attached to a steel leader, which is attached to 200 feet of 1/4” polyester line with a strength of 500 pounds. The line is wrapped around a winch in the reverse direction, then secured to a cleat with a few feet of slack in between. When a fish hits the lure, the line spins the winch, alerting us to the fact we have a fish. When the slack is taken up, the winch stops spinning and the line goes taut. We soon found that we needed to add some shock cord to the system or the sudden tension on the line would often either break the hook or jerk it out of the fish's mouth. I now tie two eyes in the line about 10 feet apart, between the winch and the stern rail and attach a length of bungee between the two eyes. The elasticity of the bungee prevents the sudden jerk and we catch far more fish.
  • Lee cloths. Lee cloths are rectangular pieces of heavy cloth that keep us from falling out of our berths when the boat is heeled or rolling. On Cups, one side is attached to the berth and the other side is attached to cleats in the ceiling. Once we are in the berth with the lee cloths attached and tight, it is quite snug and comfy. The problem we had was figuring out a quick way to attach and detach the lee cloth from the ceiling. If we used hooks or carabiners with lines, it was difficult to get enough tension in the lee cloth to feel secure. If we used lines with knots, we could get enough tension, but it usually took a couple of minutes to get everything just right and the same amount of time to extricate ourselves when it was time to get up. This wasn't usually a problem unless there was some emergency topsides requiring the immediate assistance of the off watch. What we now use are several bungees with a bowline in one end and a carabiner attached to the other end. To setup the lee cloth, each of the bungees is attached to a cleat in the ceiling with the bowline, and the two or three bungees that are closest to the feet are attached to the lee cloth with the carabiners. When the person off watch climbs into the berth to get some sleep, it is an easy matter to clip the remaining bungee cords to the lee cloth. If an emergency arises, it takes only seconds to disconnect the lee cloth.

There are a few other bungee cord applications that we have tried or thought about that either didn't or probably won't work quite as well:

  • Bungee jumping from the spreaders
  • Giant slingshot that allows Marcie to send parts and tools up to David while he is up the mast
  • Giant slingshot for rotten fruit wars with other cruisers
  • Small slingshot for shooting dried peas at birds perched on the masthead – or at David to amuse Marcie while he is up the mast
The Blue View - Replacing Lifelines with Dyneema Line

finished lifelines  

Nine of Cups will soon be celebrating her 28th birthday and has been our home for the last 13 years now. When we moved aboard, she was in pretty good fit, but one thing that needed replacement was the lifelines.

The lifelines on a sailboat act like a fence around the perimeter of the deck. When the boat is pitching and rolling, it gives the sailor something to grab onto and hopefully prevent him or her from being tossed overboard. We replaced the lifelines in the first year we owned Nine of Cups. That time we used stainless 7x7 vinyl coated wire, which looked great for a few years but began showing rust spots after about four years. In year four, we replaced them again using uncoated 7x7 wire which lasted about 5 years.

The next time we investigated using one of the new fiber technologies for our lifelines. These new fibers have a number of properties which make them good candidates for lifelines: high strength, low weight, high resistance to chafe, resistance to flex fatigue, good resistance to UV and very low stretch properties. In addition, they are easy to splice, which means I can make them myself and not have to order premade sections with swage fittings. Before making the decision, however, we needed to do a bit more research. They are called lifelines for good reason, and before we trusted our lives to them, we needed more than the manufacturers' assurance that they would live up to expectations.

After spending hours perusing the various nautical discussion boards (where someone asks a question and then 24 “experts” with varying amounts of actual knowledge provide conflicting answers, all stated with authority, and then argue amongst themselves), we found one very good paper by US Sailing, the national governing body of sailing in the U.S. Their conclusion after considerable research was that, with a few caveats, the new Ultra-High Molecular Weight Polyethylene (UHMWPE) fibers were acceptable for use as lifelines. These UHMWPE fibers have the brand names Dyneema® and Spectra® (referred to below as Dyneema® ).

We decided to use either Amsteel (Samson) or V-12 Vectran (New England Ropes). Both are 12 strand single braid lines with extremely low stretch, high strength and easy splicing characteristics. In addition, both can be ordered in grey, which looks remarkably like steel wire once in place. Both of these lines have the same or higher strength as the equivalent sized wire. The final decision was based on price and availability, and the Amsteel won out.


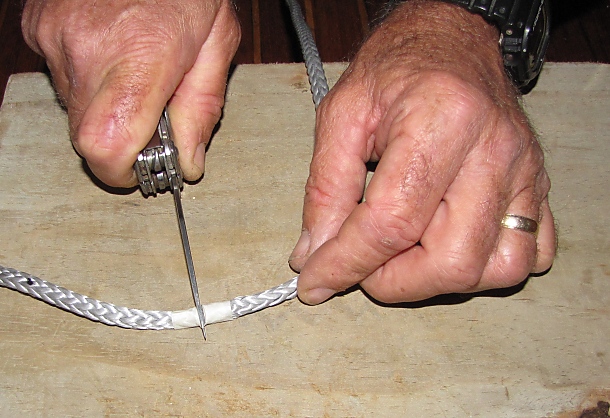
cutting dynema


The project turned out to be quite straightforward and easy to complete. I used about 180 feet of line and the entire project took about 15 hours.

If you are thinking about changing to one of the new UHMWPE fibers, I have a few observations based on our experience.

While the line has a UV resistant coating, it is still susceptible to degradation. Testing has shown that the line will retain 60% of its tensile strength after 5 years of exposure. This loss of strength can be compensated for by using the next larger size line. For example, if 1/4” lifelines are in place, replacing them with 5/16” Dyneema will still retain the equivalent strength for at least five years.


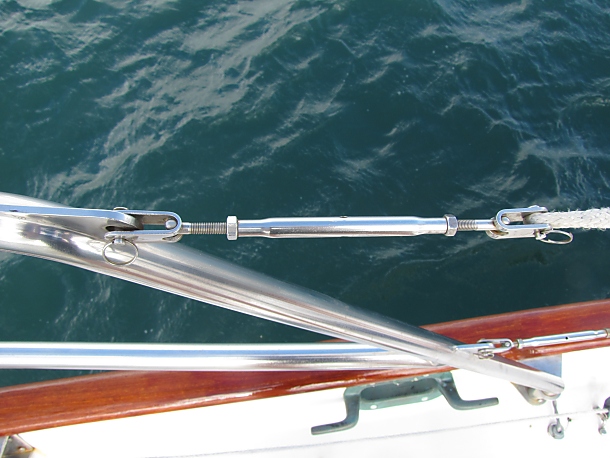
turnbuckles


The line has very little stretch, but does exhibit creep. This means over time, the line will slowly get longer. We used turnbuckles in each section so that they could be tightened periodically as needed. Alternatively, one end can be lashed in place, and the lashing shortened occasionally.

The line is chafe resistant, but not totally impervious to chafing. We check ours frequently.

It is quite easy to splice eyes in the ends of the Dyneema. Both Samson and New England Rope have illustrated techniques for eye splices on their websites.

The lifelines should be tensioned so that an 11 pound (5kg) weight hung from the middle of the lifeline does not deflect it more than 2 inches (5 cm).

Our Dyneema lifelines have now been in place for about 4 years, and we are still quite happy with them. The line has a comfortable feel to it and, of course, never rusts. Marcie prefers it to wire lifelines for hanging clothes out to dry on laundry day. It will be time to replace them again in a year or so, and I intend to use Dyneema again.

This is a condensed version of an article that was published in Good Old Boat Magazine in March 2013. The full article goes into more detail on the how-tos of making the lifelines. If you would like a copy of the full article, let us know and we will happily email a copy to you.

The Blue View - Exercising Aboard a Sailboat

Staying reasonably fit aboard the typical cruising sailboat is usually not that difficult. Living on a sailboat involves a lot of day-to-day physical activity, especially at anchor or in port. We are usually without a car, so most trips to the grocery, laundry or chandlery are accomplished by walking. There are always repairs and projects underway that involve physical exertion. Sometimes it seems like we must climb the stairs from the saloon to the cockpit a hundred times a day, and just getting into and out of the dinghy requires effort. Transporting fuel and water by dinghy is always a workout, and when we are in a warmer local, we spend a lot of time swimming and snorkeling. Even so, I routinely find myself putting on a few pounds if we stay in one place for an extended period. When I have to start wearing my larger “fat-boy” trousers, I know it's time to move on. When on a long passage, if we aren't actually seasick, we will certainly not be feeling well enough to be hungry for the first two or three days. After that, our appetites come back, but we never eat as much on a passage as we do when at anchor. We also drink no alcohol on a passage, so our overall caloric intake is down. To counter the heel of the boat as well as the rolling and pitching motion, I find that the muscles in some part of my body are always tensed - sometimes I think I even sleep with my body tensed up. There is also a frequent requirement for physical activity, when sails need adjusting or reefing for example. And the occasional epic battle with a 700 pound swordfish really takes it out of you... or so I would imagine, but even landing, dispatching and filleting a 25 pound tuna on a moving deck takes a fair amount of work. Usually by the end of a passage lasting more than a week or two, I've lost those extra pounds I put on in the last port.

At least, that's the way it used to be. As I get older, I'm finding that my “fat-boy” clothes are getting more wear than they used to, and it is becoming more difficult to keep those extra few pounds off.

So, a couple of years ago, I began looking for exercises I could do aboard Nine of Cups. It's more of a challenge than you might think. To begin with, there is not a lot of space – neither for exercising nor to store exercise equipment. I'm a bit self-conscious about it, so I wanted something I could do below deck. Jumping jacks on the foredeck aren't my kind of thing. In addition, I have a bad ankle due to an injury a few decades ago, and I needed something that was very low impact.

Then I discovered High Intensity Interval Training, or HIIT for short. There are several variations of this type of exercise, but basically, the idea is to repeat an exercise at full intensity for a short interval, followed by a brief rest period. The most common protocol is to exercise full out for 20 seconds, then rest for 10 seconds, and repeat this cycle eight times. When I first came across HIIT exercise, I thought it was another fad for the moment, and I was sure I would find an infomercial selling the book and video on how to do it and “ but wait, that's not all... if you order right now, you will also get a free jar of emulsified fish liver that has been proven to reduce back pain and can be rubbed onto your head to promote hair growth”.

As I did more research, however, I began to be convinced that there is something to it. Several universities around the world have been studying this type of exercise regimen for several decades now. One of the more well known papers was published by Professor Izumi Tabata in Japan who investigated the effects of HIIT on Olympic speed skaters. He tested two sets of athletes over a six week period. One group did 60 minutes of aerobic level exercise a day on a stationary bike, five days a week. The second group did four minutes of HIIT - 20 seconds of high intensity exercise followed by 10 seconds of rest, repeated eight times, four times a week. Dr. Tabata tested the aerobic and anaerobic capacity of both sets of athletes before and after the six weeks of training, and found that, while both improved their aerobic capacity, the group doing the HIIT improved more. In addition, the control group showed no improvement in anaerobic capacity, while the group doing the HIIT showed a 28% increase in anaerobic capacity. In other words, doing four minutes of HIIT a day, four days a week will improve your fitness level more than 60 minutes a day, five days a week of an aerobic exercise like biking, jogging, etc. This seems too good to be true, but several other studies done by other universities have shown similar results.

Another benefit seems to be the ability of the body to metabolize glucose more efficiently after a few weeks of the HIIT protocol. More than one study has shown this, and if true, it is of great interest to those of us who are genetically predisposed to Type 2 Diabetes.

There seemed very little reason not to give it a try, and I did. I have now been following my own HIIT protocol for a couple of months, and I am quite pleased with the results. The attached, actual photos of me before and after a few weeks of the program show the amazing results. Well... okay, perhaps they aren't actual un-retouched photos, and perhaps my improvement wasn't this pronounced, but I do feel better and have lost enough weight to stow my “fat boy” wardrobe.


before and after HIIT


It is something that is very easy to do on the boat and requires no equipment. I chose exercises that were very low impact and easy on my old joints. My protocol is described below, but if you are interested in trying this type of exercise regimen, I highly recommend that you do your own research online.

Here is what I do three times a week:

2-3 minutes of warm-up exercises.

Exercise 1 – Endurance/Cardiovascular Exercise: Total Time 4 Minutes

20 seconds of intense exercise followed by 10 seconds of rest – repeated 8 times

Rest: 1 Minute

Exercise 2 – Strength Building Exercise: Total Time 4 Minutes

20 seconds of intense exercise followed by 10 seconds of rest – repeated 8 times

Rest: 1 Minute

Exercise 3 – Endurance/Cardiovascular Exercise: Total Time 4 Minutes

20 seconds of intense exercise followed by 10 seconds of rest – repeated 8 times

Rest: 1 Minute

Exercise 4 – Abs: Total Time 4 Minutes

20 seconds of intense exercise followed by 10 seconds of rest – repeated 8 times

Rest 1 Minute

2-3 Minutes of cool down exercises

The entire session takes about 25 minutes. There are lots of variations recommended by many different experts, ranging from one minute of full out exercise 3 times a week to considerably more than I do, so do your own research and find a program that works for you. Don't, however, buy the video and the fish emulsion. It did nothing to restore my bald pate.


before and after HIIT