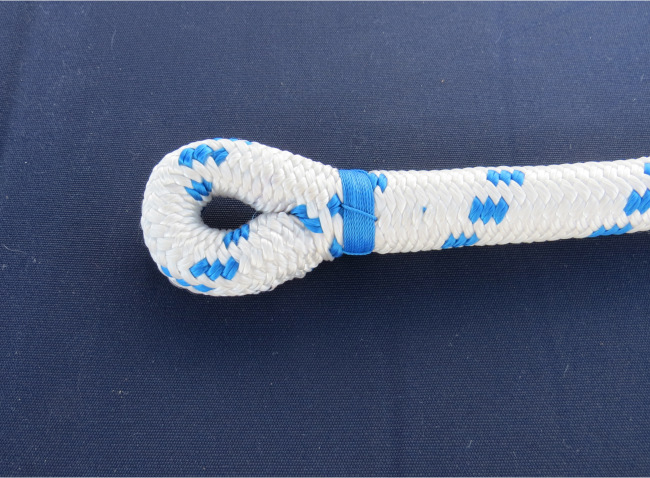
Fourteen years ago when we first started cruising on Nine of Cups, we had the opportunity to go to the Seven Seas Cruising Association (SSCA) gam in Melbourne. This is their biggest get-together, and there were hundreds of other sailors. Their experience levels ranged from raw newbies like us to people who had spent decades living aboard and had multiple circumnavigations under their keels. We could hardly contain our excitement at being with all these people who were living our dream.
On our first day, we arrived early and stopped at a nearby Denny's for breakfast. All the tables were taken and it looked to be a long wait. We put our names in and were about to sit down and bide our time when a man came up to us and asked if we would like to join him and his wife at their table. When we did, they introduced themselves - Andy and Pam Wall. It wasn't until later that we discovered they were quite a famous couple. Andy's home-built 30' sloop was the first Australian yacht to round Cape Horn in 1969, and together Pam and Andy spent decades cruising the globe with their family. To us, they were just Pam and Andy, fun and knowledgeable new friends who were kind enough to share their table.
Later that day, we discovered they were both giving seminars at the gam – Pam on preparing for a storm and Andy on how to splice line. We attended both, which were absolutely terrific, and that's where I learned how to splice an eye in double braid rope.
Sadly, Andy died way too young a few years ago. As I was splicing an eye in our new main halyard a few days ago, maybe my 50th or so since Andy taught me how, my thoughts returned to Pam and Andy. I thought it only fitting that I pass along Andy's method. You can still get Andy's video on splicing and learn the method directly from him at this link.
With only a few slight variations of my own, this is Andy's method for splicing an eye in double braid line:
Tools needed:
-
Fid in appropriate size for the line– I have both regular tubular fids and Brion Toss's splicing wand in a few different sizes and like them equally well.
-
Box cutter or sharp knife
-
Needle nose pliers
-
Scissors
-
Tape – either masking or plastic
-
Whipping twine and needle
-
Blue or black permanent marker
-
Large screwdriver or spike
Note on fid lengths: A short fid length is 8x the line diameter, a long fid is 14x the line diameter, and a full fid length is 22x the diameter. I have a table at the end with the fid lengths for a few common line sizes.
Note regarding fids: These directions are for a standard tubular type fid. If using the Brion Toss splicing wand, the cover and core are pulled through each other, rather than pushed, so the process is slightly different. Sailrite has a nice video on splicing an eye using the splicing wand.
Step 1 – Marking the cover
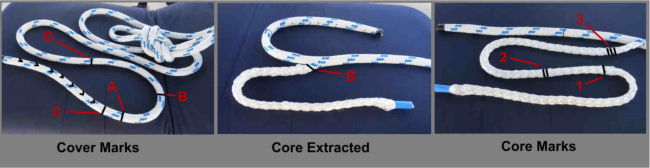
From the end of the rope, measure back one full fid length and make mark 'A'. From 'A' form the desired eye size and make mark 'B'. From mark 'B', measure one long fid length and make mark 'D'. From mark 'D', measure 5 full fid lengths down the rope and make a figure 8 knot.
From mark 'A', count eight consecutive left strands towards the end of the line and make a heavy mark completely around the line. This is mark 'C'. From mark 'C', count five consecutive left strands towards the end of the line and mark the fifth pair of strands. From this point, count another four consecutive left strands and mark the fourth strand pair. Continue counting and marking in this 5:4 sequence to the end of the line.
Step 2 – Marking the core
Bend the line sharply at mark 'B' and carefully spread the cover strands to expose the core. Using the needle nose pliers, pull the core out from the cover, making sure not to pull any of the cover strands. Pull the core braid completely out of the cover.
Tape the ends of the core and the cover. Holding the exposed core, slide the cover braid back towards the knot. Then hold the knot and slide the slack cover back down the core in the direction of the end of the line until all the slack has been removed. Mark the core at the point it exits the cover. This is mark '1'.
Once again, slide the cover towards the knot. Measure one short fid length towards the knot from mark '1' and make two marks that go completely around the core. This is mark '2'. From mark '2', measure one full fid length plus a short fid length toward the knot and make three marks around the core. This is mark '3'.
Step 3 – Burying the cover
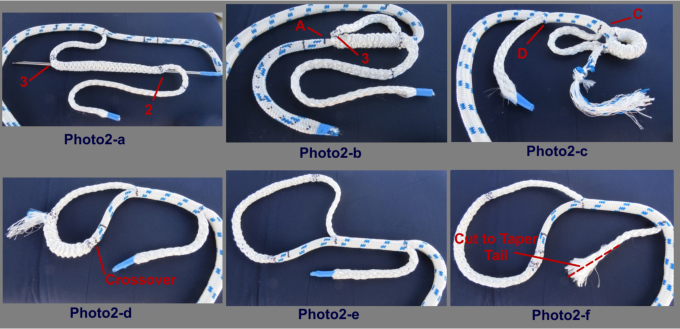
Taper the end of the cover by cutting through the tape at a 45 degree angle. Slide the tapered end into the fid and tape in place. Insert the fid into the hollow core at mark '2' and out at mark '3' (Photo2-a). When entering or exiting the braid with the fid, always go between strands. Pull the fid with the cover attached through the core until mark 'A' on the cover is exposed at mark '3' on the core. Remove the cover from the fid (Photo2-b).
Step 4 – Tapering the cover
Remove the tape from the end of the cover. Cut and remove the marked strand pairs, starting at the end of the cover and working back to mark 'C'.
Pull the cover back out of the core at mark '2' until mark 'C' is aligned with mark '2' on the core. To prevent the cover from disappearing into the core, tie a loose overhand knot in the end of the cover.
Step 5 – Burying the core
Attach the fid to the core tail using the same procedure as before. Insert the fid into the cover at mark 'C' and out at mark 'D'. Pull the core through at mark 'D' until all slack has been removed. Remove the fid from the core (Photo2-c).
Hints:
-
The line may be extremely tight where the fid passes between marks 'C' and 'D'. To create more space, grasp the core as it exits the cover at mark 'B' and pull extra core out of the line. This will cause the cover to pucker and provide some extra slack.
-
Avoid snagging the core with the end of the fid as it passes through the cover between marks 'B' and 'D'. To check if the core has been snagged, pull on the exposed core where it exits from the cover at mark 'B'. If the core moves freely, it is okay to proceed. If the core seems to be stuck, pull the fid back until the core is no longer snagged and continue.
Step 6 – Smoothing the Crossover
The crossover is the point where mark 'C' on the cover and mark '2' on the core meet. To tighten, hold the line at the crossover point and alternately pull on the free ends of the cover and the core. Continue this process until the crossover is approximately the same diameter as the line (Photo2-d).
Step 7 – Burying the tails
To bury the cover tail, untie the overhand knot. Hold the line at the crossover and smooth the core towards the cover tail, which will disappear inside the core (Photo2-e).
To bury the core tail, hold the crossover and smooth out the slack in the cover braid from the crossover to mark 'D'. Repeat this process several times to remove all the cover slack. Most, but not all of the core will disappear. Mark the core tail where it exits from the cover at mark 'D'. Then mark the core at mark 'B' by inserting the marker into the opening at mark 'B'.
Pull out the core tail at mark 'D' until the mark made at point 'B' appears. Cut off the excess core at the mark nearest the end of the core and unbraid the core tail back to the second mark. Fan out the strands (Photo2-f) and cut them so they are evenly tapered back from the end to a point about halfway to the second mark.
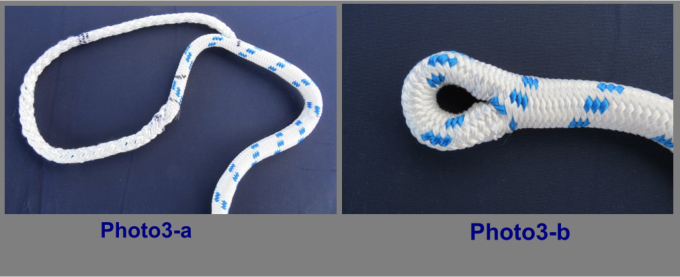
Again, hold the line at the crossover and smooth the cover braid from the crossover towards mark 'D'. The exposed core tail will disappear completely inside the cover (Photo3-a).
Step 8 – Finishing
Secure the knot in the body of the line to a solid anchor point. A lot of tension will be placed on the line when burying the splice, so the anchor point should be sturdy.
The slack in the cover braid will be used to bury the exposed cover, crossover and core down to mark 'A' to produce the desired size eye. This is accomplished by holding the line at the top of the eye and sliding the cover slack back from the knot towards the splice. Milk the cover from the crossover around the radius of the eye to the throat at 'B' (Photo3-b). Pull the leg sharply with a spike or screwdriver to help seat the splice. Flex and/or hammer the splice section to loosen the fibers. Seize or cross-stitch the eye to finish the splice.
Fid Length Table
(Dimensions are inches/mm)
Rope Diameter Short Fid Long Fid Full Fid
1/4”/6mm 2”/50mm 3-1/2”/89mm 5-1/2”/140mm
5/16”/8mm 2-1/2”/64mm 4-1/4”/108mm 6-3/4”/171mm
3/8”/10mm 3”/76mm 4-3/4”/121mm 7-3/4”/197mm
1/2”/12mm 4”/102mm 7”/178mm 11”/280mm
9/16”/14mm 4-1/4”/108mm 8”/204mm 12-1/4”/310mm
5/8”/16mm 4-1/2”/114mm 9-1/2”/240mm 14”/355mm