The Blue View - Chums, Angels and other Buddies

An anchor has its maximum holding power when the rode pulls on it in a horizontal direction. The closer to horizontal, the better it will hold. That's why the amount of scope (the ratio of the length of rode deployed to the depth of the anchorage) is such an important factor in how well an anchor holds. With a 3:1 scope, the maximum angle of pull on the anchor is 19.5º; at 5:1 the angle is 11.5º; and at 7:1, the angle is 8.2º.  
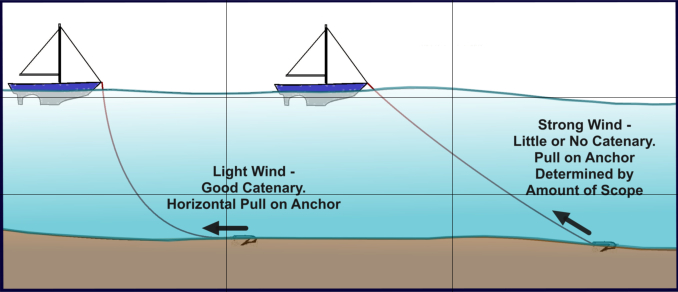
catenary


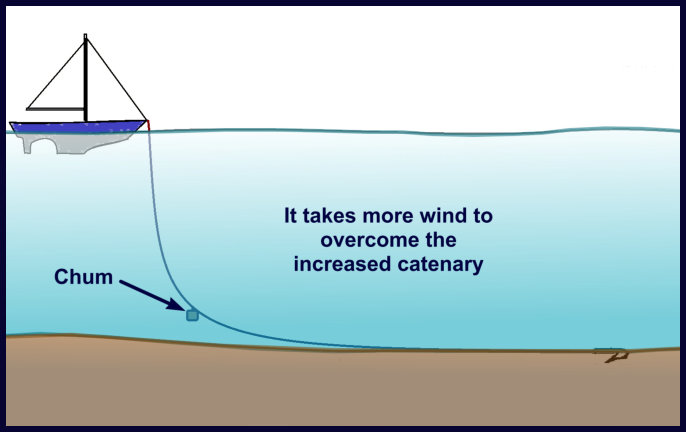
The catenary effect created by the weight of the rode also causes the pull on the anchor to be more horizontal. If you look at the arc of the anchor rode in the illustration, you can see that, in light winds, the end of the rode nearest the anchor lies on the seabed. As the wind increases, the catenary effect lessens. Eventually, if the wind becomes strong enough, the rode will form a straight line between the bow and the anchor.

The weight of the rode and size of the boat determines how much wind is required to overcome the catenary effect. If the rode is all rope, it takes very little wind to pull the line taut. For example, if Nine of Cups, a 45 foot (14m) boat, was anchored in 20 feet (6m) with 100 feet (30m) of rope rode deployed, it would take less than 10 knots of wind to overcome the catenary of an all rope rode. If the rode was 3/8” (10mm) chain, it would require almost 25 knots of wind before the chain became taut.

The catenary effect can be increased by adding weight to the rode. This can be accomplished by letting out more chain, and/or attaching a weight to the rode. These weights are referred to by a number of different names – chums, buddies, angels, anchor riders and kellets to name a few.
 

buddy catenary


We've always called these weights 'chums', and there are quite a number of very experienced voyagers who firmly believe in their use. We know a few who will use a chum every time they anchor, but most only use one when the wind begins to pick up or when in a tight anchorage. A chum will reduce the amount of swinging a boat does when the wind is light to moderate, and will increase the catenary of the anchor rode when it is necessary to use reduced scope, as is often the case when there are a number of other boats anchored close by. No matter how big the chum, however, if the wind gets strong enough, it will eventually overcome the catenary effect, and the angle of pull on the anchor will depend totally on the scope.

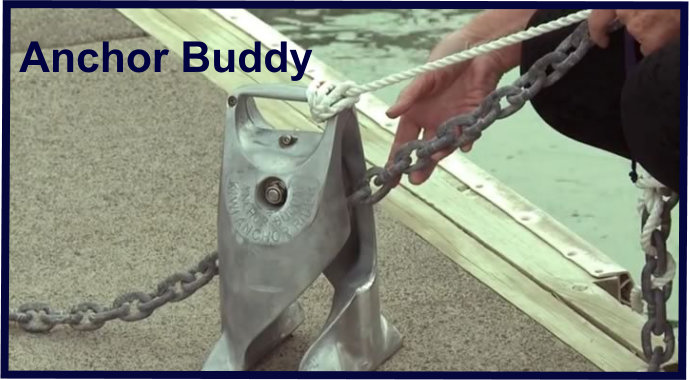
There are a few purpose-made chums available. One that is especially easy to use is the Anchor Buddy, made in New Zealand. (It is marketed in the U.S. by Quickline USA ). Once you get the hang of using it, it can be attached and detached in a minute of two.
 

anchor buddy

  You can also make one quite easily. To make a 30 lb (13.6kg) chum, you will need a 1.5 gallon or larger container – a 2 gallon plastic ice cream container would be perfect if you can find one, or a 5 gallon paint bucket will do. You will also need a half bag of concrete, and a large galvanized eye hook. After you and your friends eat the ice cream, mix the concrete and pour it into the container. Before the concrete sets, push the hook down into the concrete until just the eye protrudes. Allow it to set and cure for a week or so.


chum construction


To deploy it, you will need a very large shackle and 50-100 feet (15m-30m) of line. Tie one end of the line to the eye hook. After the anchor is set, use the shackle to attach the chum to the anchor rode. You want the shackle to be able to slide up and down the rode – do not shackle the chum to a link of chain if using chain rode. Next, let out enough line so that the chum will be just above the bottom at low tide and secure the line to a cleat.


chum shackled to chain


When it is time to retrieve the chum, it is easy to pull the chum back up the rode if there is tension on the anchor rode. If the wind isn't blowing hard enough to tension the rode, put the boat in slow reverse until the rode is taut, then pull the chum up the rode. Undo the shackle and stow the chum.

The Blue View - Lettering the Dinghy

finished lettering  

We just renewed our boat insurance, and one evening when I had too much time on my hands, I decided to actually read the new policy. I came across a clause that stated that the theft of the dinghy was only covered if the name of the vessel was clearly and permanently marked on it.

There are positives and negatives to putting the vessel name on the dinghy. On the plus side, the dinghy is much more likely to be recovered and returned if the vessel's name is marked on it - which is, I'm sure, why the insurance company requires it. A thief is less likely to joy ride or try to resell a stolen dinghy that has a boat's name on it. In several places we've been, it is required by local regulations to have either the boat's name or registration number stenciled on the dinghy - usually a visiting boat is given some leeway on local regs, but not always. And finally, a well marked dinghy is much easier to pick out on a crowded dinghy dock at night amongst a dozen or so very similar looking dinghies.

On the negative side, your well marked dinghy is going to be harder to sell when it's time to buy a new one. The biggest negative, however, is that when the dinghy is tied up at the dinghy dock, it is a good indication to any would-be-thief that the vessel it belongs to is probably unattended at the moment. (Using the mother ships's registration number instead of the name will avoid this possibility, but if the dinghy goes missing, the insurance company may not cover it, and if someone does find it, matching the registration number on a dinghy to it's mother ship is difficult, especially if the vessel is not local).

Given all the pros and cons, we decided in favor of putting our boat name, Nine of Cups, on our inflatable. I've put the boat name on several of our previous dinghies as well as numerous life rings, fuel cans and propane tanks, and I find the following method works well for me.

I start by making the stencil. Using the computer, I experiment with different font types and sizes until I find the right combination. Sometimes this involves printing the boat name in a few different versions on plain paper and temporarily taping them in place to decide which I like best.

Once I am happy with the font, I print the name on my stencil material. While there is commercially available stencil material, it is expensive and not always easily obtainable. I make my own using a combination of letter sized self-adhesive laminating sheets and letter sized self-adhesive shipping labels. In my experience, adhesive labels don't adhere to most surfaces well enough to prevent the paint from bleeding under the stencil. The laminating sheets adhere quite well, but can't be printed on. I print the lettering on the paper labels, stick these labels to the laminating sheet, and then cut out the letters. Usually, the font size is too large to print the entire boat name on one sheet, but I can usually print each word of the name “Nine of Cups” on one sheet.


cutting the stencil


To cut the letters out, I use scissors and a razor. I utilize a straightedge to guide the razor along the straight segments, and either the razor or the scissors to cut the curved segments. Once cut, but before removing the laminating sheet backing, I tape the letters onto the surface to be painted. With each letter lightly held in place with masking tape, it is easy to adjust and move each letter or word until the lettering looks good. Once I am happy with the spacing and positioning of the letters, I tape the letters of each word together. I put several locating marks on the dinghy surface with a marker, so it will be easy to align the stencil again in the next step.


applying the stencil


To attach the stencil to the surface, I lift one end of the first word and peel back an inch or so of the laminating sheet backing. I lightly press the laminate against the surface, trying to avoid any wrinkles, bubbles or misalignment. Once the end is lightly stuck in place, I remove the masking tape securing the rest of the word, and begin removing the remaining backing material. As each inch or so of backing is removed, I lightly press the laminate against the surface, using the alignment marks to position each letter. A small positioning mistake can be corrected at this stage by using tweezers or needle nose pliers to detach and reattach small sections of the stencil. Once the entire word is in place, I press the entire stencil firmly in place. The backing material for the center sections of the circular letters – O, P, R, Q, etc. - is next removed and these stencil segments are attached. Once the entire stencil has been applied, I mask around and between each word.


painting the letters


I use ordinary spray paint to paint our dinghy. This has worked well for us and usually outlasts the dinghy - but our inflatable is rarely deflated. If we had a dinghy that was routinely deflated and re-inflated, we might look for a paint that was intended for this purpose.

It is amazing how much over spray there is on even the calmest day, so I use masking paper to mask a large area around the stencil. If there is any breeze at all, I hold a large piece of cardboard directly downwind of the area I am spraying.

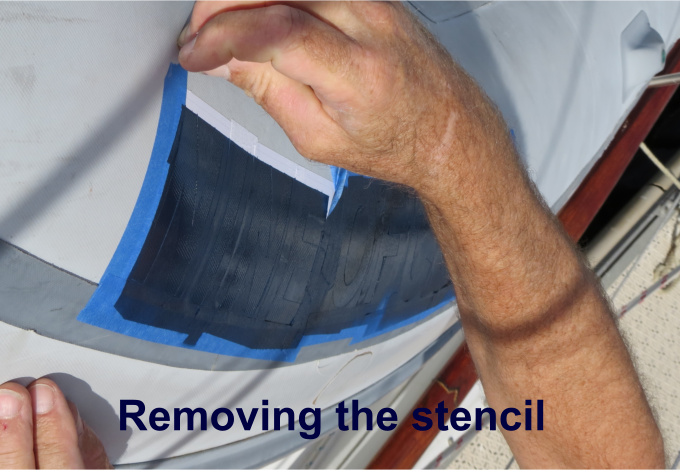
I find that heavier coats of paint are more likely to bleed under the stencil, so I apply several very light coats of paint. I wait 10-15 minutes between coats. Then I wait until it is dry to the touch, 1-3 hours, and carefully remove the stencil. The laminate material sticks really well, so I sometimes need to use tweezers or needle nose pliers to peel back a corner of each stencil. The laminate adhesive will often leave a residue, but it's best to let the paint cure a day or two before removing it. Alcohol or mineral spirits will remove the residue without damaging the paint after it has fully dried.


removing the stencil


Once it is all done, I take a few digital pictures. If ever it goes missing, this might be important to prove to the insurance company that we did have the boat name clearly marked on the dinghy.

The Blue View - Springing off a Dock

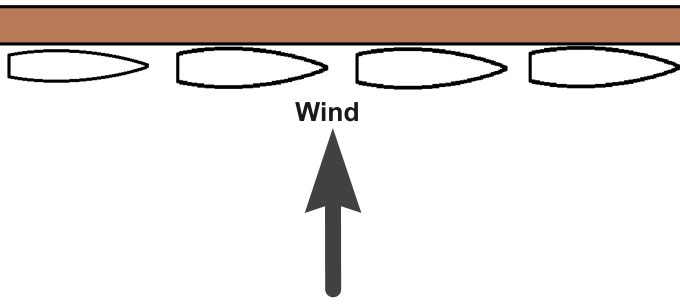
When we are lying alongside a dock and there are boats tied up just in front of and behind us, departing can be a bit tricky. Add a contrary wind blowing us onto the dock and attempting to leave can be a real challenge. If the wind isn't blowing too hard, using a spring line will usually enable us to extract ourselves without damaging either Nine of Cups, the other vessels or our pride.  

pinned against the dock


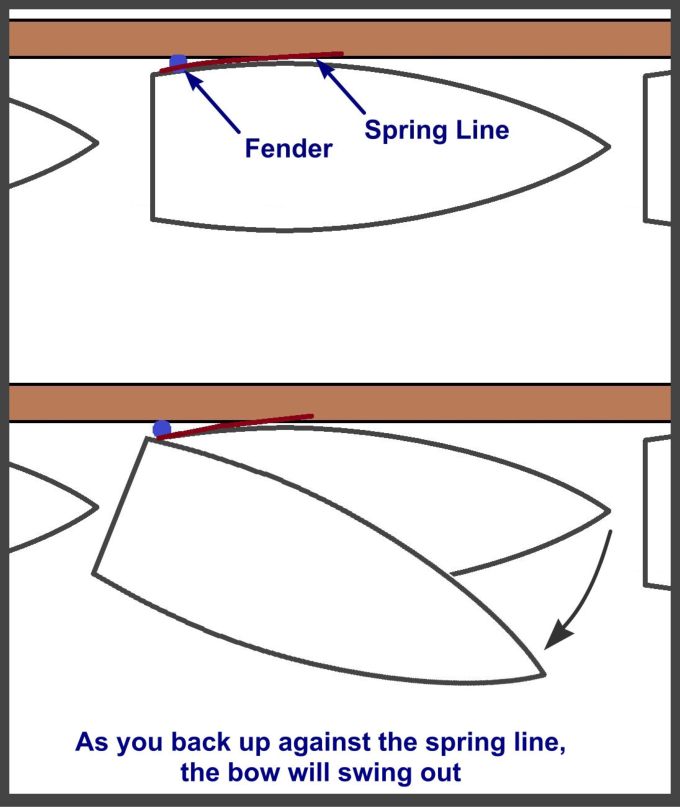
If the wind is very light, we use a stern spring line. We tie a large bowline in the end of a dock line and drop it over a dock cleat located close to midships. The other end of the line is secured to Nine of Cups at a cleat near the stern. Next, we position a fender at or slightly forward of the stern cleat. Since the stern will be swinging close to the dock, it is important to make sure there isn't a piling or other obstruction that could damage whatever is on the rail like an outboard or a solar panel. Once all the other dock-lines are released, we begin slowly backing up. As the spring line tensions, the stern will begin to pivot on the fender and the bow will start to swing out. We keep the engine in reverse, increasing the engine speed as necessary until the bow swings out enough to clear the boat in front of us. Then I put the engine in neutral which immediately takes the tension off the spring line. If there is someone on the dock, they remove the bowline from the cleat and toss it to us. If not, Marcie is quite adept at giving the dock line a flip to remove it from the dock cleat. As she pulls the line in, I motor forward and away from the dock.


spring maneuver


If there is a moderate wind blowing, it is better to use a bow spring line. The spring line is attached to the bow and the fender is rigged forward. As Cups motors forward, tensioning the spring line, the stern will swing out. Once it is far enough out, I put Cups in neutral, taking the tension off the spring line, and it is removed from the dock cleat. I put the boat in reverse, and as we back away from the dock, the wind will blow the bow downwind. This is not the time to dawdle – I use a lot of throttle as we back away from the dock to make sure the wind doesn't blow Cups into our neighbor. I continue backing up until I find a spot with enough maneuvering room to turn around.


bow spring maneuver


In my last Blue View, we found ourselves moored between the tables at a dockside tiki bar after botching a torque turn. We tried to extricate ourselves by springing off the dock, but that's when we learned that Nine of Cups has too much windage to manage it if the wind is stronger than 20 knots or so. An obliging sailor offered to take a bow line and secure it to a piling 100' (30m) upwind. Once he secured the line, we used the windlass to pull us off the dock. Once we were clear, he released the line, Marcie quickly pulled it aboard before it could get fouled in the prop (that would have really capped the evening), and we motored out of the marina.

I'm not sure whether the applause we received as we left was to congratulate us on finally getting off the dock or to thank us for providing the evening's entertainment. If the latter, we did not even consider going back for a curtain call.