The Blue View - Repairing the Propane Stove

Our Force 10 propane galley stove is the original that was installed when Nine of Cups was new – which means it is now almost 29 years old. That's ancient in terms of boat gear. We think we are dong pretty well if something lasts 10 years.  

force 10 stove


That's not to say it hasn't needed repairs on occasion. The gimbals, those steel studs on each side of the stove that allow it to keep the cooking surface level as the boat rolls or is on a heel, have worked loose from time to time. When that happens, I have to remove the front panel that holds the burner knobs, and reach way inside to replace the bolt that holds each gimbal in place. I found that if I use a cap screw with a socket head and an allen wrench, I can get the bolt in place and tightened without too much difficulty. The gimbals do wear out as well – we had new ones machined in Ecuador a few years ago.


gimbals


The 'sparker', the device that provides the spark at each burner when lighting the stove, gave it up about a decade ago. I didn't replace it for a couple of reasons: first, because it is quite easy to light a burner using a fireplace lighter, and second, because we store pans in the oven. The U.S. Coast Guard frowns on storing things in the oven, as it is too easy to light the oven with a sparker, forgetting about the things that reside there. Since we have to open the oven to light it, I'd have to be pretty preoccupied to overlook the pans sitting there and melting them or worse. I'm not sure this argument will get us off the hook if we are ever boarded and inspected by the coast guard, but I'm game to argue the point.

Another frequent problem we have is with carbon build-up in the burner jets. Under each burner is a small jet with a precision orifice. Over time, the orifice slowly clogs up with carbon, and the flame gets progressively smaller. When we start having problems getting the oven up to temperature or when it takes forever to heat our morning cuppas, I know it is time to clear out the carbon.

It is quite easy to ream out the carbon build-up. On our Force 10 stove, each burner has a cap that acts as a flame disperser and which lifts off the burner. Once the flame disperser is removed, the jet can be seen below. I usually light the flame without the disperser – it will be 2”-4” (50mm-75mm) when there is a moderate amount of carbon.


disperser and jet


I use an .032” (0.813mm) drill bit mounted in a Dremel tool to ream the jet. I don't actually plug the Dremel in and turn it on, but use the Dremel tool only as a holder for the bit. I carefully insert the drill bit into the jet and slowly rotate the bit, gradually reaming the orifice. The drill bit will, after a few minutes, break through all the carbon. Then I carefully withdraw the bit. It is quite tiny, and the project is going to take a lot longer if the bit breaks off in the jet.


dremel and bit


reaming

The most used burners will have the most carbon, but as long as the tools are out, it only makes sense to ream all the burners. When I'm all finished, I light each flame before replacing the dispersers. The flame heights will now be 10”-12” (25cm-30cm) or more – watch your eyebrows.

 

flames before and after

The Blue View - What Broke?

Cocos Keeling to Rodrigues Island

As of Rodrigues Island, our Indian Ocean passage is almost 2/3rds done. We've sailed about 3400 nm since leaving Geraldton, and have about 1900 nm miles to go. This last leg, 13.5 days from Cocos Keeling to here, had its good days and bad – like most passages. And like most passages, the list of repairs and things needing attention grew quite long.

People who don't live on boats or make offshore passages often wonder why so many things break on a passage. Don't we keep Nine of Cups up at all? I think a reasonable analogy might be a 45-foot motor home, one that you drive continually, 24 hours a day, for weeks on end, half on paved roads and half on rough 4wd roads. Every few hours, use a fire hose to spray gallons of saltwater over the dashboard and instruments. Maybe once every few weeks, use the same fire hose to spray the entire interior with saltwater. Continue this for 14-15 years for a total of 800,000 miles, the rough equivalent of putting 80,000 nm on a boat, and no matter how well you maintain your motor home, things will stop working.

So what broke so far on this last leg? Here's my list:

  • Stove gimbal: When at sea, the galley stove is supported by two large pins, one on the left side and one on the right side of the stove. As the boat heels and rolls, the stove rotates on the pins, and the cooking surface stays mostly horizontal – keeping the soup in the pan and the pan on the stove. Each gimbal pin is held in place by a bolt through the side of the stove. Every once in awhile, one of the bolts works loose, causing the gimbal pin to fall off, and the stove to drop down on one side, which is what happened on this passage. The bolt is difficult to get to inside the stove, even after partially disassembling the stove. In addition, the original bolt dropped down inside the space between the oven and the stove outer wall and was lost. This repair couldn't wait until we were in port. I found a bolt with the right thread, cut it off to make it the right length and, using lots of thread lock, bolted the gimbal back on.
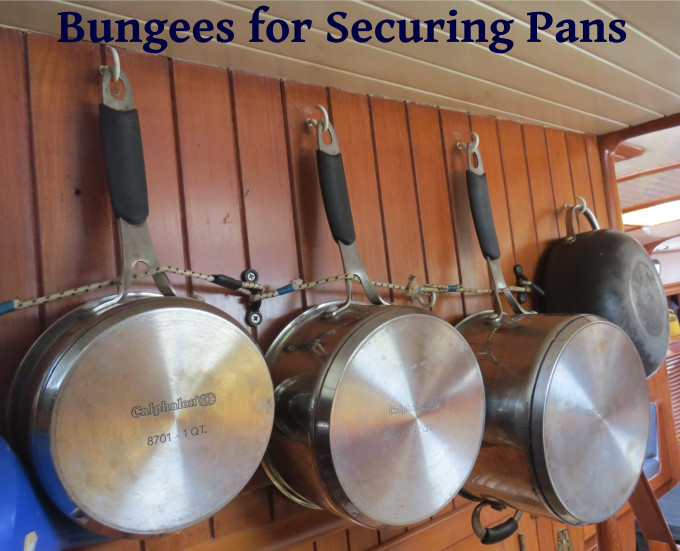
  • Pan bungees; We mount our cooking pans on the wall opposite the stove. When at sea, we keep them from swinging and banging into the wall, passing crew and each other with lengths of bungee cord. The bungee cords are getting a bit stretched out and need replacing. Add to the list.


pan bungees


  • Reefing pendants: The whipping on several of the reefing pendant lines need to be renewed. Add to the list.
  • Ignition Switch: One of the big waves that washed into the cockpit shorted out the engine ignition switch. The switch is located behind a plexiglass window, and is a watertight marine switch, but apparently enough moisture over the years has made its way into the switch to short out the internal contacts. I replaced it temporarily with a breaker switch until we can get a permanent replacement.
  • Portable cockpit GPS: Our small backup GPS in the cockpit stopped working. It turned out to be an easy fix – one of those big waves knocked me into the breaker panel next to the Nav station, and I inadvertently switched the breaker for the cockpit outlets to the off position. Marcie noticed the GPS wasn't working on one of her night watches, and I tracked it down the next day.
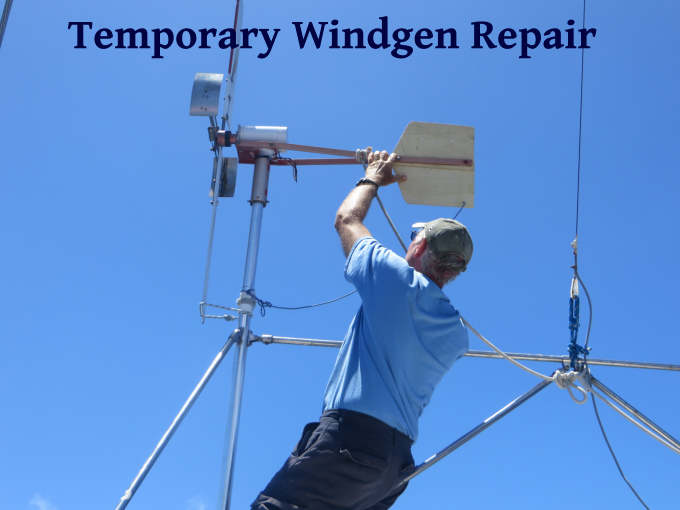
  • Windgen: Our wind generator takes a beating on passages. On this one, the tailpiece that acts as a rudder to keep the blades facing into the wind broke in half – probably due to fatigue from vibration and sun exposure after all these years. I have a spare located under the forward berth – but in a place not easy to get to while the boat is pitching and rolling. I made a temporary replacement out of plywood, but it will need to be properly repaired. Add to the list.


temporary windgen repair


  • Sailslide: The webbing that attaches the top sailslide to the mainsail has chafed through. Add to the list.
  • Stove burners: The flame height for some of the stove burners seems lower than normal. I have to periodically clear the carbon that builds up in the burner jets. Add to the list.
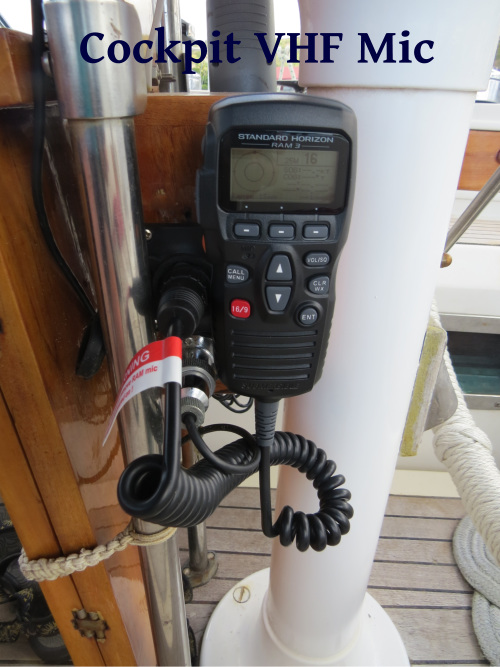
  • Cockpit VHF: We have a VHF radio located below at the Nav station, and a remote mic and speaker in the cockpit. The latter, as well as its cable and connector are waterproof, but with time and enough seawater dousings, the remote stops working. The life expectancy of the remote seems to be 1-3 years, depending on the conditions we find ourselves sailing in. This time, the contacts in the “waterproof “ connector have corroded. I have a spare cable and mic, ready to install. Add to the list.


cockpit vhf


  • Cockpit 12v outlet: The 12volt outlet we use to keep the iPad charging while underway is corroded and no longer useable. I made a temporary hard wire connection which will hopefully last until I can make a more permanent fix. Add to the list.
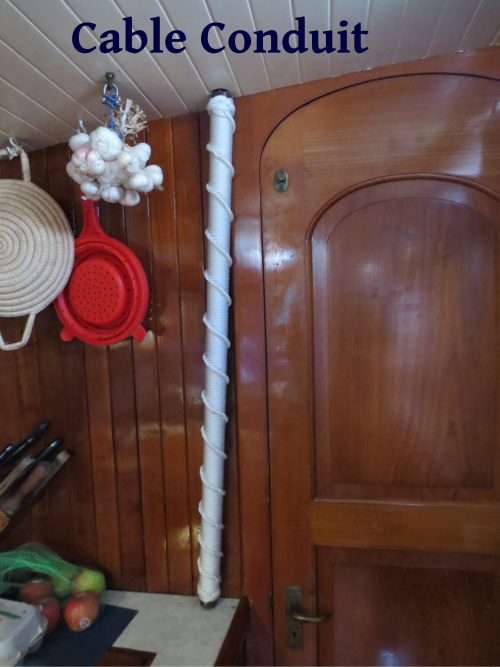
  • Water leak over galley counter: We noticed a lot of water making its way down to the galley counter when the seas are high. Cups has a number of wires that lead from the engine room up behind some lockers to the galley counter, then through a conduit to a locker in the cockpit. When we take waves over the cockpit, water makes its way into the locker and down through the conduit. The conduit used to have a glob of modeling clay stuffed in the top to make it somewhat watertight, but when I was tracking down the source of the leak, I saw the glob of clay sloshing around with all the water in the cockpit locker. I need to figure out a better method of keeping the water out. Add to the list.


BVWhatBroke CableConduit


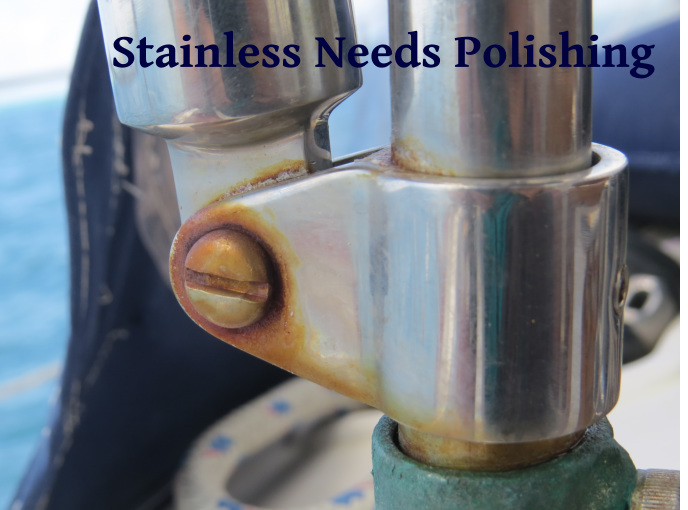
  • Stainless: The stainless steel fittings, stanchions, poles and hardware are overdue for a thorough polishing and waxing. Add to the list.


BVWhatBroke Stainless


  • iPad: Our backup iPad, went flying across the saloon, ricocheted off the galley sink, and ended up in a puddle of seawater on the galley floor after the big wave hit us. It is housed in a rubber-like case, and while it is still mostly functional, the GPS no longer works – making it somewhat less useful for navigation. Add repair or replace iPad to the list.

There should be plenty of time to take care of most of the repairs – assuming Marcie doesn't want to do any sightseeing while in Rodriques. Let the negotiations begin.

The Blue View - Docking with One Line

Several years ago, I read an article in Good Old Boat written by Dave Chase. The article talked about tying up to a dock or jetty, at least temporarily, using only a single line. If done properly, the line can be dropped over a cleat using a boathook, and once in place, the boat is pulled into the dock as it motors forward. Then a crew member can step down to the dock and attach the remaining lines. We tried the method, tweaked it a bit for Nine of Cups, and found that it makes docking, whether in a slip or at a linear jetty, a great deal easier for a shorthanded crew. We now use this technique almost all the time.  

single line illustration


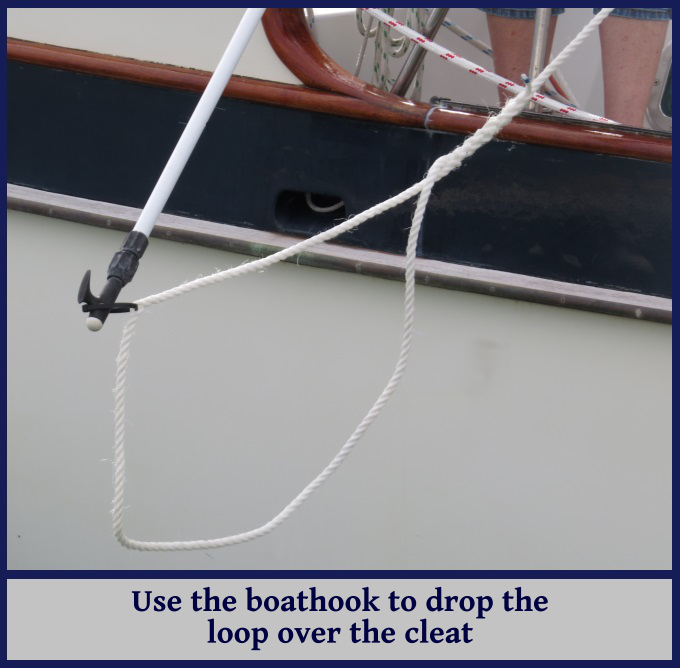
The method uses a single springline that is attached to a cleat on the dock, then run forward through a block at the boat's pivot point, and back to a cockpit winch. We use a 45' (14m) length of 1/2” (12mm) 3-strand polypropylene line for our springline. We have a large, three foot (1m) eye spliced in one end. Attached to the eye-splice is a small loop made from a cable tie. This small loop is just large enough to fit the end of the boathook.


docking loop


As we approach the dock, Marcie rigs the springline so that the loop just reaches the stern of the boat. She routes the line so it passes through a block on the rail at a point just about even with our mast, then back to the cockpit, where it is secured to a winch. She stands at the midship gate, holding the loop with the boathook. As soon as the cleat is within reach of the boathook, Marcie drops the loop over a cleat. Then, I continue motoring forward slowly until Cups is pulled into the dock. Once the springline is tensioned, I keep Cups in gear and turn the wheel away from the dock. Depending on the wind, I may have to give us slightly more throttle to keep us at the dock. Then as long as we keep the engine running and in gear, Cups will stay nestled up against the dock, allowing us time to leisurely step down to the dock and attach the bow, stern, and normal springlines. Once securely tied, we shutdown the engine and remove the temporary springline.

Some experimentation may be needed to find the right spot to locate the block on the rail. If it isn't far enough forward, the bow of the boat will swing out.


loop and boathook


When it is time to leave, we use one of several options. If we need to spring either the bow or stern away from the dock, we use the technique described in the earlier blog on springing off a dock. If all we have to do is motor forward or backwards, we reverse the process above. We attach the springline as before, start the engine, turn the wheel away from the dock and put it in gear. Then we can remove all the other lines leisurely and step back aboard. Marcie hooks the loop with the boat hook, and lifts it off the cleat as soon as I put the engine in neutral, taking the tension off the line.