The Blue View - Anchoring Techniques: Lines Ashore

noc anchored  

We've encountered perhaps as many as 100 anchorages over the years that were idyllic and protected, but were too small and too deep to anchor safely using the traditional single anchor method. If we dropped the anchor, we either couldn't deploy enough anchor rode or chain to give us our desired scope, or we ran the risk of being on the rocks if and when the tide or wind direction shifted. We've used three methods in these situations, and each has its own advantages and disadvantages.

The first method is to deploy a second bow anchor. This is the easiest method, but our least favorite. Often, the anchorage is too small and too deep to safely deploy two bow anchors. If the anchorage is in an area where the winds and tidal currents shift, we invariably end up with the two anchor rodes twisted around each other, and it always takes time to unwind them. Once we were anchored off Key West for a couple of weeks, and the two rodes were wrapped around each other 15 times. It took us a good hour to unravel them. Not a good situation if we wanted to leave an anchorage in a hurry.

The second method is to use a stern anchor. While the anchorage might still be too small to safely deploy a stern anchor, there are many other situations when using a stern anchor is the best alternative. It has saved our bacon on more than one occasion and has often made a very unpleasant anchorage much more comfortable. This will be the subject of another blog.

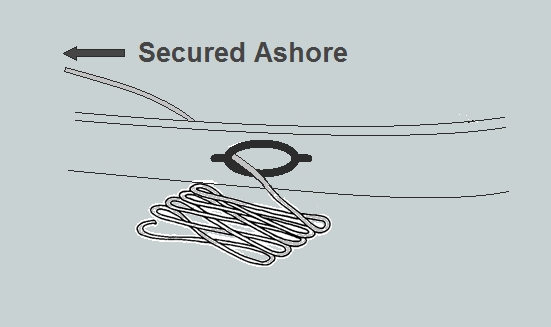
The third method is to drop the hook and run lines ashore. We have used this technique in numerous anchorages in Patagonia, Tierra del Fuego, Fiordland and Stewart Island in New Zealand, in some of the Pacific atolls and in Maritime Canada. In fact, we've probably used this method more than the other two combined. We use anywhere between one and four lines ashore depending on the situation, but most often two lines suffice. Sometimes we are so close to shore we need to avoid the tree limbs. Marcie always enjoys picking flowers without leaving the boat.

I briefly discussed this method in my previous blog post “The Blue View – Storms at Anchor”, but I think it is an important enough topic to merit a more detailed discussion. Our shore line “kit” is made up of two, 300' (90m) lengths of 3/4” (18mm) polypropylene line, two 35 pound (16kg) anchors, four 15' (5m) lengths of 3/8” (10mm) chain and several large shackles. We prefer polypropylene line because it floats, so towing it ashore in the dinghy is easier, and it is quite chafe resistant. In the event we need more than two lines, we use one or two of our spare anchor rodes.
 

deployed


The procedure used for running the lines ashore takes a little practice, and varies somewhat depending on the terrain ashore. If the shore has large rocks or trees, we first deploy the dinghy and flake the line out on the aft deck. We pass one end through an aft hawsehole and tie it to the dinghy. Next, we drop the bow anchor and set it, then attempt to back Cups up towards the shore, deploying more chain as needed. When we get as close as we can, I hop into the dinghy and tow the end of the line towards shore while Marcie feeds the line out. I find a place to go ashore and secure the line to a stout tree or large rock. If there is any chance of chafing the line on the rock, I wrap a length of chain around the rock, shackle the ends together, and attach the line to the chain.

If the shore is sandy with no large trees or rocks, I sometimes attach the chain to one of the anchors and go ashore to secure it in place before we anchor. Once we anchor and back up close to shore, it is hard to hold position while I go ashore to secure the stern line, especially if there is an adverse wind or current, so it is helpful to have secured the anchors in advance. If it is a sandy beach, I use a small shovel and bury the anchors as deep as I can. If it is rocky, I try to wedge the anchors in place. Then I return to Nine of Cups and we follow the same procedure for running the lines ashore as before.

The end of the line on Cups is wrapped around a winch, and we use the winch to pull the boat towards shore. If needed, we then run another line to shore from the other side of the boat, and possibly the 3rd and 4th lines from either the midship or bow cleats. By winching in the lines and letting out more chain, we can get the boat quite close to shore, often in some tiny cove that is completely protected. When we are all set, we test the holding by powering away from shore to make sure the lines are secure. The last step is to attach an anchor snubber.

Fortunately, we were alone in the anchorage the first time we tried this. I've left out the part about keeping the dinghy from drifting away as I tried to clamber up, or slipping and falling on those mossy, slippery rocks while dragging two hundred feet of line and carrying 15 feet of chain wrapped around my neck while concurrently swatting at the mosquitoes or flies swarming around my head. It took us well over two hours of sweating and swearing to get everything just right. After a dozen or so times, however, we were completing the task in about 20 minutes and with hardly any cursing at all.

When it is time to leave, I dinghy ashore and release all but one of the lines. Marcie pulls each line aboard while I retrieve and stow the anchors and/or chains in the dinghy. If conditions are anything but ideal, I then dinghy back to Cups, and we motor forward, bringing in the anchor rode while letting out more line astern. If we come to the end of the last shore line, we just cast it off and continue moving away from shore. When we have shortened the anchor rode enough to be sure we won't swing into a tree or any nearby rocks, I dinghy ashore once more and release or retrieve the last line. Usually the anchor is set well enough to hold Cups for these last few minutes even with the reduced scope, but Marcie is there with the engine going just in case the boat does break free.
 

faked line secured for stowing


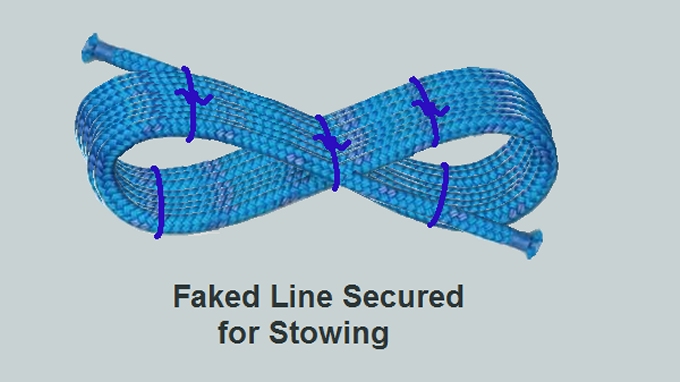
Keeping all that line tangle free is an art form in and of itself. If we are in an area like Patagonia where running lines ashore is done in many, if not most, anchorages, we mounted spools on the stern rail to hold the lines. I asked a local chandlery to save a couple of empty spools for me. I cut the spools in half, mounted them on the stern rail and used a combination of scrap plywood and lashings to hold the two halves together. They held up well for the season we spent there, but if we were planning to be there longer, I would have done something more permanent. I have also seen cruisers use large plastic laundry hampers or big duffel bags. The line can be faked into the hampers or bags in figure eights after each use. Then when they are needed, it is easy to pull the line out, tangle free. Now that we have only an occasional use for the line, I fake each line in figure eights on the aft deck, then use small line to secure each of the loops. The line is then stowed forward above our chain locker.

The Blue View - Having the Right Supplies Aboard

small supplies

“If the women don't find you handsome, at least let them find you handy”...Red Green

We've been staying with relatives for the past few months, primarily Marcie's sister, Lin, and my sister, Mary. Both are single, and while both are smart, competent ladies, there are always a number of house projects and repairs that they can use a little help with. I am more than happy to help where I can. I enjoy doing the projects and it helps assuage my guilt about being such a mooch.


fixing the brakes


The typical home project or repair involves making lists of all the supplies that will be needed, then hopping in the car and making the rounds of the local building supply and hardware stores to round everything up. At various stages through the project, I again hop in the car and run over to the local hardware to get the stuff I forgot or didn't know I needed. The last step, after the project is completed, is to make the rounds once again, returning all the items I didn't need or bought too much of. The convenience of having access to a car and a multitude of nearby hardware, paint and lumber suppliers is wonderful.


working with plasterboard


On Nine of Cups, making a repair or completing a project lacks this level of convenience. If we are at sea or in some remote part of the world and something breaks, our options are simple. We can either fix it if we have the parts and supplies, jury-rig something to get us through until the proper repairs can be made, or do without whatever it was that broke. Even in port, making trips to the local chandlery, lumber or hardware store often involves a wet dinghy ride followed by a very long walk and/or figuring out the local bus system. The time required to run out for that roll of PTFE thread tape or tube of silicone grease increases from 15 minutes to half a day. Thus, it is important to have not only the spares needed to repair something, but also to have all the various and sundry supplies aboard that we may need to complete most projects and repairs.

When we first moved aboard, I had a pretty good stock of many of the household repair supplies I'd used in the past, and some of these, like plumbing supplies (solder, paste, PTFE tape, pvc cleaner and cement...) and electrical supplies (electrical tape, solder, crimp terminals, shrink tubing...) could be used in a marine environment and were moved aboard. Other supplies, like all my bins of zinc plated nuts, bolts and screws, and non-marine grade hose clamps, had no use aboard. Then there was a whole host of supplies that I didn't have, like UV resistant sail thread, whipping twine, specialty adhesives, and stainless hardware.

Initially, to determine what things I should be buying, I did a lot of reading, and made a lot of lists of supplies I'd need. I talked to other more experienced cruisers and browsed the shelves of the chandleries I visited. We spent our first two years primarily coastal sailing along the U.S. East coast, which gave us ample opportunity to accumulate a good inventory of repair and maintenance supplies. When I did a repair and had to buy supplies, I would always try to buy extra to have on hand for the next time. Over the years, our stock of commonly used items, as well as a host of supplies that are used for those less common repairs, has grown. Much like the tools and spares I keep aboard, my many caches of supplies in various locations around the boat has contributed to our lowered waterline.

When I notice our stock of something is getting low, I make sure to add it to our ongoing “Need to Buy” list, as well as what I should be paying for the item. I have the world's worst memory, and if I don't write it down, not only will I forget what I needed, but I won't remember whether the local price is outrageously high or a bargain - should I grit my teeth and only buy the minimum to get by with or should I smile and stock up on the item?

A friend recently asked whether I had a list of all the repair and maintenance supplies we keep aboard Nine of Cups. I didn't, but I thought it was such a good idea, that I have started one. It is much too long to include as part of this blog, but we will happily send it to you. My only request is that you let me know what I've overlooked or forgotten so I can add to it. Send us an email and we (or actually Gentry, our very patient blog- meister ) will send you a copy in pdf format.

The Blue View - Making a Mast Boot

finished mast boot  

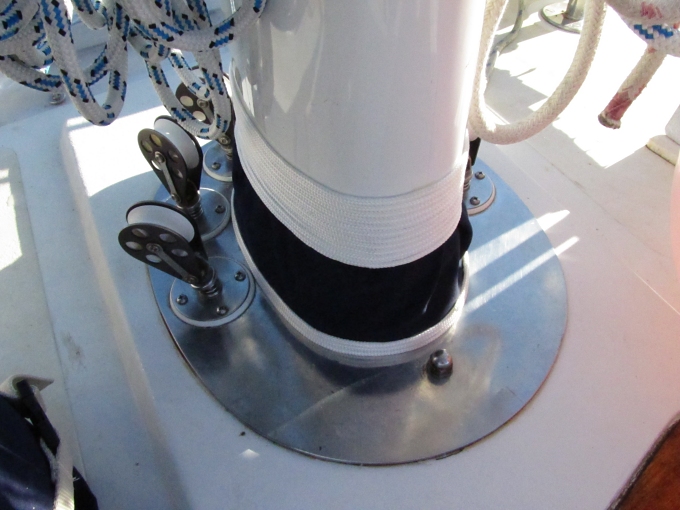
Over the years I have tried several methods to create a watertight mast boot, including duct tape, mast boot tape and Spartite. The results were what you'd expect. The duct tape worked well for a few months, the mast boot tape worked for a bit longer and the Spartite worked quite well for a long time. The biggest problem with Spartite is that it is expensive. When we pulled the mast for refitting a few years ago, we couldn't reuse the old Spartite mast boot, and I was hoping to find a less costly alternative.

At the suggestion of a local rigger, I decided to try a one-part waterproofing compound that’s marketed for roof and gutter repairs. This is a thick, rubbery substance about the consistency of honey that can be brushed on. It will adhere to metal and painted surfaces and, once it dries, remains flexible and is UV-resistant. I thought it was worth a try.

The first step was to create a mold to support the waterproofing compound until it could set. I used my ever-present duct tape to make the mold, but any wide, adhesive-backed tape would work. I started the mold by making a wrap around the deck collar and continuing to make wraps upward until I had a cone-shaped mold reaching from the deck collar to the mast. Next I put a wrap of masking tape around the mast 1 to 2 inches above the top of the mold and applied masking tape to the deck below the mast collar.


making the mold


I found the waterproofing compound at a local building supply store. The product itself is not hard to find, but it is difficult to find in a small quantity. For Nine of Cups, I needed less than a quart, and the usual quantity available was in 1- and 5-gallon size containers. If you can't find it at the local building supply place, try an RV supply store. You can also do a search online for roof repair products. I've found various products ranging in price from $18 to $35 a quart.

Using disposable chip brushes, I applied three thick coats following the manufacturer’s re-coat schedule. For the product I used, I was able to apply a new coat after eight hours of drying time, so I applied two coats the first day and the last coat on the second day. After it had dried beyond the tacky stage, I carefully removed the masking tape, using a razor blade as necessary. I then let the waterproofing compound cure for a couple of days.

Since the waterproofing is UV-resistant, the mast boot was now functionally complete, but it didn’t look finished. I opted to make a cover from Sunbrella, using a small piece left over from our bimini project.

The shape of the cover is a bit odd. After a bit of trial and error, I came up with a simple formula that can be used to make the pattern.


cover pattern


First I measured the circumference of the mast, c1, and the circumference of the mast collar, c2. I estimated how high on the mast I wanted the cover to reach and put a pencil mark on the mast at that point. Then I measured the distance from the base of the mast collar to the pencil mark on the mast which is “ht” in the formula. You can calculate the two radii, r1 and r2, using the formulas below.

r1 = (c1*ht)/(c2-c1)

r2 = r1 + ht

For example, on Cups the mast has a circumference of 26 inches and the mast collar has a circumference of 31 inches. The distance from the bottom of the mast collar to the top of the cover is 7 inches. Plugging these values into the formulas:

r1 = (26*7)/(31-26) = 182/5 = 36.4 inches

r2 = 36.4 + 7 = 43.4 inches

Before marking and cutting the fabric, I made a template from paper to make sure the pattern was correct. Once I was convinced the template was accurate, I used it to draw the pattern onto the fabric. I added an extra inch to one end of the pattern to allow for an overlap, then added 1/2 inch to the entire outline to allow for a finished edge. Next I folded the 1/2 inch of material along the outline and hand-stitched it. The last step in the fabrication process was to hand-stitch mating pieces of Velcro onto the ends of the fabric where it overlaps.


paper template


I installed the cover by wrapping it tightly around the mast and collar and pressing the Velcro strips together. I added a whipping with 1/8-inch white nylon line to the top to give it a finished look. I used a hot melt glue gun to attach one end of the small line to the cover about 1/2 inch from the top, then made 12 wraps of line tightly and neatly around the mast working upward. I put a small dab of glue on each revolution and secured the end to the mast and the wrap just below it with another dab of glue. Originally, I also put a whipping on the bottom of the cover, which you can see in the photo of the finished mast boot. I found that this had a tendency to trap water, however, which led to mold growth, and I later removed it.

This mast boot has been in place for years. It has been exposed to heavy seas and cold temperatures in the southern New Zealand and Tasmanian waters as well as the more tropical temperatures of Vanuatu and Fiji. So far it has shown no sign of leaking. I did find that the Velcro began to lose its grip after a couple of years and, using a curved needle, I have now hand stitched the Sunbrella in place.

This is a condensed version of an article I wrote for Good Old Boat magazine, which appeared in the May 2013 issue. For the full article which has more details (and much more professional illustrations), do an article search on the Good Old Boat website and enter keywords “mast boot”.