Over the years I have tried several methods to create a watertight mast boot, including duct tape, mast boot tape and Spartite. The results were what you'd expect. The duct tape worked well for a few months, the mast boot tape worked for a bit longer and the Spartite worked quite well for a long time. The biggest problem with Spartite is that it is expensive. When we pulled the mast for refitting a few years ago, we couldn't reuse the old Spartite mast boot, and I was hoping to find a less costly alternative.
At the suggestion of a local rigger, I decided to try a one-part waterproofing compound that’s marketed for roof and gutter repairs. This is a thick, rubbery substance about the consistency of honey that can be brushed on. It will adhere to metal and painted surfaces and, once it dries, remains flexible and is UV-resistant. I thought it was worth a try.
The first step was to create a mold to support the waterproofing compound until it could set. I used my ever-present duct tape to make the mold, but any wide, adhesive-backed tape would work. I started the mold by making a wrap around the deck collar and continuing to make wraps upward until I had a cone-shaped mold reaching from the deck collar to the mast. Next I put a wrap of masking tape around the mast 1 to 2 inches above the top of the mold and applied masking tape to the deck below the mast collar.

I found the waterproofing compound at a local building supply store. The product itself is not hard to find, but it is difficult to find in a small quantity. For Nine of Cups, I needed less than a quart, and the usual quantity available was in 1- and 5-gallon size containers. If you can't find it at the local building supply place, try an RV supply store. You can also do a search online for roof repair products. I've found various products ranging in price from $18 to $35 a quart.
Using disposable chip brushes, I applied three thick coats following the manufacturer’s re-coat schedule. For the product I used, I was able to apply a new coat after eight hours of drying time, so I applied two coats the first day and the last coat on the second day. After it had dried beyond the tacky stage, I carefully removed the masking tape, using a razor blade as necessary. I then let the waterproofing compound cure for a couple of days.
Since the waterproofing is UV-resistant, the mast boot was now functionally complete, but it didn’t look finished. I opted to make a cover from Sunbrella, using a small piece left over from our bimini project.
The shape of the cover is a bit odd. After a bit of trial and error, I came up with a simple formula that can be used to make the pattern.

First I measured the circumference of the mast, c1, and the circumference of the mast collar, c2. I estimated how high on the mast I wanted the cover to reach and put a pencil mark on the mast at that point. Then I measured the distance from the base of the mast collar to the pencil mark on the mast which is “ht” in the formula. You can calculate the two radii, r1 and r2, using the formulas below.
r1 = (c1*ht)/(c2-c1)
r2 = r1 + ht
For example, on Cups the mast has a circumference of 26 inches and the mast collar has a circumference of 31 inches. The distance from the bottom of the mast collar to the top of the cover is 7 inches. Plugging these values into the formulas:
r1 = (26*7)/(31-26) = 182/5 = 36.4 inches
r2 = 36.4 + 7 = 43.4 inches
Before marking and cutting the fabric, I made a template from paper to make sure the pattern was correct. Once I was convinced the template was accurate, I used it to draw the pattern onto the fabric. I added an extra inch to one end of the pattern to allow for an overlap, then added 1/2 inch to the entire outline to allow for a finished edge. Next I folded the 1/2 inch of material along the outline and hand-stitched it. The last step in the fabrication process was to hand-stitch mating pieces of Velcro onto the ends of the fabric where it overlaps.

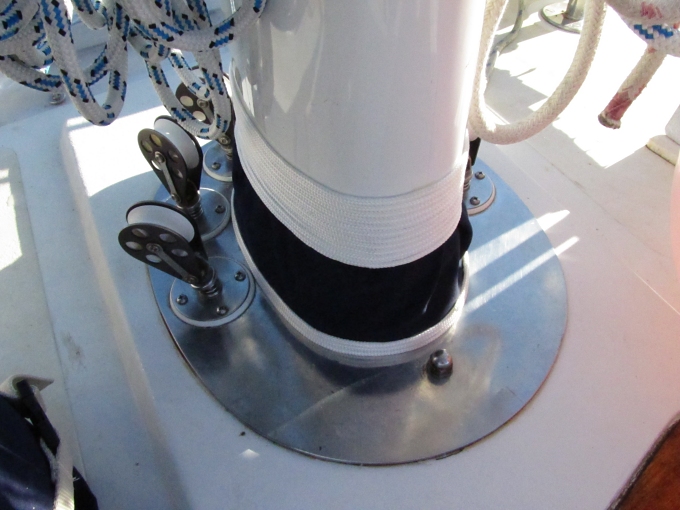
I installed the cover by wrapping it tightly around the mast and collar and pressing the Velcro strips together. I added a whipping with 1/8-inch white nylon line to the top to give it a finished look. I used a hot melt glue gun to attach one end of the small line to the cover about 1/2 inch from the top, then made 12 wraps of line tightly and neatly around the mast working upward. I put a small dab of glue on each revolution and secured the end to the mast and the wrap just below it with another dab of glue. Originally, I also put a whipping on the bottom of the cover, which you can see in the photo of the finished mast boot. I found that this had a tendency to trap water, however, which led to mold growth, and I later removed it.
This mast boot has been in place for years. It has been exposed to heavy seas and cold temperatures in the southern New Zealand and Tasmanian waters as well as the more tropical temperatures of Vanuatu and Fiji. So far it has shown no sign of leaking. I did find that the Velcro began to lose its grip after a couple of years and, using a curved needle, I have now hand stitched the Sunbrella in place.
This is a condensed version of an article I wrote for Good Old Boat magazine, which appeared in the May 2013 issue. For the full article which has more details (and much more professional illustrations), do an article search on the Good Old Boat website and enter keywords “mast boot”.


