The Blue View - Faucet Replacement

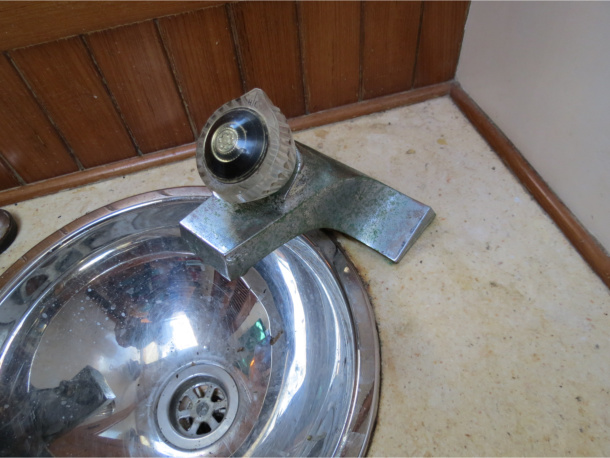
old faucet  

We have a pressurized water system aboard Nine of Cups. There is a small water pump that connects the water tanks to each of the faucets, and when we turn a faucet handle, the water pressure in the lines drops, causing the water pump to come on. So, when everything is working well, our faucets work just like those in a house. We also have a foot pump at the galley sink as a backup, in case we have a problem with the pressurized system.

The water pump is loud enough to be heard, under normal conditions, throughout the boat. You might think this would be undesirable, but it is actually a good thing. The pump should not come on unless a faucet is opened. If we hear the pump and no faucet is open, we know we have a leak somewhere. And so it was about a week ago - the water pump was cycling on and off for a second or two about once an hour – a sure sign of a leak.

Sometimes the leak is difficult to track down, since the pressurized lines run through a number of hard-to-get-to areas, but this time it was pretty easy. The shelf under the sink in the forward head was wet, and the fittings connected to the faucet were corroded. That particular faucet had been replaced several years ago with a household bar sink faucet. Household faucets are pretty and usually less expensive than marine grade faucets, but have a limited lifetime aboard a boat. In addition, since household faucets are designed to connect to household plumbing, which is usually different than boat plumbing, it is sometimes a challenge finding the right fittings to make the connections.

The faucet was definitely showing its age both above and below the counter, so we went in search of a replacement. The counter is some sort of a marble-like substance, and quite difficult to drill or cut, so we were hoping to find something that would fit the old holes. This, of course, didn't work out, but we did find a nice marine grade faucet at Whitworth's (the Aussie equivalent of West Marine), with a removable spout that can be used as a shower head. While it wouldn't fit the same holes, at least it would cover the old ones, so we bought it. It really doesn't look as nice as a conventional sink faucet, but at least it costs twice as much.


new faucet


As is typical of most of my projects, what should have taken an hour or two took closer to two days. I needed to convert the two drilled holes into a rectangular cutout, and the marble-like counters were even harder to cut than I expected. I tried hole saws, my multi-tool with a saw blade and my Dremel with a cut-off wheel, but none of the power tools seemed to make much of a dent in the counter. After drilling for 45 minutes with the hole saw, for example, I had completely worn it out and had only a 1/2” deep hole to show for my effort. It was too small an area to use a jig saw. I contemplated making a trip to the local Bunnings to see if I could find some diamond tipped tile cutting bits, but it's a three-hour round trip by train and bus, with no guarantee that they had the bits or that the bits would cut any better.


hacksaw blade


Eventually, I found that a hacksaw blade worked as well or better than anything else. It didn't exactly fly through the counter – it took 15 minutes of concerted effort to cut 1/8” (3mm) but it did make progress. I drilled 1/4” holes to make the radii in the corners, and used a chisel to connect the dots. After a day and a half of sawing, drilling, sweating and swearing, I finally finished the cutout.


the new hole


The rest of the job was pretty straightforward. I masked the faucet and caulked under it with silicone, then screwed it into place. The plumbing connections were easy – 1/2” reinforced vinyl tubing held in place with double hose clamps. When I turned the pump back on, no leaks and the pump now only comes on when it should. Another “two hour” project to check off the list. Actually, it wasn't on the list to begin with, so I had to add it to the to-do list before I could check it off.
The Blue View - Annual Engine Maintenance

As the title suggests, it was time to spend a day doing all those engine tasks that have to be done at least once a year. This is certainly not my favorite way to spend the day, but I prefer to get them all out of the way at once. Adelaide was going through a heat wave and trying to work topsides in temperatures well over 110F/43C didn't seem like a good plan, so today was the day. I go through each system of the engine, starting with the cooling system. Nine of Cups has a Ford Lehman diesel engine, which is a marinized version of a Ford tractor engine. It has a freshwater cooling system, but instead of a radiator, it uses a heat exchanger to cool the freshwater coolant. There are actually three heat exchangers, one for the engine coolant, one to cool the motor oil and one to cool the transmission fluid. Raw seawater is pumped through a strainer by an impeller type pump, then through the three heat exchangers. The seawater is then mixed with the engine exhaust, which cools the exhaust gases and acts as a muffler.

These are the items on my cooling system checklist:

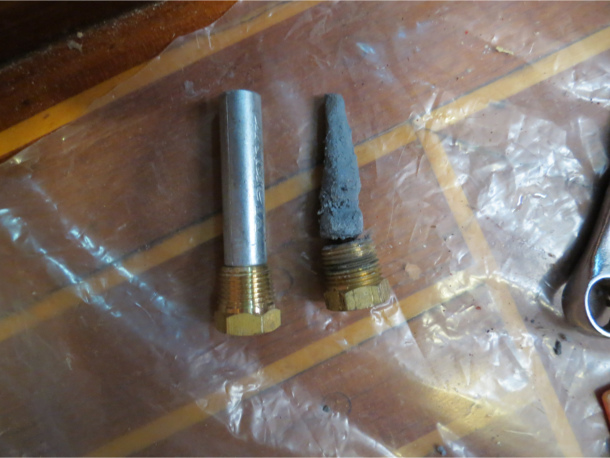
  • Finger zinc. The first heat exchanger has an internal finger zinc to prevent corrosion. I usually check it quarterly.


finger zinc


  • Raw water strainer. This occasionally gets clogged and is checked as needed, but I pull it out and inspect it for fouling and corrosion annually. While it is out, I open the thru-hull briefly to flush out anything in the intake line.
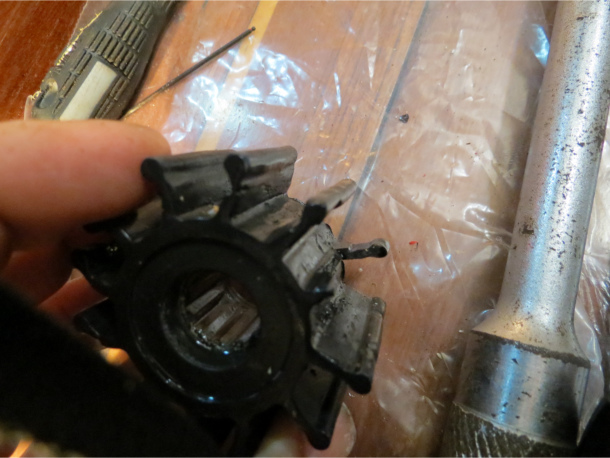
  • Impeller. The impeller will usually last for years unless something finds it way through the strainer or the engine is run without water. This is what happened when I tried to start the engine before cleaning the thru-hull, and sure enough, it was damaged.


impeller


  • Coolant heat exchanger. This heat exchanger has a tendency to clog up. I remove the end cap and run a small wooden dowel through each of the holes and clean any debris from the inlet side. I replace it every five years.
  • Oil and transmission heat exchangers. I inspect these externally to check for corrosion and to make sure the oil lines feeding them are secure and in good shape. I replace these every three years.
  • Hoses and clamps. All the hoses and clamps in the cooling system are checked and replaced as needed.
  • Exhaust mixer. We have a monel exhaust mixer that cools the exhaust gases and acts as the muffler. This is inspected to check for corrosion and integrity.
  • Exhaust hose. We have a 10 foot or so run of hose from the mixer to the transom, and this is inspected to check for aging or chafe.


Fuel System

The fuel system checks are next. Fuel is pumped out of either the port or starboard fuel tank, through a primary Racor filter, then to the day tank. From there, it is gravity fed to the secondary filters and on to the injector pump. These are the items on my fuel system checklist:


racor bowl


  •  Fuel tanks. I Inspect each fuel tank to check for sediment or algae. Polish the fuel if necessary.
  • Primary filter. I change the filter and clean the sediment bowl.
  • Day Tank. The day tank is inspected to make sure it is secure and there is no evidence of leaking.
  • Secondary filters. Both of the secondary filters are replaced.
  • Hoses and clamps. All hoses and clamps are inspected and checked for aging, corrosion or wear.
  • The fuel system is then bled and the engine is started and run until warm.

 Oil

  • Normally the oil and filter is changed every 180-200 hours. Since the oil hadn't been changed in over a year, I changed it and the filter. All oil lines are inspected.

Transmission

  • I change the transmission oil annually. The old oil is inspected for evidence of water or overheating. All the transmission lines are inspected. The engine is started and the transmission is put in gear, both forward and reverse to check operation and controls. Shaft vibration is checked for evidence of engine misalignment.

Coolant

  • The coolant level is checked. I flush and replace it every two years.

Engine cables and controls

  • The engine is controlled by cables that run from the cockpit to the engine room. These are checked for damage or corrosion. The fittings on each end are inspected.

Air filter

  • The air filter is cleaned and checked.

General checks

  • I give the engine a good once-over to check for the following:
  • Motor mounts. All the motor mounts are checked for tightness. The port side aft motor mount has a tendency to work loose on Cups.
  • Oil leaks. Any oil leaks are investigated.
  • Valve cover bolts. The valve cover bolts are checked and tighten.
  • Engine belts. Our engine has two belts and these are checked for aging and tightened or replaced, if necessary.
  • Visual. I check the wiring, starter, solenoid, alternator, water pump, injector pump, etc. for any visual indication of problems.

 Clean Up

This is the home stretch.

  • I wipe down the entire engine and touch up any paint that has worn away or is bad shape. It is much easier to find a future oil leak if the engine is clean.
  • After changing the oil and fuel filters, bleeding the fuel lines, and flushing the raw water intake, the engine sump always has several inches of a melange of all the engine fluids. I sop up all the petroleum based liquids using oil absorbent pads and dispose of it properly. The remaining liquids are a combination of seawater, fresh water and possibly engine coolant. These are cleaned up and disposed of, and a fresh oil absorbent pad is placed in the sump. Our engine always leaks a small amount of oil from the various seals, and the pad collects it.

Me

  • By now, I am a stinky, sweaty, oily mess. The best part of the entire job is taking a shower, changing clothes and updating my maintenance log with a cold, home brewed India Pale Ale.

The Blue View - Cleaning Her Bottom

bottom prep  

Two days ago, I donned my snorkel and mask and dove into the chilly water here to check out Nine of Cups' bottom. There are times when I wish we had an underwater camera. I do not possess the verbal skills to describe what the bottom of Nine of Cups looked like.

From the surface it didn't look too bad. The waterline had a build-up of slime and algae, but not any worse than could be expected after sitting in one place, neglected, for almost eleven months. Visibility in the water here is limited to just a few feet, so we couldn't see that much of the hull below the waterline. What we could see obviously needed attention, but it didn't look that daunting.


bottom growth


It was a different story when I viewed it from underwater. I have never seen so much growth on a boat's bottom. We could have made our fortune selling snorkeling tours to view all the colorful flora and fauna living there. The leading edge and bottom of the keel sported long rubbery tentacle things, 2-3 feet long – some sort of kelp I would guess. There were large bush-like growths along the lower areas of the hull that resembled terrestrial tumbleweeds, ranging in size from 1 to 3 feet. Each of the thru-hulls sported long white tubular growths, and I half expected to see a moray eel peering out at me. The entire hull was covered in a thick slime with the occasional red or white gooey animal adhering to the anti-fouling.

The rudder and the cavity that houses the prop were the worst. Those rubbery tube things and the tumbleweed bushes seemed to thrive there. It was now home to number of colorful tropical fish. I could only assume that the prop was actually still there – it was so overgrown I couldn't see it.

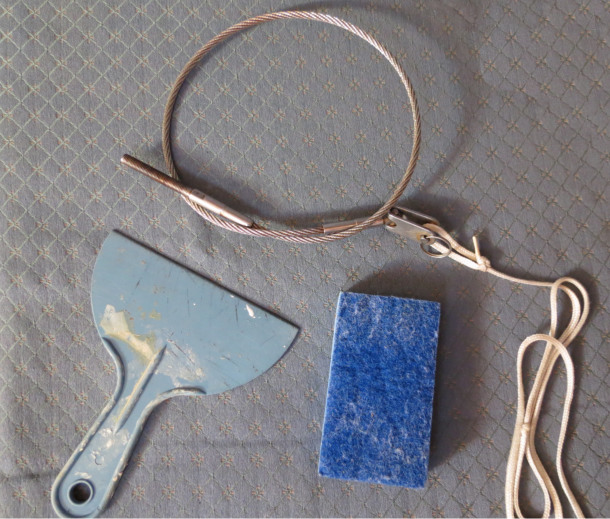
I used a nylon scrubbing pad to clean the waterline, a six inch plastic putty knife to clean the hull, and a short section of old stainless lifeline as a snake to clean out the thru-hulls. I have a hookah aboard for serious underwater work, but I thought I could get the majority of the hull done using only a snorkel and mask. The water here is cool, but not too cold, so I wore dive skins rather than a wet suit.


tools


It took about two hours to clean the starboard side. By then I was pretty cold and I quit for the day. Yesterday, I cleaned the port side and the prop. All in all, it went much more quickly than I expected. The scraper easily removed the growth. The anti-fouling was in pretty good shape, and I find using a plastic putty knife instead of a scrubbing pad leaves most of it on the hull after a cleaning. We used PropSpeed propeller coating on the prop during the last haul-out, and it is amazing stuff. It is a gold colored coating that makes the prop too slippery for anything to take hold. The prop, once I removed the forest surrounding it, wiped totally clean with very little effort. Normally, I would have needed to spend an hour or so just cleaning it.


cleaning


Somewhere along the way we lost the prop anode. This is a sacrificial hunk of zinc that protects the propeller from electrolysis. Our anode screws onto the end of the prop shaft, and I was able to remove the old screw and mount a new anode without dropping the anode, screw, washers or allen wrench. A good day!

Now we can pump water in the forward head, and the thru-hull that feeds raw water to the engine is no longer clogged. The large reef-in-the-works that was attached to Cups's bottom is gone and she seems noticeably happier (and lighter) in her berth.