The Blue View - Where is Daw Island?

where's daw  

It is difficult to pin down the exact location of Daw Island, our destination on the west end of the Great Australian Bight. Our Australian paper charts give its position as 33S51, 124E04. Our Raymarine chartplotter gives the position of the anchorage as 33S50.55, 124E08.35, about 3.75 nautical miles further east. We use Navionics Gold software on the chartplotter, but also have Navionics on our iPad. Even the Navionics software on the two devices differed. The satellite view provided by Google Earth gives the position of the anchorage as 33S50.55, 124E08.04, about 0.25 nm west of the chartplotter location. So where the heck is it anyway? Which position do we use? Take the average?

Modern GPS based electronics will locate you on the earth's surface to within a few feet. This accuracy is astounding, and it becomes very easy to rely on those electronic marvels almost exclusively. Therein lies a danger.

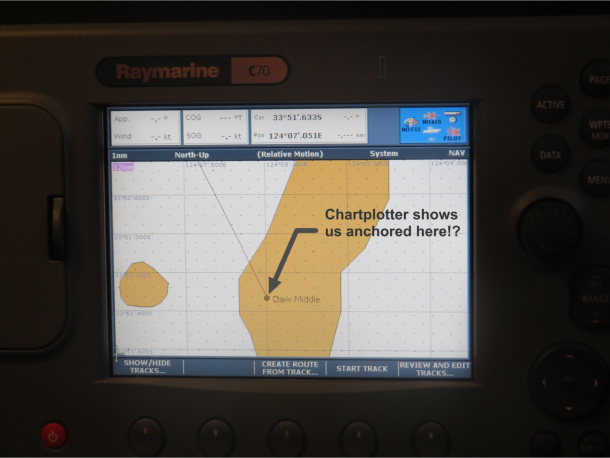
Many of the nautical charts, both electronic and paper, are based on surveys that were done before the advent of the GPS. The GPS may locate you on the earth's surface to within a few feet, but the chart may be off by as much as half a mile or more. Thus, the chartplotter may show you being well clear of an offlying danger, for example, when in actuality you may be about to hit it. Conversely, there have been any number of times our chartplotter showed Nine of Cups being high and dry in the middle of an island when we were safely anchored in 50 feet of water a fair distance off the beach.


chartplotter


Fortunately, Daw Island is easy to find in the daylight. It is by far the tallest and largest island in the immediate area. We used the chart plotter to get us to the general vicinity, made sure we arrived in the daytime, then used a combination of the paper charts, electronic charts and our eyes once we could see the island. The shoals and rocks lying off its west and north ends were easy to spot, so it was relatively straightforward to find our way into the anchorage without running into any hard spots along the way.

So which position was correct? This time it was Google Earth. This isn't always the case, however. You would think that a satellite photo would be right on, but we have been in a number of places that Google Earth was also off by a significant amount, along with the chartplotter and paper charts, and all by differing amounts.

The speed at which navigation technology is evolving makes me think that all these issues are short term. A decade from now, we will all undoubtedly have 3-D systems that will safely navigate our vessels for us, between any two points in any of the oceans of the world. Until then, however, I don't think we will be relying entirely on our GPS and chartplotter to find the next anchorage for us, no matter how much it thinks it knows where it is.

The Blue View - Rigging for Downwind Sailing

nine of cups  

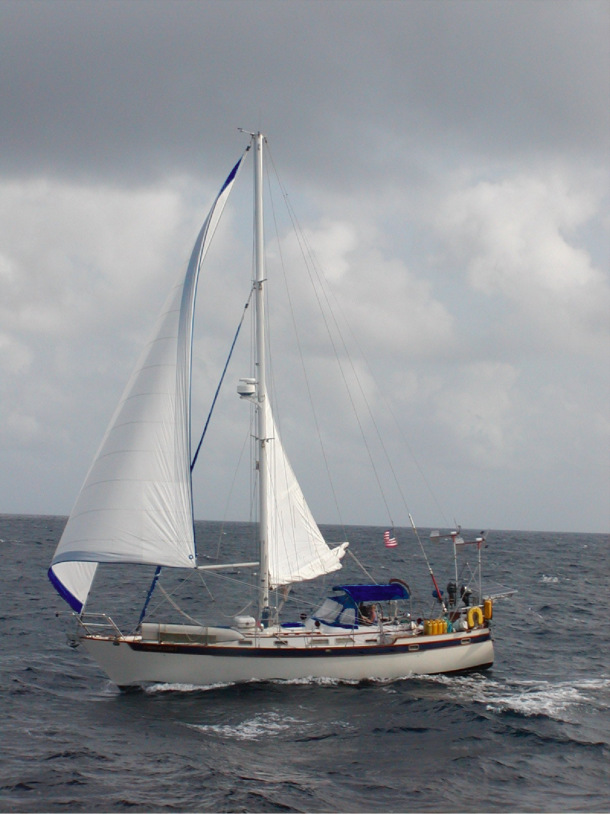
It's been awhile since we rigged Nine of Cups for downwind sailing. On our passage from St. Francis Island to Eucla, however, we saw light to moderate winds from the southeast to the northeast, and we needed to wipe the cobwebs off our whisker pole and rig it for poling out the genoa. We also needed to clear the cobwebs from our heads and try to remember how it was, exactly, that we rigged all those lines.

We used to use the whisker pole a lot when we were in the Caribbean, and occasionally when crossing the Pacific, but it has been at least two years since we last deployed it. How did we route the fore guy? What line did we use for the aft guy? (I didn't make a mat out of that line, did I?) What height should the pole be for the old genoa? Which blocks did I use last time? Lots of things to figure out again, but I suspect we will be using it a lot when we begin crossing the Indian Ocean next July, so it was good to get it all organized again.


pole rigged


We have an extendable pole that is mounted on a track on the front of the mast. When stowed in place, the car for the inboard side of the pole is located at the top of the track, and the outboard end is locked in place at the lower end of the track. Here is how we rig it to pole out our genoa.

We tie a four foot section of line to the lifelines just aft of the bow pulpit. This will be used to restrain the outboard end of the whisker pole and keep it from swinging around and smacking something or someone while we're deploying it.

We next route the fore guy and attach one end to the bottom of the whisker pole. The topping lift is always left attached to the outboard end of the pole and runs from there to a block about 2/3rds up the mast and back down to a cleat at shoulder height on the mast. We remove it from its cleat. The aft guy is routed from the cockpit, through a block near our sheet turning blocks, then forward, outside all the shrouds, and tied to the lifeline near the four foot section of line. Both of the genoa sheets are faked out in the cockpit, and the windward sheet is given some slack.

Once I unclip the outboard end of the pole from the mast, Marcie uses the fore guy to control the outboard end of the pole. I use the uphaul control line to lower the inboard end of the pole. As I lower my end, Marcie guides the outboard end towards the line attached to the lifelines. Once it is lowered enough that the outboard end can rest on the lifelines, Marcie uses the short line tied there to keep it in place. She ties a very loose loop around the pole with a reef knot.

I continue lowering the inboard end until it is at the bottom of the track. At this point, the pole is nearly horizontal and resting on the lifelines with the opening of the jaw facing upwards. The fore guy is attached to the underside of the pole and the topping lift is attached to the top of the pole.

Marcie uses a bowline to attach the aft guy to the underside of the pole and clips the genoa sheet into the jaw, making sure the release pin is locked shut. I slack off on the topping lift and pull on the line that extends the pole as Marcie helps it along on her end. We extend the pole to the length of the J dimension of our headsail – the distance from the bottom of the headstay to the mast – whether we are using our 90% yankee or our 120% genoa. On Cups, the J dimension is 20 feet, so the pole is extended about 8 feet beyond the lifelines. We have a mark on the pole that indicates how far it is to be extended, and when it has been extended to the correct length, I cleat the extension control line.

Marcie now heads back to the cockpit and takes in the slack on the fore guy and aft guy. Once she has them secure, I release the line holding the pole to the lifelines, return to the mast and raise the outboard end of the pole using the topping lift, while Marcie uses the two guys to keep the pole from swinging too much as it is raised. We want the pole to be about the height of the clew when the sail is unfurled, which is different for the yankee and the genoa. I have the topping lift marked in two places, so I know when the outboard end of the pole is the right height for either. Once it is at the correct height, I cleat the topping lift.

Next, I use the uphaul to raise the inboard end of the pole until it is at 90 degrees with the mast. As with the topping lift, I have marked the uphaul control line, so I know what height it should be for either headsail. Finally, both the uphaul and downhaul lines are cleated tight, and the guys are adjusted until the pole is at the desired angle to the wind.

The headsail is unfurled in the usual way, except that the sheet is winched aft until the clew just reaches the pole. We make sure that the clew is not winched so tightly that the knot attaching the sheet to the clew becomes wedged in the jaw of the pole.

As the apparent wind direction changes, we adjust the angle to the wind using the guys. The headsail can be reefed down or furled as needed.


pole lines


Jibing takes a bit of time. Let's say we are jibing from a starboard tack to a port tack. First, the headsail must be furled. The extended pole is too long to clear the deck behind the baby stay on Cups, so it must be lowered, secured to the lifeline again and retracted. The sheet is unclipped. The aft guy is removed and rigged on the port side. Since Cups is a cutter rig, the fore guy must be untied and rerouted from the port side of the boat as well. Another 4 foot line is attached to the lifeline on the port side, then the inboard end of the pole is raised back up towards the top of the track until the other end of the pole can be swung to the port side, where it is secured to the lifeline with the short line. Then the process is the same as before.

Like most things, it only seems complex until we've done it a few times and worked the kinks out. The first time we ever rigged the pole, it must have taken us an hour while we figured everything out. We've changed a few things to make the process easier, and both of us know what we are each supposed to do, so we can usually get the pole up in a few minutes – less time than it takes to read this blog post... or at least this is how long it will take once we get ourselves retrained and organized again.

The Blue View - Anchor Alarms

manual anchor alarm  

We routinely use an anchor alarm when we are on the hook. This is an alarm that goes off if we drift too far from our current position, warning us that we are either dragging our anchor or that the wind has shifted significantly. It is an especially good thing to have when we are anchored in an anchorage with less than optimal holding, in a small anchorage that has rocks or other hazards within swinging range of our anchor, or if there is bad weather in the forecast. It's also a good thing to have when the holding is good, the anchorage has plenty of swinging room and the forecast is benign – because you just never know.

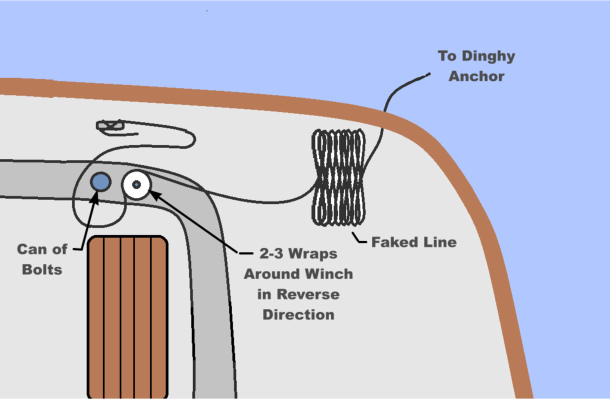
When we first started cruising, GPS's were more expensive, less accurate and real power hogs, and didn't make the best anchor alarms. We learned from an old salt how to make a manual anchor alarm that usually worked pretty well. We would start with a small dinghy anchor and about 200 feet (60m) or so of small, non-floating line attached. Once we were anchored and settled in, we would drop the dinghy anchor over the stern and attach the bitter end to a cleat. Then we would wrap the line 2-3 times around a winch in the reverse direction, leaving about 6' (2m) of slack between the bitter end and the winch, and fake the remaining line on the aft deck. By wrapping it in the reverse direction, when the line is pulled in the direction of the anchor, the winch turns, making the clicking noise. If the main anchor dragged or if the wind shifted and the boat drifted more than the length of the line, the dinghy anchor would stay put until all the slack was played out, then the winch would turn until the extra line between the winch and the cleat was taut. The clicking noise of the winch wasn't enough to wake us from a sound sleep, especially if the wind was howling, but if we took something that would make a lot of noise if it got knocked over, like a can of bolts, and rigged the slack in the line so that it would knock the can over when it went taut, we were sure to wake up if we were dragging. We had a lot of false alarms, but it always let us know if we were dragging or if the wind shifted and we were in danger of running aground.

Now, of course, we have several GPS's aboard that have automatic anchor alarm features built in, and the accuracy has gone from a few hundred feet to something like 6 feet, so we no longer need to use the manual system. We have a couple of anchor alarm apps for our tablet as well. They are quite sophisticated, with lots of bells and whistles, and are quite fun to set up and play with. I'm not quite ready to trust them yet, however. Our iPad often loses its GPS fix below deck. Sometimes, it gets preoccupied and forgets to update its position. Sometimes it gets a bad fix and suddenly thinks we are somewhere else for a for a short period. Also, since it uses considerably more power when using the GPS feature and it must be left on continuously, it needs to be plugged in. I really like our tablet, but I still think of it as a backup system and am a bit wary of depending on it entirely.


normal arc


Instead, we keep one of our handheld GPS's plugged in by our berth and set the alarm every night we are at anchor. If the anchorage is large with no hazards to worry about and the holding is good, we set the allowable distance quite large. If there is limited swinging room or there are any hazards downwind, we set the leash quite small. This makes for more false alarms, but false alarms are a reasonable trade-off for increased reaction time if there should be a problem. By having the GPS at the bedside, not only are we assured of hearing the alarm, but a quick glance at the display will quickly tell us if we have an actual problem or whether the alarm is due to a small benign wind shift.


wind shift


We set the GPS to display our position graphically, then zoom in so that the page resolution is 200 feet (60m) or so and turn the tracking on. After a few hours, the display should show a nice arc as the boat swings at anchor. The graphic display will clearly show a large wind shift or if we are dragging. Each morning, if we are staying another day, we clear the tracking history, which clears the old track and starts a new one.


dragging


We have used the anchor alarm every night since leaving Adelaide. The combination of a new, unknown anchor, anchorages known for their bad holding, no shortage of hazards, and strong winds have made us especially diligent. We had several false alarms due to small wind changes, but during our first night in Kingscote harbor at Kangaroo Island, the alarm clearly showed we were dragging our anchor. We hustled on deck, but by the time we got there, the anchor had caught again and stopped dragging. We reset the alarm and kept an anchor watch for an hour or so. When we didn't drag again, we went back to bed knowing our anchor alarm was watching out for us.