The Blue View - Turning the Boat in its Own Length

Just to remind you that we do live on a sailboat and though we're currently in the middle of the desert, we're still thinking about sailing …. We took a course when we were first learning to sail called “Basics of Bareboat Chartering”. After successful completion of the course, we would supposedly be qualified to charter a boat on our own for a week or so in some exotic place like the British Virgin Islands. It was a fun course – we actually got to live aboard our classroom for four days - and we learned a lot about sailing. One of the things the instructor taught us was torque turns, which is a technique that allows you to turn a boat 360 degrees in an area no longer than a boat length. This is a very useful maneuver. We have used torque turns on dozens of occasions to turn Cups around in a tight marinas, or to line Cups up with a slip when there was no maneuvering room.


torque turn


When making a torque turn, we depend on the boat's propeller walk to help turn the boat. Prop walk is the tendency of the boat to rotate when it is first put in gear, and is much more pronounced in reverse than in forward. If the boat has a right-handed prop (i.e. the prop turns clockwise when viewed from the stern), the prop walk in reverse will cause the stern of the boat to swing to port. Conversely, if the boat has a left-handed prop, the stern will rotate to starboard when the boat is put in reverse.


prop view


Nine of Cups has a left-handed prop, so when we put the engine in reverse, the stern of the boat has a tendency to move to starboard. To do a torque turn with Cups, we turn the wheel hard to port, then put the engine in forward. The boat will start moving forward and to port. As soon as we start moving forward, I move the throttle to idle, put the engine in reverse, and then put the throttle at about half full speed. Cups will stop moving forward, but before there is any perceptible movement backwards, the stern will start rotating to starboard. As soon as the boat starts moving backwards, I again move the the throttle to idle, shift to forward and apply half throttle. As this process is repeated, Cups will rotate in place in a counterclockwise direction. If your boat has a right-handed prop, you would turn the wheel hard to starboard, and the torque turn will rotate the boat clockwise.

There are a couple of potential complications to keep in mind when doing a torque turn. We've learned the hard way that the wind and current have a major effect on how successful the torque turn will be. For example, it is very difficult to turn Cups' bow into even a moderate wind using a torque turn. The best we are able to do is get Cups broadside to the wind while she is being blown downwind. I learned this when we had had Cups only a few months, and I was trying to get us out of a tight marina in St. Pete. We provided the evening's entertainment for dozens of cruisers enjoying sundowners at a tiki bar there. I think we could have dropped anchor between two waterside tables and bought a round of drinks while I figured out how to extract us.
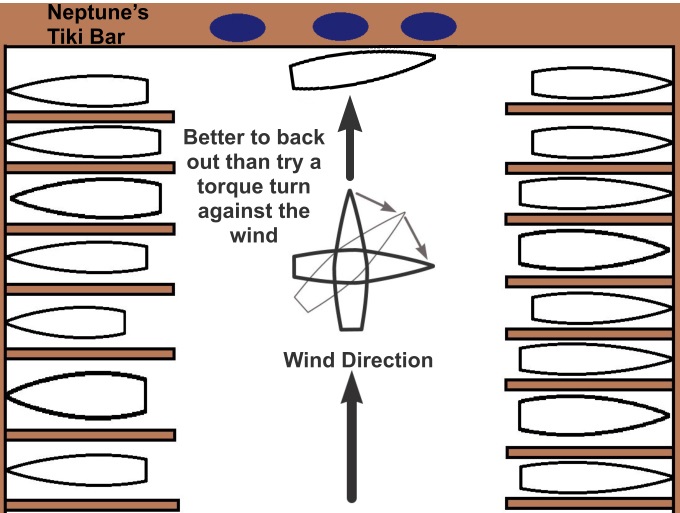
 

windy torque turn


Likewise, if there is a current, Cups will do a very nice torque turn while moving down-current at whatever speed the water is moving. I learned this a few months later when I was trying to line Cups up with a Travelift slipway. I did a great torque turn before realizing there was quite a strong current. By the time I got us perfectly aligned, we were about a boat length downstream of the slipway.

In most circumstances, the technique works very well. When it doesn't, I'd like to devise a clever way of quickly covering Cups' nameboards. I need to give that some thought.
The Blue View - Controller for the Daytank

The purpose of the fuel pump is to deliver diesel from the main fuel tank(s) to the injector pump. If the fuel contains air bubbles or the flow is restricted or interrupted, the engine will sputter and quit. One of the advantages of a daytank is that it can give us a little warning if the fuel pump stops delivering fuel, but only if we have a way of detecting when the fuel level in the daytank is low. As it turns out, adding a low fuel alarm to a daytank is quite easy. There are several fuel tank gauges available that incorporate a built in alarm. If the fuel level in the daytank drops below a certain level, an LED on the gauge lights up. Some have built-in audible alarms and some allow an external alarm. These gauges can be purchased with the sending unit or will work with most standard sending units.

It would also be nice to control the electric fuel pump automatically. The ideal controller would turn the fuel pump on when the fuel level in the daytank drops to a certain level, then turn the pump off when the fuel level rises above another predefined level. It should also incorporate a low fuel alarm and have an overflow alarm in the event the fuel level gets too high.

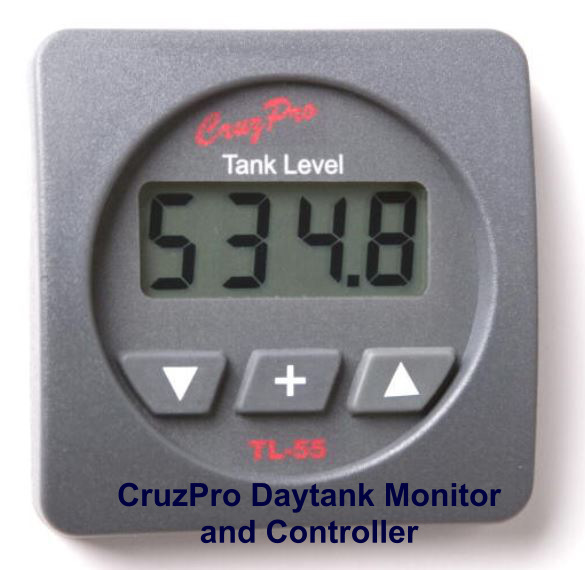
There are a few controllers available that do all of that. One in particular, the TL-55 from CruzPro in New Zealand is an inexpensive unit that appears to be well designed. The controller costs about $120USD. Add to that the cost of the sending unit, shipping, the cost of other incidentals like wire, a fuse and connectors, etc. and the entire unit will probably be just around $200USD.


cruz pro controller


Another alternative is to build your own controller. If you are handy with a soldering iron, it is not that difficult. It took about two days to build the controller for my daytank, and ended up costing about $50USD. The design is quite straightforward and has been working quite well for several years now.

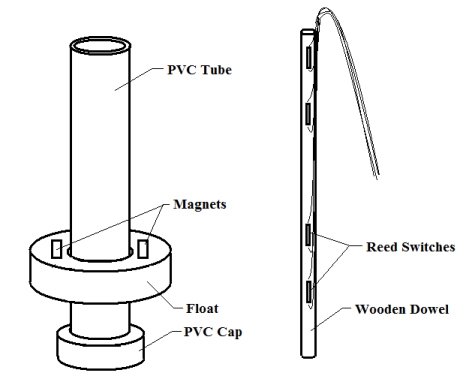
The figure below shows the level sensor portion of the controller. I used magnetic actuated reed switches that open or close when a magnet is in close proximity. The float, which has magnets epoxied to it, moves up and down with the level of the fuel. As it passes a reed switch, the switch closes.


controller sensor


The controller itself is housed in a plastic case. The three LEDs give an indication of the fuel and pump status. I attached the controller to the daytank. I also configured a remote LED and alarm in both the cockpit and the Nav station.


daytank with controller


The complete design documentation, including schematics, parts list, assembly details and photos are contained in a separate document, which you can find on our website at http://www.nineofcups.com/boatprojects.html.

To help with the process, here is our three part playlist on Soldering Basics:


Daytank Series Pt. 1

Daytank Series Pt. 2

The Blue View - Adding a Daytank

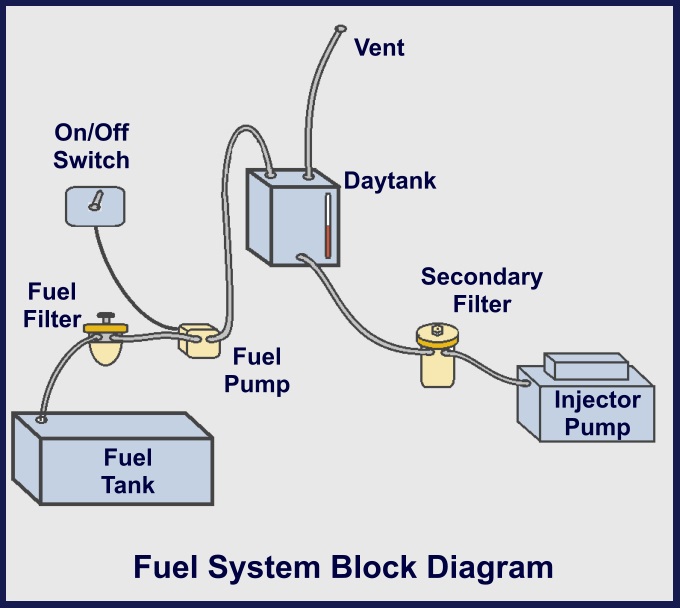
If you have decided to add a daytank to your engine, there are a few decisions to be made. The first decision is how fuel will be transferred from the main fuel tank to the daytank. One option is to use the existing engine lift pump. This is simple and inexpensive, but has two drawbacks. If the daytank is low on fuel, it takes a long time and a lot of hand pumping of the lift pump to transfer an adequate amount of fuel into the daytank. The second drawback is that once the engine is running, the rate of fuel transfer will be greater than the rate of fuel consumption by the engine, and eventually the daytank will overfill. To prevent the fuel from overflowing through the vent hose, a fuel return line must be added from the daytank back to the fuel tank. This return line could be tee'd into the existing return line, but the hose diameter may have to be increased to allow for the extra fuel flow. The other option for transferring fuel is to use an inexpensive electric fuel pump. An electric fuel pump will quickly fill the daytank. It can be controlled using a simple On/Off switch or a controller can be incorporated that will automatically keep the fuel at the desired level. Alternatively, the pump can be run continuously whenever the engine is running, as long as, as before, a large enough fuel return line is added. The sketch below is a diagram of a very simple implementation using an electric fuel pump.


block diagram


The second decision is how large the tank should be. If your vessel is a typical sailboat, a daytank that holds 3-4 gallons (12-16 liters) will provide at least a couple of hours of motoring. If you have a power boat or large motorsailer, you will probably need a larger tank and/or an automatic controller.

The daytank must be mounted higher than the engine. Ideally, there is enough space in the engine room above the engine, but it can be located elsewhere. As I mentioned in the previous blog, I have seen other boats that had the daytank mounted in the lazarette. The fuel pump should be between the primary filter and the daytank, and the secondary filter(s) should be between the daytank and the engine. The daytank should be securely mounted for obvious reasons. A vent hose should be provided, and it should be vented outside the boat.

The next decision is what material the daytank should be made of. In my opinion, aluminum is the best choice. I made a temporary daytank out of plywood and epoxy which held up for more than five years, and had planned to replace it with a custom aluminum tank while we were in Australia. I found one online, however, at a race car supplier's website. It was quite inexpensive, came with all the necessary fittings already welded in place, and was the perfect size. I added a sight glass to the front using plastic barbed fittings and clear plastic tubing. I can tell at a glance how much fuel is in the daytank by the level in the sight glass.


daytank fittings


Our original daytank used an electric fuel pump which was controlled by an On/Off switch. The tank held enough fuel to motor for about an hour and a half. We always checked the sight glass before starting the engine, and topped up the daytank as necessary. When we were motoring, we would set a timer to remind us when it was time to refill the daytank. When the timer went off, we would then flip the fuel pump switch on until the tank was filled. Once it was filled, the timer was started again. This system worked flawlessly 95% of the time. Sometimes, however, something would go wrong. I'd turn the pump on, then make a cup of coffee while it was filling and forget to turn it off. Sometimes one of us would forget to restart the timer, or the timer would stop running, and the daytank would run out of fuel.

We had problems often enough that I thought it worthwhile to add a controller. The next blog will provide the details of how to make an automatic controller for the daytank.

Daytank Series Pt. 1

Daytank Series Pt. 3