

The Blue View - Adding a Daytank
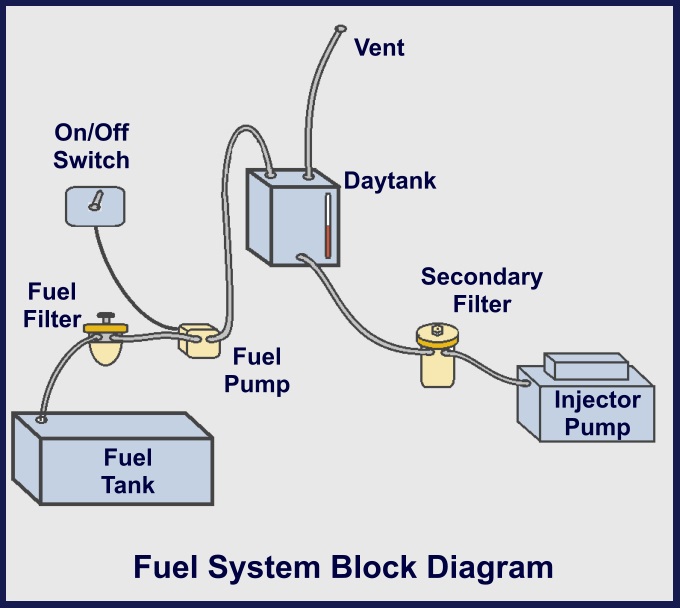
/If you have decided to add a daytank to your engine, there are a few decisions to be made. The first decision is how fuel will be transferred from the main fuel tank to the daytank. One option is to use the existing engine lift pump. This is simple and inexpensive, but has two drawbacks. If the daytank is low on fuel, it takes a long time and a lot of hand pumping of the lift pump to transfer an adequate amount of fuel into the daytank. The second drawback is that once the engine is running, the rate of fuel transfer will be greater than the rate of fuel consumption by the engine, and eventually the daytank will overfill. To prevent the fuel from overflowing through the vent hose, a fuel return line must be added from the daytank back to the fuel tank. This return line could be tee'd into the existing return line, but the hose diameter may have to be increased to allow for the extra fuel flow. The other option for transferring fuel is to use an inexpensive electric fuel pump. An electric fuel pump will quickly fill the daytank. It can be controlled using a simple On/Off switch or a controller can be incorporated that will automatically keep the fuel at the desired level. Alternatively, the pump can be run continuously whenever the engine is running, as long as, as before, a large enough fuel return line is added. The sketch below is a diagram of a very simple implementation using an electric fuel pump.
The second decision is how large the tank should be. If your vessel is a typical sailboat, a daytank that holds 3-4 gallons (12-16 liters) will provide at least a couple of hours of motoring. If you have a power boat or large motorsailer, you will probably need a larger tank and/or an automatic controller.
The daytank must be mounted higher than the engine. Ideally, there is enough space in the engine room above the engine, but it can be located elsewhere. As I mentioned in the previous blog, I have seen other boats that had the daytank mounted in the lazarette. The fuel pump should be between the primary filter and the daytank, and the secondary filter(s) should be between the daytank and the engine. The daytank should be securely mounted for obvious reasons. A vent hose should be provided, and it should be vented outside the boat.
The next decision is what material the daytank should be made of. In my opinion, aluminum is the best choice. I made a temporary daytank out of plywood and epoxy which held up for more than five years, and had planned to replace it with a custom aluminum tank while we were in Australia. I found one online, however, at a race car supplier's website. It was quite inexpensive, came with all the necessary fittings already welded in place, and was the perfect size. I added a sight glass to the front using plastic barbed fittings and clear plastic tubing. I can tell at a glance how much fuel is in the daytank by the level in the sight glass.

Our original daytank used an electric fuel pump which was controlled by an On/Off switch. The tank held enough fuel to motor for about an hour and a half. We always checked the sight glass before starting the engine, and topped up the daytank as necessary. When we were motoring, we would set a timer to remind us when it was time to refill the daytank. When the timer went off, we would then flip the fuel pump switch on until the tank was filled. Once it was filled, the timer was started again. This system worked flawlessly 95% of the time. Sometimes, however, something would go wrong. I'd turn the pump on, then make a cup of coffee while it was filling and forget to turn it off. Sometimes one of us would forget to restart the timer, or the timer would stop running, and the daytank would run out of fuel.
We had problems often enough that I thought it worthwhile to add a controller. The next blog will provide the details of how to make an automatic controller for the daytank.