The Blue View - Carved Name Boards - Part 2

Hand Carved Lettering

I have a basic set of woodcarving tools: a set of wood chisels ranging from 1/4” to 1” and a starter set of short-handled carving tools, which do the job nicely and don't cost all that much. I also have a set of small files and rasps to remove cutting marks. Marcie made a nice roll up pouch to keep them all in. Photo 1 shows my complete set of woodcarving tools.

davids handcarving tools

To keep them sharp, I use a small sharpening stone for the chisels and some sharpening compound applied to a small felt disc mounted in my Dremel rotary tool for the spoons and gouges.

All basic letter carving can be done using four basic techniques – carving vertical line segments, horizontal line segments, diagonal line segments and lastly, curved line segments. Wood reacts to the carving tools differently depending on whether you are carving with the grain or across the grain, and each individual piece of wood will be slightly different than another seemingly identical piece  depending on its age, tightness and direction of grain, dryness, and other factors.

To practice the different techniques, first draw the four symbols shown in Photo 2 on a piece of wood. Each symbol is about 2-1/2” high by 1/2” wide. I used a straightedge for the first three symbols, and a compass to draw the fourth symbol with an outer circle of 2-1/2” in diameter and an inner circle of about 2”.
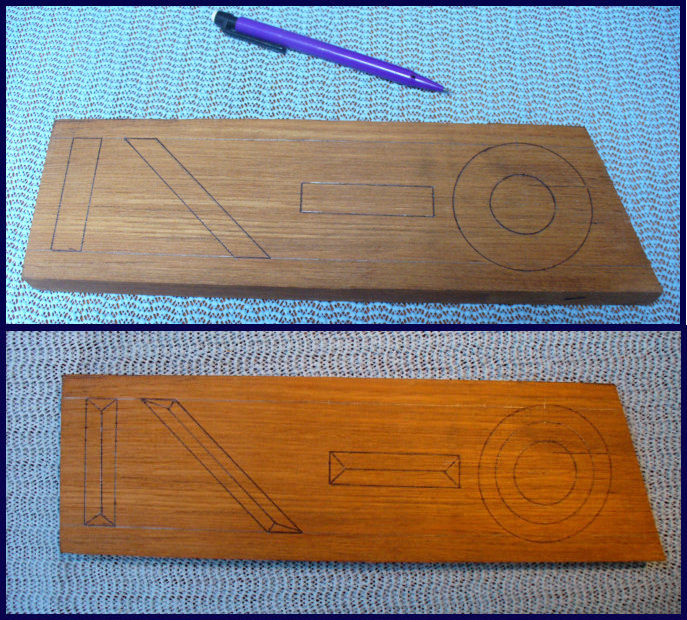
the four symbols

Next draw the lines in the center of each symbol as shown in the lower view of Photo 2. These are called split stop lines, because they will prevent the wood from splitting beyond them. In the first symbol, draw a line from each corner until they intersect. Then draw a vertical line between the intersection points. The third symbol is done in the same fashion.  In the second symbol, draw lines from each corner that bisect the angle. They will be different lengths. Connect the intersection point with a line along the center of the symbol as shown. Finally, the split stop line for the fourth symbol is another circle with a diameter of 2-1/4”.

defining the split stop

Begin carving the first symbol by defining the split stops. Place your 1” chisel at its intersection with the upper diagonal split stop lines. Holding it at 90 degrees, hit it with the mallet until you have a groove about 1/16” deep. Move the chisel down and repeat until you reach the lower intersection point. For the diagonal lines, use a smaller chisel, and place it along one of the lines. You want to make a cut that just breaks the surface of the wood at the corners and is about 1/16” deep at the intersection points. Repeat for each of the remaining diagonal lines.

begin carving

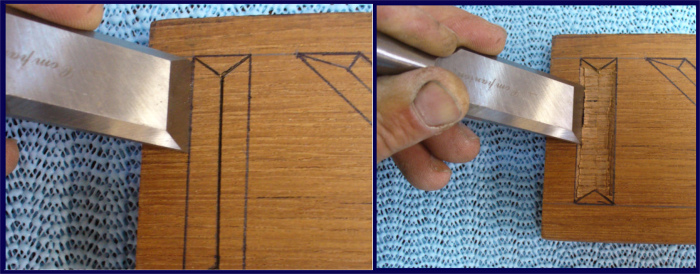
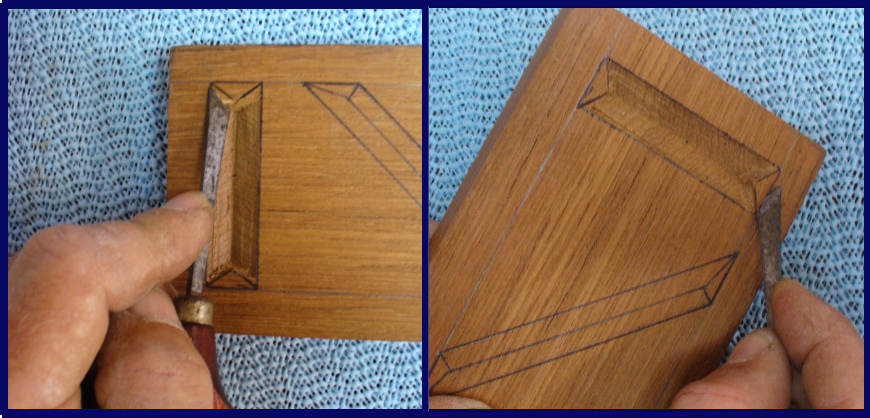
Next, place your 1” chisel on the left line of the first symbol at a 45 degree angle. The chisel should be about even with the top intersection point. Lightly tap it with the mallet 2 or 3 times. Now move the chisel to the next part of this line and again tap it with the mallet, and repeat until the chisel is even with the lower intersection point. Now rotate the board 180 degrees and do the same on the other vertical line. You are going to repeat this process on each vertical line until they form a V-shaped valley with a clean, straight line at the bottom.

Next, carve the triangular sections at the top and bottom of the symbol. Using your small angled chisel, carve out the small triangle remaining on each vertical line. Then gently...very gently...slice along the top horizontal line. If it resists you and begins to split, try working from the other direction. Continue carving the wood away until the small triangle at the top of the symbol descends to the intersection point.

chiselling

Use the angled chisel and small files until the symbol has smooth straight sides and straight clean lines. As a final step, use 80-100 grit sandpaper to remove any imperfections.

Carving the diagonal symbol is done in the same manner, except the wood will have more of a tendency to split outside the lines and the sides of the cut will not be as smooth. You will have a bit more control if you carve towards you rather than away.

Carving the horizontal symbol is the next level in complexity and requires a different approach. As you carve the long horizontal lines with the grain, the wood will want to start splitting away from the line. Make sure you have freshly sharpened chisels. Start as before by defining the split stop lines with the chisel and mallet for the center line and the small angled chisel for the diagonal lines. Next use the angled chisel to carve the two triangle shapes at the ends of the symbol. Carve from the outside vertical line to the intersection point, maintaining the 45 degree angle.

Continuing with the angled chisel, place it at a 45 degree angle about 1/4” from the intersection at the right and about 1/16” from the center line, and slice parallel to the center line towards the left intersection. Do not get closer than 1/4” from either intersection. Rotate the board 180 degrees and do the same on the other side of the center line. Continue making passes on each side as you slowly back away from the center line towards the outside lines. Be careful, as you near the outside lines, to avoid splitting the wood outside the lines. Keep the angle consistent and eventually you will have the V-shaped trough. Clean the sides and lines with a chisel, then file and sand as before.

the harder parts

To carve the last symbol, yet another technique is used. Begin with your smallest chisel and mallet, and maintaining a 90 degree angle, score the center line about 1/16” deep all the way around the circle. As before, the wood is most likely to split as you carve closer to the grain, so to control this tendency as much as possible, begin your cuts at these points. Using the small angled chisel, start at the most southerly point of the of the inside circle and slice at a 45 degree angle towards the center, working in clockwise direction, stopping at due west. Then returning to the south , slice in a counter clockwise direction stopping at due east. Next go to the most northerly point of the inside circle, slice the northeast quadrant first, then the northwest quadrant until the first pass is completed. Do the same for the outside circle, in the same order, and slicing towards the center line. Be very careful. It is easy to tear or split the wood outside the line.

Once the inner and outer lines have been defined, work away from the center line towards the smallest circle. Make several passes, working gradually outward until the inner circle is reached. Now carve from the outside radius towards the center line. Make several passes, working slowly and patiently, carving a little each pass. Alternate with the angled chisel and a gouge, working towards the center line until the V-shaped trough begins to form. Clean the sides and center line with the various shaped chisels, then file and sand until it is perfect.

nicely done

Photo 7 shows the completed practice carving. Allow yourself a few minutes to admire your fine work, then flip the board over and repeat the entire process on the other side. This not only gives you a bit more practice to hone your skills, it also gives you a chance to practice with a grain that runs differently than the first side.

Carving Script Letters and Graphics

Script letters and graphics are often easier than carving block letters because the eye will catch every flaw in a block style letter whereas in script and graphics, the eye is more forgiving of minor flaws and discrepancies.

For carving script letters, the process is almost the same as for block letters. Each line segment should have a split stop line. The straight-line segments will have split stops just as in a block letter. The curved segments will have split stop lines that follow the center of the curve. Use the same techniques as for the exercises, paying close attention to the direction of the grain.

Carving the graphics has a somewhat different approach. Practice making the logo or graphic on a scrap piece of wood before carving it on the name board. I only used split stop lines on line segments that are wide and for which the 45 degree V-shaped trough is desired. Otherwise, I used the various carving tools, especially the spoon shaped gouges, to carve out the image. I worked from the higher parts to the lower or deeper parts, rotating the board frequently as the angle to the grain changed.

Carving the lettering on the name boards are an extension of carving the basic shapes - vertical lines, diagonal lines, horizontal lines, curves and graphics. Use the same techniques for each line segment.

Stay tuned for Part 3 – Gilding the Lily

The Blue View - Carved Nameboards pt. 1

A touch of elegance

In my mind, there is nothing that adds more elegance to a boat than a carved name board. No matter whether it is a traditional schooner or a state of the art racer, the sun reflecting off the glossy varnish and gold leaf always looks beautiful. When we moved aboard Nine of Cups 15 years ago, I decided to make our own name boards, and after a lot of trial and error, ended up with our own touch of elegance. While it took a bit of time, it was easier than I thought it would be and we were quite pleased with the results.

It took the better part of a year to make our name boards. I worked on them in various ports as we cruised the east coast of the U.S., Maritime Canada and the Bahamas. It was a labor of love, and I wasn't in a hurry.

There were several steps required between visualizing what we wanted and actually mounting the finished name board:

Designing the lettering and graphics/logos. We looked at a lot of other name boards – what we liked and what we didn't. Some were too small and looked ludicrous, while others were too large and garish. For Nine of Cups, a 45' cutter, we chose to make each name board 44” long by 6” high, with 3.5” letters. The font we selected was Times New Roman in a bold typeface, and we added a stylized seahorse to the beginning and end  of the name.

name board design

Selecting the wood; Cutting, shaping and sanding the wood. When we were in Nova Scotia, we found an old time lumber yard that had a nice selection of rough cut hardwoods. We chose a couple of choice sections of mahogany, which the yard was happy to plane down to the thickness I wanted. I used my jig saw and sandpaper to cut and shape the wood to size. I also drilled and countersunk the two mounting holes I would be using later.

Transferring the pattern to the wood. Using my computer and MS Office, I increased the font size until each letter was 3.5” high, and used MS Paint to increase the size of the seahorses. Then I printed them, and taped everything together in a long banner. I taped the banner to the front of each piece of wood, slid sections of carbon paper under the banner and traced the outlines of the letters and seahorses. The carbon paper left a very visible image on the wood.

Carving the letters and graphics. It would have been quicker to use a Dremel tool and a pantograph to cut the lettering into the wood, but I don't think the end result is as good as hand carving the lettering. Some of the automated systems can cut lettering that is indistinguishable from hand carved work, but I didn't have access to any of these systems. I chose to hand carve the lettering and graphics. I got a book on the subject and learned on a scrap piece of wood. Part 2 of this blog will go into more detail about the technique I use.

hand carving

Finishing the wood. The first few times I finished the name boards, I used a base of clear West System epoxy (2 coats), covered with 12 coats of Epiphanes varnish. I lightly sanded it and added a couple coats of varnish every six months or so, and it typically lasted about 3 years before it needed to be stripped down and re-coated. The last two times, I used a New Zealand marine aliphatic urethane based finish called Uroxsys (now marketed by Awlgrip as  Awlwood MA). It seems to last closer to five years, requiring a maintenance coat only every two years or so.

Applying the gold leaf. Gilding the lettering and graphics with gold leaf was another skill I learned while making the name board. Like wood carving, I first practiced on a scrap piece of wood, and also like wood carving, it is a subject that deserves a blog of its own. Stay tuned for Part 3 of this blog.

gold leaf

Outlining the lettering. The final step is to outline the lettering and graphics with a contrasting color. Outlining provides a sharp edge to each letter, and makes it appear to come into focus. Any contrasting color will do, but since our sheer stripe is dark blue, I used the same color for outlining our name boards. I decant a small amount of paint in a disposable container (anything from a tuna can to a bottle cap will work), then use a fine artist's brush to outline each letter and seahorse. It takes a little practice, so, as before, I used a scrap piece of wood initially.

outlining the lettering

Mounting the finished name boards. Our name boards were to be mounted on our sheer stripe. I drilled slightly oversized holes through the bulwarks, and coated the insides of the holes with epoxy, using a Q-tip. I used spacers between the name boards and the topsides to allow air and water to pass behind the name boards. Then I mounted each name board with 1/4” flathead bolts.

mounting the nameboard

Enjoying the result. The end result was and is great. Seeing the glittering gold of the name boards reflecting in the sunlight as we dinghy back to Cups always brings a smile to my face.

final result

The Blue View - Sticky Stuff

In a recent Blue View, I extolled the virtues of WD-40 and duct tape, two essentials for the yachtie's tool kit. As I was writing it, I thought about all the other sticky stuff I use routinely on Nine of Cups, without which, I seriously wonder whether I could keep the old girl afloat. Here is my list of the top 10 sticky substances most used aboard Nine of Cups. variety of sticky stuff

Duct tape. I've already talked about duct tape and some of its many uses aboard. It's been used by sailors for a long time – I'm pretty sure Ulysses used duct tape to lash himself to the mast as he sailed past the Sirens. Seriously, it is good for temporary fixes and stopping leaks until proper repairs can be made. It does have a few shortcomings – it doesn't stick well to wet surfaces and if left in the sun for more than a few hours, it leaves a residue that is hard to clean up – but I think this is one of the 2000+ uses of WD-40.

Sikaflex 291/292/3M-5200. These are polyurethane based adhesives, sealants and bedding compounds. I always have a tube or two aboard. In the time we've been here in Durban, I've used almost a whole tube to re-bed, seal around, and/or stop leaks with two hatches, one rope clutch, the instrument box, a new propane regulator, and one leaking portlight. Plus, I think I could use it to seal all my body orifices if ever I found it necessary to take a dip in the smelly, oily water here in the marina.

J.B. Weld - 5 Minute Epoxy. Great for temporary fixes and the occasional permanent fix. I've used it to reattach the internal magnets in our wind generator, temporarily seal a small leak in a fuel tank, and hold two fiberglass parts together long enough to make a more permanent glass and mat repair.

West System Epoxy. I have the gallon size container of the resin aboard along with slow and fast hardeners, bonding and fairing fillers and enough glass mat and cloth to lay-up a new boat – well almost. I use it frequently to fill and fair topside holes and dings, protect and bond wood, bond parts to fiberglass, repair hull and deck damage and a host of other things like hardening sea urchin shells that Marcie's collected.

tapes

Masking tape. Whenever we go back to the states, we always bring back a dozen or so rolls of good, 14-day masking tape. The cost of good 3M tape in the U.S. is usually less than the cost of the cheapest masking tape in other countries. I use it for masking when painting, varnishing, epoxying and re-bedding parts.

Self-amalgamating tape. Technically, this isn't sticky, but it serves the same purpose, so I added it to the list. If you wrap this tape around something, making sure to overlap each turn by about 50% and stretching it as you wrap, it will bond to itself and make a watertight seal. It is a great insulator for wire and will seal fittings. It will make a temporary patch for a leaking hose or pipe, and is UV and weather resistant.

Hot melt glue. I use this for holding parts in place temporarily. For example, if I am trying to epoxy some glass mat or cloth onto a vertical or overhead surface, I can tack it in place with several small blobs of hot melt glue, then apply the epoxy. I also use it frequently for tacking wires down, especially inside enclosures.

Modeling clay. I use it to make dams and molds for epoxy. For example, there are times when I want to fill an old hole in the deck – maybe the the new replacement part doesn't fit the old holes – but the old hole goes all the way through the deck. If I pour thickened epoxy into the hole, it will drip out the bottom. I can prevent this by plugging the hole from the bottom with modeling clay. I've also cast a few small parts like bushings and pads for cheek blocks by carving a template of the part in a bar of soap, then pressing modeling clay around the template. Then I  extract the carved soap from the modeling clay, and fill the new mold with thickened epoxy.

Tef-Gel. This is a sticky, gooey substance that prevents corrosion when dissimilar metals come in contact with each other. For example, when a stainless bolt is screwed into an aluminum part, the combination of the sea air and/or saltwater and the contact between the two metals will cause galvanic corrosion. In short order, it will either become impossible to remove the bolt or the aluminum part will deteriorate. If the bolt is first coated with Tef-Gel, the corrosion will be prevented.

band aids

Band-Aids. I am, without doubt, clumsier than most people. I rarely finish a project without cutting, gashing or wounding myself in some way, and I go through a lot of Band-Aids. At some point in the last couple of decades, the size of the standard Band-Aid was reduced in width from 1” to 3/4”, and the gauze pad was reduced to the size of a pencil eraser. These little, puny excuses for a Band-Aid just don't do the job for me.  Even if I could get one of these Lilliputian sized things to stick for more than five minutes, if I had a cut that small, I certainly wouldn't bother with a Band-Aid. When one of us visits the States, along with all those rolls of masking tape, we also pack several boxes of the Tough Strip 1” wide Band-Aids, as well as a few boxes of the 2” wide versions.