The Blue View - Repairs in Exotic Places...Again

In Marcie's recent blog about our trip down the Wild Coast to East London, she mentioned we broke a few sail slides – 12, in fact. While it isn't all that unusual to break a few sail slides, this may be a new record for Nine of Cups. BVRepairsAgain Broken Slides

One side of each sail slide is attached to the mainsail with webbing. The other side of the slide is t-shaped, and fits into a groove, or track, on the mast. As the name implies, the sail slides slide up and down inside the track, allowing the sail to be raised and lowered. I use mainly nylon sail slides, with the occasional stainless version at high stress points. The nylon sail slides can handle anything the mainsail is likely to encounter, unless the sail starts to flog. The stainless slides are indestructible, but have a tendency to jam-up when trying to reef or lower the sail off the wind, so I use them sparingly. I prefer replacing the occasional broken sail slide to being unable to lower the sail when it's time to reef down.

I keep an inventory of sail slides on hand. I had 20 spares when we left Tasmania a couple of years ago, but when I checked my parts bin, I found I was down to only nine, two of which were stainless. It is rare that we break more than a couple on a passage, so normally nine sail slides would have been more than enough, but obviously not this time. Unless we wanted to repair our Yamaha outboard, East London doesn't have much in the way of boat parts,  so we weren't able to find anything locally, and having something shipped in could potentially cause us to miss the next weather window. Marcie reminded me, however, that the sail slides on the storm trysail were the same size – I could 'borrow' some from it. Since we weren't likely to need our storm sails between here and Cape Town, this seemed like a good plan.

BVRepairsAgain Stitching

It took an afternoon to make the repairs. The process is simple enough – cut the stitching that holds the webbing, remove the broken slide, then hand stitch the new one in place. We've done it enough times that we actually have a 'How-To' video on the subject. I also discovered two broken and one missing batten, which we will do without until Cape Town.

The other problems were easy to fix:

Malfunctioning vacuum gauge on the engine fuel system – swapped it out with the spare

Handheld autopilot remote was flaky – cleaned the contacts on the cockpit connectors

AIS info not being displayed on the Nav station chartplotter – corrected a baud rate setting that somehow changed since the last time it was used.

All in all, not a bad list of repairs for our passage down the Wild Coast.

The Blue View - Carved Nameboards pt. 3

  The gold leaf is what makes your name board a real work of art. Properly applied, it will last indefinitely, far longer than the varnish (or wood for that matter) under it.

finished nameboard

There are two gold leaf options. One is to use 24 carat gold leaf, which comes in small delicate sheets. The other option is to use a faux gold leaf. The faux gold is much cheaper, and when first applied, looks reasonably good. The problem is that after a month or two of exposure to sea air, it will turn green. In theory, you can prevent this by coating it with lacquer, polyurethane or varnish, but then you lose the bright luster, and when I tried it, the lettering still turned green after a few months. If you are on a tight budget, this may be an acceptable alternative, and you can always remove it and gild it with real gold later. There are other materials that can be used such as aluminum or platinum, which you may want to try at some point, but my preference is to use 24k gold leaf. I have had good results with both Italian and German gold leaf.

I used 1-1/2 to 2 sheets of gold foil per letter for the 3-1/2 inch letters. The leaf comes in books of 25 sheets. The price varies a great deal depending on the price of gold at any point in time. The last time I ordered it, the cost was $50 for a book.

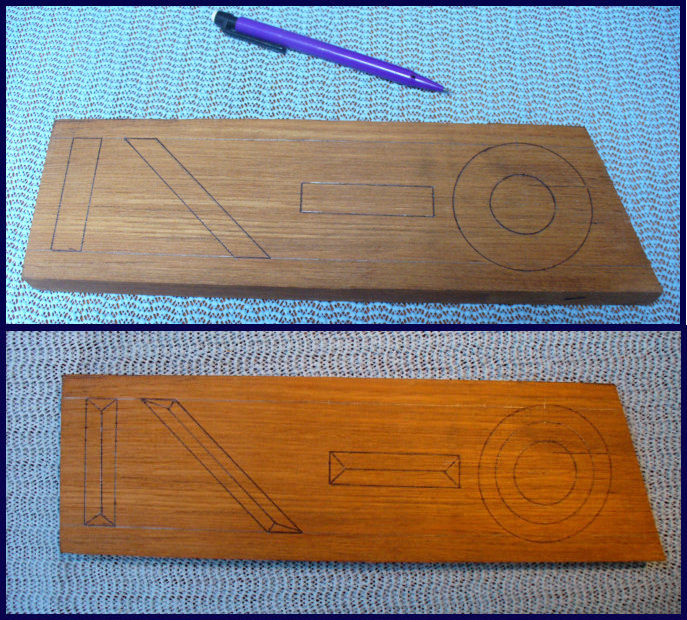
There are three steps to the gilding process. I first applied a liquid called "size" that will cause the gold to adhere to the finish of the name board. Next, I applied the gold leaf, and the third step was to outline the letters.

The gold leaf process has been around for many centuries, and many substances have been used for the size. Years ago, egg whites were used as size when applying gold leaf to glass, and it is believed the ancient Egyptians used human blood for size. As often as I manage to cut or gash myself in the course of some project, I can never depend on having enough blood available at the right time, so I purchase my size.

When you purchase size, you want gold leaf size. It will be available in either a quick dry or slow dry formulation. Once applied, the size will begin to dry, with a wet stage, a tacky stage and finally a dry or cured stage. The leaf must be applied during the tacky stage. If applied too soon, the leaf will become dull. If applied too late, it will not properly adhere. The quick dry size usually has an initial drying time of around 1-1/2 hours, and a tacky stage of about the same length of time. The slow size has a wet stage of about 24 hours and a tacky stage of about two weeks. You can also buy both and mix them to get a tacky stage that is somewhere in between. A ratio of 50/50 will give you a wet time of 8-12 hours and a tacky time of about a week. A ratio of 25% slow to 75% quick will result in a wet time 4 hours and a tacky time of 8-10 hours. I have both types aboard, but now only use the quick size.

The size is a clear liquid and it is difficult to see where it has been applied, so I add some color to it. You can buy a small container of universal tint from most paint stores that is compatible with oil, water and lacquer based paints, but this seems to affect the drying time. I now add a couple of drops of topside paint. White and yellow work nicely. You will also need a small artist’s brush, a mixing stick, a small mixing container – a clean tuna can works well - and something to use as a pallet such as a small square of plastic or piece of metal.

Use 220 grit sandpaper and lightly sand the area to be gilded. You want to remove any roughness, air bubbles or dust that might be on the surface of the finish. Pour a small amount of size into the tuna can. If you are mixing quick and slow size, pour the appropriate amounts of each into the can. Then add a couple drops of the paint or tint. Add only enough colorant to make a yellow or white wash.

applying size

Dip the brush into the size and wipe the excess onto the pallet. Paint the size onto each letter. When the brush is dry, return to the pallet for more, adding more to the pallet as needed. Stay within the letter areas and make sure each letter is entirely coated with size with no holidays (missed spots). When you are done, clean the brush in lacquer thinner and store it flat.

Set the boards in a location away from dust and wait for the size to reach the tacky stage. Depending on the type of size you are using and the mixing ratio if any, you have a rough idea how long this will take, but it will vary depending on the temperature and humidity. You can tell when the size is ready by rubbing a dry knuckle across the surface listening for a squeaking sound, called the whistling tack.

applying gold leaf

Now you are ready to apply the gold. Work in a draft free area. The gold is very light and will blow away with the slightest breeze. For this step, use a larger #10 or #12 artist’s brush. Use the brush to lift the gold from a sheet and place it onto the letter. Use the brush to fold any gold outside the letter back onto the size. Be careful not to let the brush touch the size directly. Gently paste the gold into place. Add more gold as needed until the entire letter is coated. There will be a lot of small pieces that can be gently swept into the small corners and serifs. As you dab and brush the gold into place, it will begin to smooth out and shine. Continue until all the letters are completed. Some small bits will stick to the board outside the letters creating a small shiny spot. These are easily removed within an hour or so of

application using a combination of liquid soap and water on a soft rag.

removing leaf outside the lines

After enough time to ensure the size has completely cured - 24 hours or so with quick size - use a cotton ball to burnish and polish the gold. Use a gentle pressure to go over all the letters to achieve maximum shine. As before, use a liquid soap and water to remove any small bits that have come loose and stuck to the board outside the letters.

The last step is the outlining of the letters. Outlining makes an amazing difference in the appearance of the letters – it enhances the edges and seems to bring each letter into focus. For this step I used a fine #1 artist’s brush, a pallet similar to the one I used for the size, the scrap practice board I carved the symbols onto, and a quality enamel or topside paint in a contrasting color. Black, red and dark blue are all good colors. Since our sheer stripe is a dark blue, this is the color I used.

outlining the letters

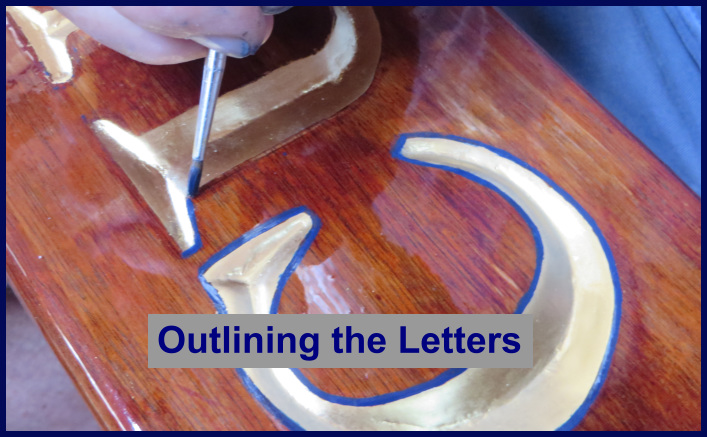
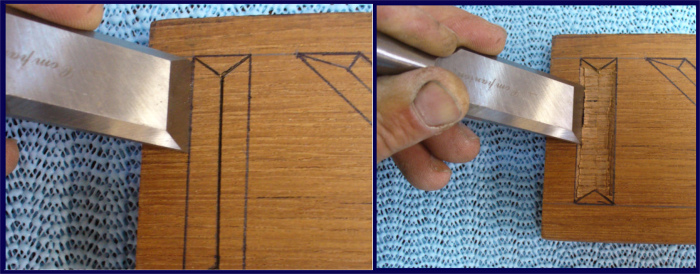
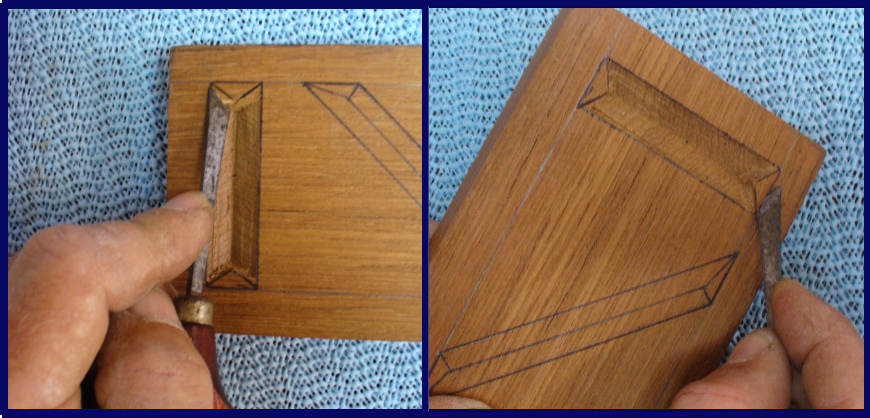
I experimented using the practice piece of wood. If you are right-handed, you should work from left to right to avoid dragging your hand through the paint and vice versa if you are left handed. I transferred some paint from the can to the pallet, wiped the excess off the brush, and pulled the brush along the edge of the letter. For the straight lines, I began at the lower left corner and pulled the brush away from me. Then I did the top and bottoms and finally the right side. For the circle, I started at the 9 o’clock position, pulled the brush to the top of the circle, then did the segment from the 9 o’clock position to the bottom. I replenished the paint after each stroke. After a little practice I was ready to start the name board. With a little patience and using the same technique, I found it to be easier than I expected.

I use this for the size and this for the gold leaf.


The Blue View - Carved Name Boards - Part 2

Hand Carved Lettering

I have a basic set of woodcarving tools: a set of wood chisels ranging from 1/4” to 1” and a starter set of short-handled carving tools, which do the job nicely and don't cost all that much. I also have a set of small files and rasps to remove cutting marks. Marcie made a nice roll up pouch to keep them all in. Photo 1 shows my complete set of woodcarving tools.

davids handcarving tools

To keep them sharp, I use a small sharpening stone for the chisels and some sharpening compound applied to a small felt disc mounted in my Dremel rotary tool for the spoons and gouges.

All basic letter carving can be done using four basic techniques – carving vertical line segments, horizontal line segments, diagonal line segments and lastly, curved line segments. Wood reacts to the carving tools differently depending on whether you are carving with the grain or across the grain, and each individual piece of wood will be slightly different than another seemingly identical piece  depending on its age, tightness and direction of grain, dryness, and other factors.

To practice the different techniques, first draw the four symbols shown in Photo 2 on a piece of wood. Each symbol is about 2-1/2” high by 1/2” wide. I used a straightedge for the first three symbols, and a compass to draw the fourth symbol with an outer circle of 2-1/2” in diameter and an inner circle of about 2”.

the four symbols

Next draw the lines in the center of each symbol as shown in the lower view of Photo 2. These are called split stop lines, because they will prevent the wood from splitting beyond them. In the first symbol, draw a line from each corner until they intersect. Then draw a vertical line between the intersection points. The third symbol is done in the same fashion.  In the second symbol, draw lines from each corner that bisect the angle. They will be different lengths. Connect the intersection point with a line along the center of the symbol as shown. Finally, the split stop line for the fourth symbol is another circle with a diameter of 2-1/4”.

defining the split stop

Begin carving the first symbol by defining the split stops. Place your 1” chisel at its intersection with the upper diagonal split stop lines. Holding it at 90 degrees, hit it with the mallet until you have a groove about 1/16” deep. Move the chisel down and repeat until you reach the lower intersection point. For the diagonal lines, use a smaller chisel, and place it along one of the lines. You want to make a cut that just breaks the surface of the wood at the corners and is about 1/16” deep at the intersection points. Repeat for each of the remaining diagonal lines.

begin carving

Next, place your 1” chisel on the left line of the first symbol at a 45 degree angle. The chisel should be about even with the top intersection point. Lightly tap it with the mallet 2 or 3 times. Now move the chisel to the next part of this line and again tap it with the mallet, and repeat until the chisel is even with the lower intersection point. Now rotate the board 180 degrees and do the same on the other vertical line. You are going to repeat this process on each vertical line until they form a V-shaped valley with a clean, straight line at the bottom.

Next, carve the triangular sections at the top and bottom of the symbol. Using your small angled chisel, carve out the small triangle remaining on each vertical line. Then gently...very gently...slice along the top horizontal line. If it resists you and begins to split, try working from the other direction. Continue carving the wood away until the small triangle at the top of the symbol descends to the intersection point.

chiselling

Use the angled chisel and small files until the symbol has smooth straight sides and straight clean lines. As a final step, use 80-100 grit sandpaper to remove any imperfections.

Carving the diagonal symbol is done in the same manner, except the wood will have more of a tendency to split outside the lines and the sides of the cut will not be as smooth. You will have a bit more control if you carve towards you rather than away.

Carving the horizontal symbol is the next level in complexity and requires a different approach. As you carve the long horizontal lines with the grain, the wood will want to start splitting away from the line. Make sure you have freshly sharpened chisels. Start as before by defining the split stop lines with the chisel and mallet for the center line and the small angled chisel for the diagonal lines. Next use the angled chisel to carve the two triangle shapes at the ends of the symbol. Carve from the outside vertical line to the intersection point, maintaining the 45 degree angle.

Continuing with the angled chisel, place it at a 45 degree angle about 1/4” from the intersection at the right and about 1/16” from the center line, and slice parallel to the center line towards the left intersection. Do not get closer than 1/4” from either intersection. Rotate the board 180 degrees and do the same on the other side of the center line. Continue making passes on each side as you slowly back away from the center line towards the outside lines. Be careful, as you near the outside lines, to avoid splitting the wood outside the lines. Keep the angle consistent and eventually you will have the V-shaped trough. Clean the sides and lines with a chisel, then file and sand as before.

the harder parts

To carve the last symbol, yet another technique is used. Begin with your smallest chisel and mallet, and maintaining a 90 degree angle, score the center line about 1/16” deep all the way around the circle. As before, the wood is most likely to split as you carve closer to the grain, so to control this tendency as much as possible, begin your cuts at these points. Using the small angled chisel, start at the most southerly point of the of the inside circle and slice at a 45 degree angle towards the center, working in clockwise direction, stopping at due west. Then returning to the south , slice in a counter clockwise direction stopping at due east. Next go to the most northerly point of the inside circle, slice the northeast quadrant first, then the northwest quadrant until the first pass is completed. Do the same for the outside circle, in the same order, and slicing towards the center line. Be very careful. It is easy to tear or split the wood outside the line.

Once the inner and outer lines have been defined, work away from the center line towards the smallest circle. Make several passes, working gradually outward until the inner circle is reached. Now carve from the outside radius towards the center line. Make several passes, working slowly and patiently, carving a little each pass. Alternate with the angled chisel and a gouge, working towards the center line until the V-shaped trough begins to form. Clean the sides and center line with the various shaped chisels, then file and sand until it is perfect.

nicely done

Photo 7 shows the completed practice carving. Allow yourself a few minutes to admire your fine work, then flip the board over and repeat the entire process on the other side. This not only gives you a bit more practice to hone your skills, it also gives you a chance to practice with a grain that runs differently than the first side.

Carving Script Letters and Graphics

Script letters and graphics are often easier than carving block letters because the eye will catch every flaw in a block style letter whereas in script and graphics, the eye is more forgiving of minor flaws and discrepancies.

For carving script letters, the process is almost the same as for block letters. Each line segment should have a split stop line. The straight-line segments will have split stops just as in a block letter. The curved segments will have split stop lines that follow the center of the curve. Use the same techniques as for the exercises, paying close attention to the direction of the grain.

Carving the graphics has a somewhat different approach. Practice making the logo or graphic on a scrap piece of wood before carving it on the name board. I only used split stop lines on line segments that are wide and for which the 45 degree V-shaped trough is desired. Otherwise, I used the various carving tools, especially the spoon shaped gouges, to carve out the image. I worked from the higher parts to the lower or deeper parts, rotating the board frequently as the angle to the grain changed.

Carving the lettering on the name boards are an extension of carving the basic shapes - vertical lines, diagonal lines, horizontal lines, curves and graphics. Use the same techniques for each line segment.

Stay tuned for Part 3 – Gilding the Lily