

The Blue View - Series Drogue DIY Pt. 1
/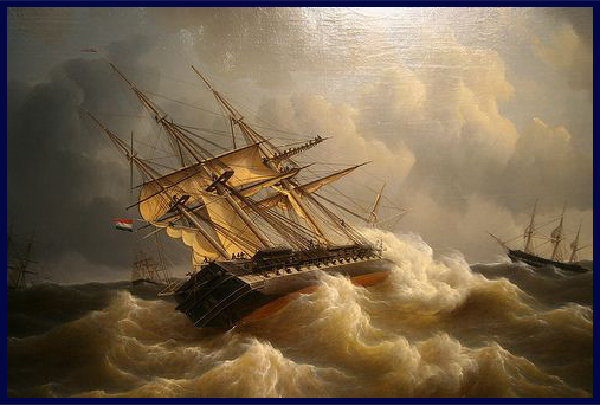
Nothing seems to generate a more lively discussion among offshore sailors than the question “What is the best tactic for heavy weather at sea?” Is it heaving-to, lying a-hull, running before the storm, deploying a sea anchor, laying warps or setting a drogue? When I was searching for the right answer, I discovered a number of differing opinions. The Pardeys advise heaving to with the help of a sea anchor deployed from the bow. Robin Knox-Johnson handled storms in the southern oceans by streaming a 600 foot warp from the stern. Bernard Moitessier and Vito Dumas found warps unsatisfactory, preferring to run before the storm. Many experienced seamen feel that lying a-hull and letting the boat look after itself is the best tactic. As evidence, they point out the many stories of abandoned vessels found safe and sound with the hatches open after the storm passed.
Perhaps there is no one answer for all conditions and all boat designs, but some tactics are better than others. Our experience with gales and storms has all been in the southern oceans. Our strategy in the past has been to run before the wind, reducing sail, until the weather increased to force 8 or so, and then heave-to for the duration. This strategy has served us well, but the gales and storms we weathered did not include breaking waves.
A boat can survive huge waves unless they are breaking. The inherent force and extremely steep face of even a relatively small breaking wave, however, will capsize and possibly roll a sailboat if it is caught beam-on. Researchers have found that the size of a wave required to capsize a sailboat depends in part on the boat design and ranges from 30% to 60% of the boat length. This means that some 40 foot sailboats will capsize if a 12 foot breaking wave is encountered beam-on, and virtually all 40 foot sailboats will capsize if a 24 foot breaking wave is encountered beam-on.
Likewise, a breaking wave taken on the bow or stern will cause the boat to slalom down the face of the wave until it reaches the bottom of the trough. If the wave is big enough, the boat will either broach and capsize, or worse, pitchpole. Fortunately, most storms do not produce breaking waves.
So how do the various tactics fare in a storm with breaking waves? Let’s look at the options.
-
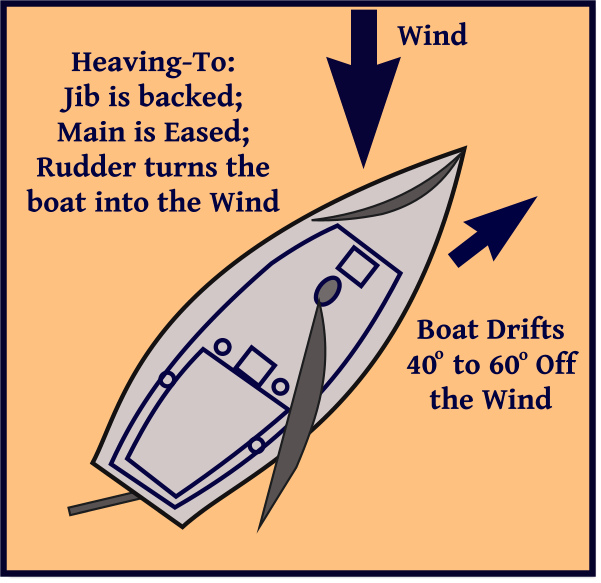
Heaving-to. This is a good tactic to employ up to moderately severe conditions. This is not a comfortable or safe tactic for winds and seas beyond about Force 8 or 9, or when the waves are breaking. In addition, some fin keeled boats cannot heave-to.
-
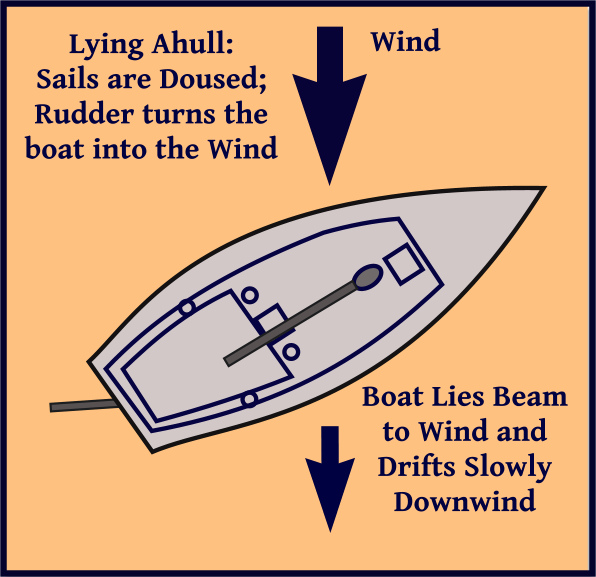
Lying a-hull. This was the most popular tactic in the 1979 Fastnet storm, and is traditionally the next step when heaving-to is no longer feasible. When the waves are breaking, however, the boat is quite susceptible to capsize and rolling, with a high likelihood of injury to the crew and loss of rigging and mast.
-
Running before the storm. With a fresh, skilled crew and a maneuverable boat, running is a reasonable tactic, even with breaking seas. It is important to keep the boat at an optimum angle to the waves. Too much angle and you risk broaching. Too little angle and you risk pitchpoling. It is a less viable tactic in a typical shorthanded cruising boat as the crew becomes fatigued.
- Warps. Deploying warps from the stern when running before a storm has as many deterrents as proponents. Some sailors, such as Robin Knox-Johnson have reported good success with warps, and many others have had unsatisfactory results. The usefulness of a warp may vary with the length of the warp as well as with the height and period of the waves.
-
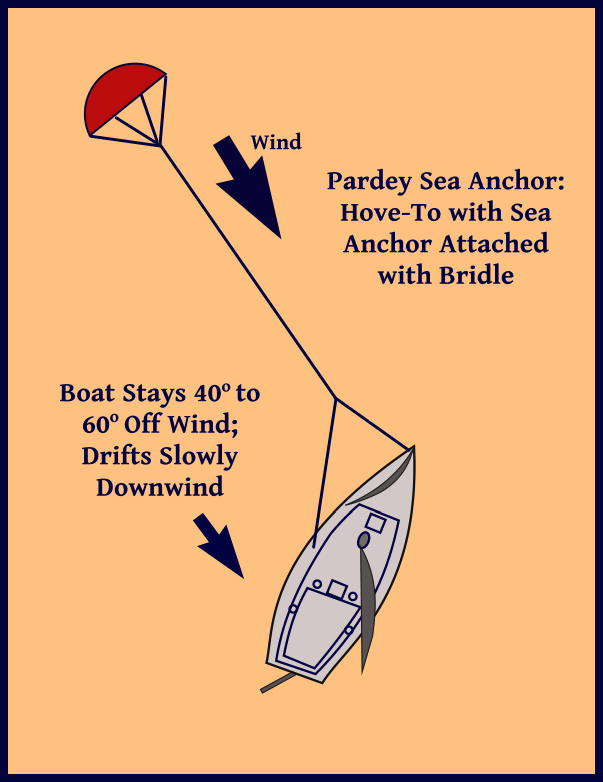
Sea anchors. Deployed from the bow, a sea anchor or parachute keeps the bow into the wind. The Pardeys use this technique to keep their boat hove-to in severe conditions. Critics say that sailboats, especially high windage vessels, tend to yaw as the boat passes into the trough of the wave. If a wave hits it when it is off the wind, it is susceptible to high stresses on the rode, damage to the rudder and possible knockdowns.
-
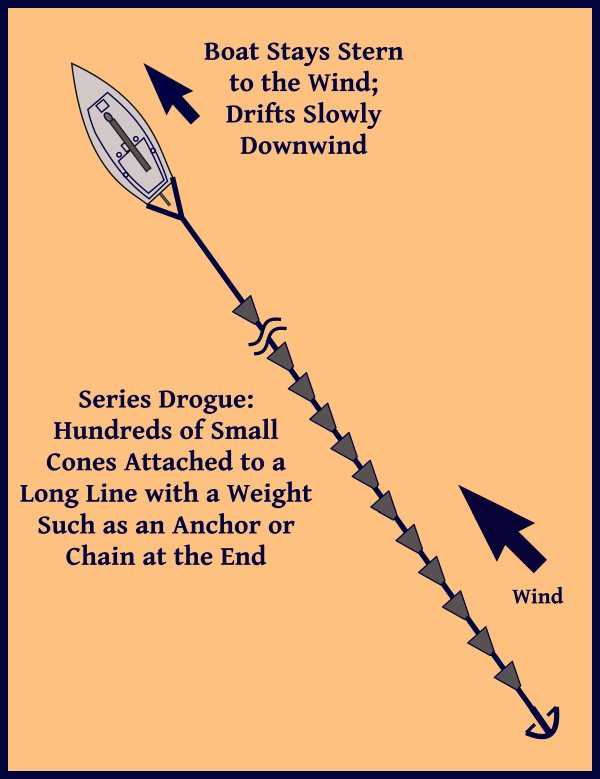
Drogues. Deployed from the stern, a drogue slows the forward speed of the boat and keeps the stern pointed to the wind. Its drawbacks are that it is difficult to recover, and the boat is susceptible to being pooped.
What is clear is that there does not appear to be a universally acceptable solution for all vessels and all conditions. Sailors who survive storms with no breaking waves often conclude that the tactics they employ such as heaving-to, lying a-hull or running with the storm are adequate to prevent capsizing. After our research and experience, we concluded that a drogue trailed from the stern seems the best tactic for severe conditions with breaking waves. The conclusions drawn from a multi-year study by Donald Jordon in cooperation with the US Coast Guard convinced us that a drogue was the right approach. The study incorporated computer simulations, model testing and actual testing on full size boats and concluded that a suitable drogue deployed from the stern of the boat was the best method to avoid being capsized in breaking waves. An independent study by the prestigious Wolfson Unit of the University of Southampton had similar findings.
Once the conclusion was reached that the drogue was the best tactic, the study attempted to determine which drogue design was the best. In their estimation, a line with a series of small cones attached had several advantages over a single large cone or parachute type drogue.
-
The series drogue is simple and safe to deploy under difficult storm conditions. Assuming the boat is either running or lying a-hull under bare poles, the drogue can be payed out over the stern, building up load gradually.
-
It is unlikely to foul or entangle enough to make it ineffective.
-
The series drogue rides below the waves and is not affected by a following sea. There are known cases where a parachute or large cone has been pulled out of the water and even catapulted ahead of the boat.
-
The series drogue can be weighted whereas the parachute or single large cone cannot. When the boat is in the trough of a large wave, the towline tends to go slack. With the series drogue, the weight sinks, pulling the towline backwards and taking some of the unwanted slack out of towline.
-
The load and stress on any one cone is small, making each less susceptible to fatigue-related failure. Since the number of cones is large, the failure of one or even several cones has little effect on the performance of the drogue.
-
When a breaking wave strikes, the drogue must catch the boat quickly to prevent a broach. The series drogue, since some of the cones are near the boat where towline stretch is low, will build up load faster than a conventional cone or chute at the end of the towline. Similarly, if the breaking wave strikes at an angle to the towline rather than directly astern, the series drogue will build up load much faster than other types.
-
It can be modified for any size boat by increasing the number of cones, as well as the line length and size.
As with all drogues, however, the two biggest drawbacks are that it will not be easy to retrieve until the storm has abated, and if the breaking seas are large, you can expect to be pooped. Larger center cockpit boats would be less susceptible to being pooped. Assuming you have reasonably sized cockpit drains, there is little to be done topsides. It is usually best to batten down everything in the cockpit, latch all hatches and washboards, and go below and get whatever rest you can.
Once we made the decision that we wanted a series drogue, we explored our options. It is possible to purchase a complete series drogue from at least two sources. You can also purchase a kit from Sailrite and save considerable money by doing the labor yourself. All the design information is available, so another option is to make your own. Since we were in South America at the time, making it difficult and expensive to obtain parts, we decided to make our own.
In the next Blue View, I'll cover the design details of a series drogue and how to go about making your own.


