The Blue View - Series Drogue DIY Pt. 2

Drogue2 Making a Drogue

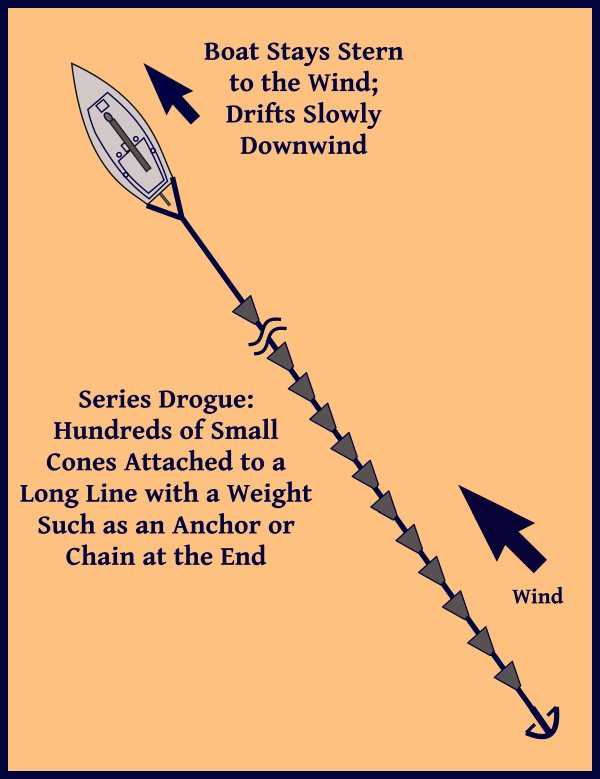
In the last Blue View, I talked about why we liked the idea of a series drogue and why we think it is as good as any other method for handling major storm conditions. I also discussed why we felt it is far superior to any alternative tactic we know of when the waves are breaking. In this blog, I'll talk about how to make your own series drogue. The design and construction details of a series drogue were published as part of a publicly funded study completed by the U.S. Coast Guard and Don Jordan, and are freely available to the public. I used this as my guide when we made ours along with lots of practical advice from our friends at Sailrite.

The illustration gives an overview of the construction. The cones are the same size for any boat – larger boats simply add more line length and increase the number of cones. As the number of cones increases, the initial line size must also increase to handle the added load.

construction of a drogue

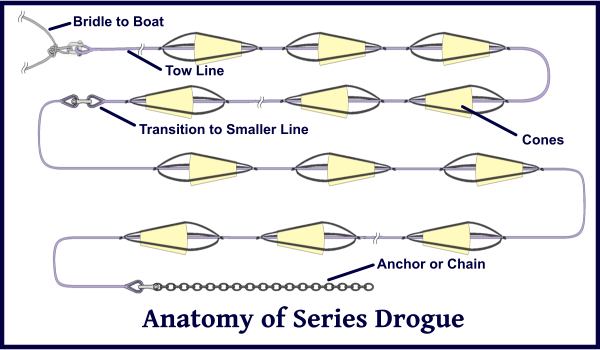
The bridle performs two functions. It splits the load, distributing it between two strong points on the transom, and it provides a turning moment to keep the boat stern-to to the waves. Each leg of the bridle should be 2.5 times the transom width, plus an allowance for the splice and for attachment to the boat.

The following table provides a quick summary of line sizes and the number of cones needed for different size boats. Use the gross tonnage for your vessel and then add 10%. The total load on the boat is shown in the second column. The third column in the table shows the load on the attachment points on each side of the transom. The line lengths shown in the fourth column is the length for the towing line. These lengths also include 5 feet at each end for splicing. A double braid line should be used rather than a three strand, which has a tendency to unlay as it is towed. The line sizes specified in the table are based on average strengths for double braid nylon line from several manufacturers. Check the breaking strength of the line you purchase.

Monohull

Displacement

(lbs)

Load

(lbs)

Load at

Attachment

Points (lbs)

Line Length

Required

(ft)

Line Size

(inches)

No. of

Cones

Weight at end of line

(lbs)

10,000

8000

5600

250

5/8”

100

15

15,000

12000

8400

260

3/4”

110

15

20,000

14000

9800

150/150

3/4”,5/8”

120

15

25,000

17000

11900

155/155

1”,5/8”

130

25

30,000

20000

14000

165/165

1”,5/8”

140

25

35,000

23000

16100

170/170

1”,5/8”

150

25

40,000

25000

17500

125/125/125

1”,3/4”,5/8”

160

30

45,000

28000

19600

130/130/130

1-1/8,3/4”,5/8”

170

40

50,000

30000

21000

135/135/135

1-1/8,3/4”,5/8”

180

50

For example, Nine of Cups has a gross tonnage of 18 tons, so we used 40,000 lbs as our displacement when designing the drogue. We needed to make and attach 160 cones to three lines, each 125 feet long. This seemed daunting at first, but it proceeded quickly once we got into the project. We set goals for ourselves to complete a given milestone each evening, e.g. draw and cut out 25 cones or cut 100 strips of nylon tape.

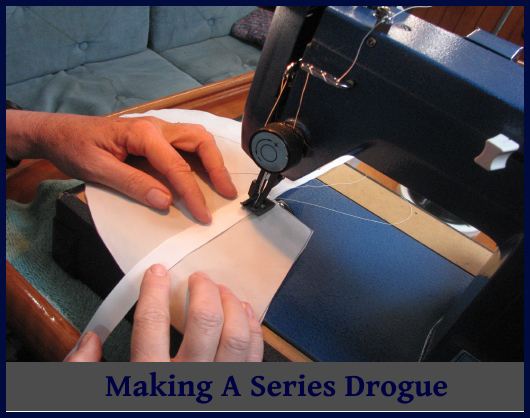
A 1-1/2 ounce ripstop nylon material was recommended for the cones. We used an old mainsail, which was much heavier than necessary. The emphasis is on the word ‘old’ in the last sentence. This sail had been retired for about four years and stowed on the forward bunk. Before we spent a lot of man-hours making all those cones, we wanted to be sure the sailcloth had not deteriorated and lost too much of its strength. To test the material, we made up a dozen cones, attached them to a line and, during one passage, dragged them for 24 hours. Our speed varied between 4 and 6 knots. The cones held up fine, but we did learn a few things about the construction and stitching.

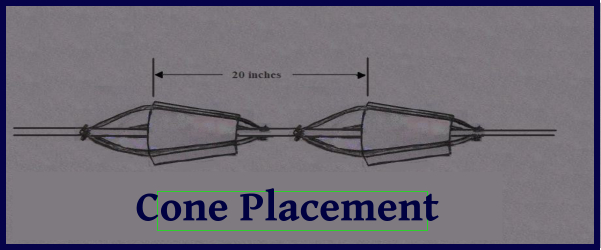
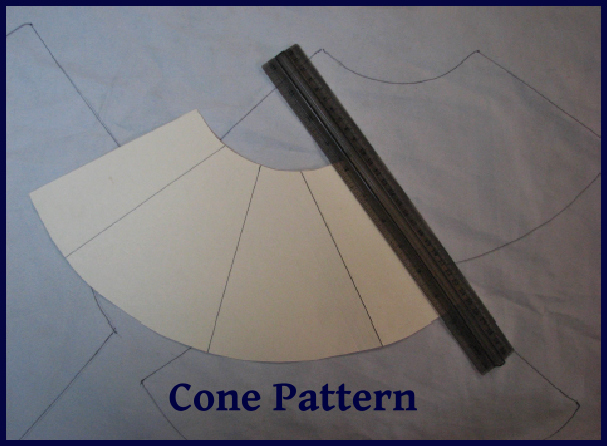
The illustrations below show the recommended size and placement of the cones. We made a pattern out of cardboard to mark the outline of each cone for cutting. We also used the pattern to mark each cone to aid in aligning the nylon tape for sewing. We first tried cutting each cone using a hot knife, but found this to be too slow. We switched to a pair of electric scissors and then used a butane lighter to seal the edges.

cone dimensions

cone placement

cone pattern

The next step was to cut and mark each length of nylon tape. We placed pieces of masking tape on a flat surface to serve as a template for measuring, cutting and marking each strip of nylon. These strips were then sewn to the cones. One thing we discovered with our test run was that it was important to double stitch the tape at each end.

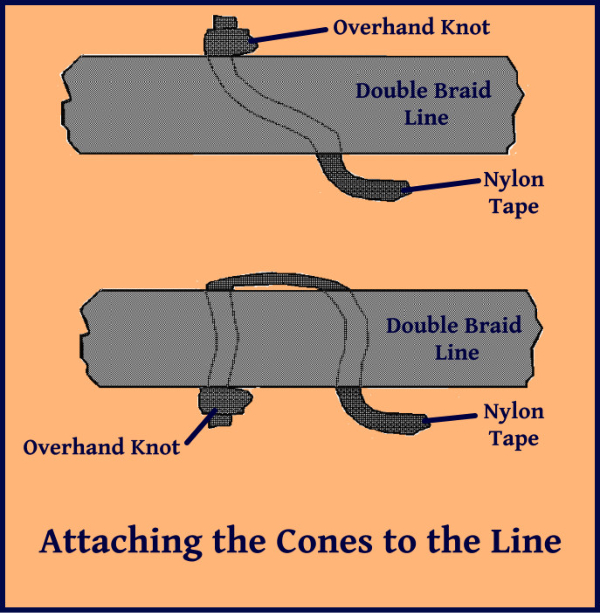
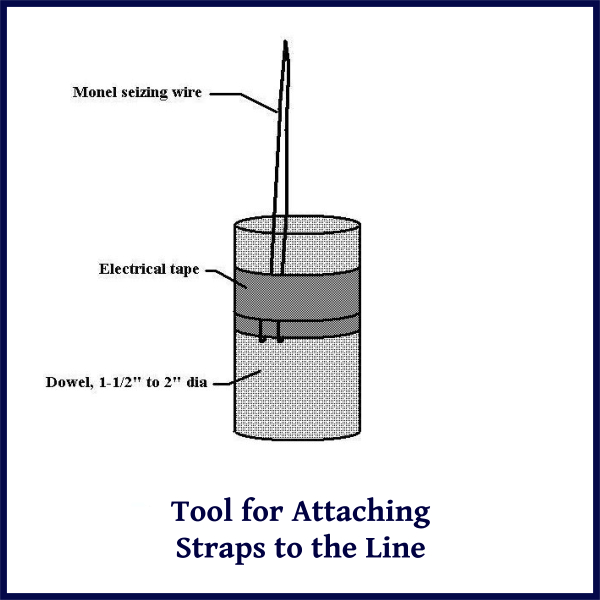
Each piece of cone material was then folded in half and double stitched together. The last step was to turn each cone right side out so that the seam was on the inside. It probably doesn’t matter, but we sewed each cone so that the tape was on the outside of the finished cone. We next began attaching each cone to the line. The first step was to mark the line at 20 inch intervals, leaving 5 feet or so at each end for splicing. Each cone was threaded onto the line, then the end of each strip of tape from the cone (six per cone) was pulled through the line and tied with an overhand knot using either the single or double pass method. We already had a splicing wand that worked well for this process, but you can make a tool using seizing wire bent into a loop and taped to a wooden handle.

attaching cones

tool

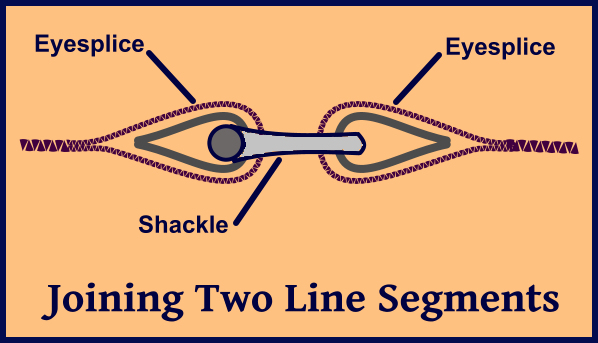
The next issue was the attachment of the line segments, towing line, bridle and anchor. A proper splice is stronger than any knot. The line we bought, however, was manufactured in South America and we found it was almost impossible to splice eyes into it, unlike the line we were used to that was made in the U.S. Instead of splicing eyes into each end, we resorted to using knots to attach the line segments together. Ideally, we would have spliced heavy metal thimbles in the ends of the lines and attached them together with heavy duty shackles. For the weight at the end of the line, we used a 20 foot length of 3/8” chain. We attached it with a shackle to a standing bowline at the end of the line.

eyesplice and thimble

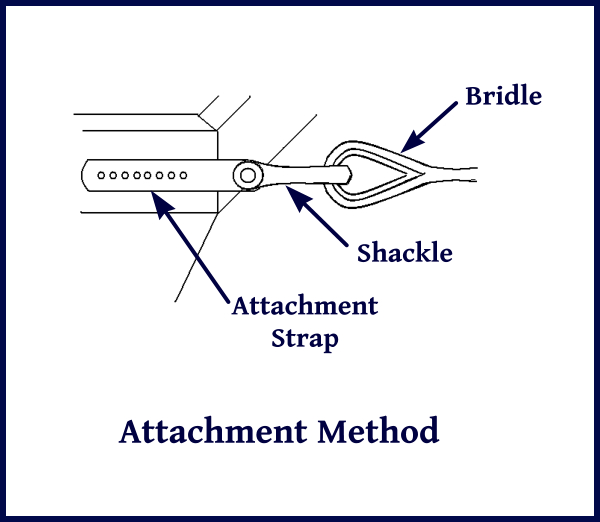
An important aspect of the overall system is the attachment points on the boat. These must, of course, be strong enough to withstand the load. The bridle splits the total load between the two corners of the transom, making the load at each attachment point no more than 70% of the total load. Most cleats and sheet winches, however, are not designed to withstand stresses of this magnitude. The ideal alternative is to make attachment points similar to chain plates by bolting stainless straps to each corner of the transom. These should be through bolted and utilize backing plates. Use heavy shackles to attach each tow line.

cone attachment

The following table lists conservative size straps and shackles for several boat sizes. If cleats are used, make sure they are rated for the load and are bolted through the deck with substantial backing plates.

Load at attachment

point (lbs)

Strap Size (Inches)

Bolts

Shackle Size

10,000

¼ x 2.25 x 14-3/8 inch

4 each

½ Inch

14,000

¼ x 2.25 x 18-3/8 inch

6 each

5/8 Inch

18,000

3/8 x 2.25 x 22-3/8 inch

8 each

¾ Inch

22,000

3/8 x 2.5 x 26-3/8 inch

10 each

¾ Inch

Chafe may be an issue as well. We actually used dyneema for the bridle which is more chafe resistant than nylon, and enabled us to use a smaller diameter line. The last issue is the stowage of the drogue. The total weight of our drogue system was too much to handle, so we separated the line segments and only connected them together when we needed to deploy it. We stow each segment the way we stow our spare rope anchor rode using figure-eight flakes.

faked line secured for stowing

Now that the drogue is all designed and built, how do we deploy it? How do we get it back aboard again? I'll cover that in the last installment of this 3-part series next week.

The Blue View - Series Drogue DIY Pt. 1

storm at sea

Nothing seems to generate a more lively discussion among offshore sailors than the question “What is the best tactic for heavy weather at sea?” Is it heaving-to, lying a-hull, running before the storm, deploying a sea anchor, laying warps or setting a drogue? When I was searching for the right answer, I discovered a number of differing opinions. The Pardeys advise heaving to with the help of a sea anchor deployed from the bow. Robin Knox-Johnson handled storms in the southern oceans by streaming a 600 foot warp from the stern. Bernard Moitessier and Vito Dumas found warps unsatisfactory, preferring to run before the storm. Many experienced seamen feel that lying a-hull and letting the boat look after itself is the best tactic. As evidence, they point out the many stories of abandoned vessels found safe and sound with the hatches open after the storm passed.

Perhaps there is no one answer for all conditions and all boat designs, but some tactics are better than others. Our experience with gales and storms has all been in the southern oceans. Our strategy in the past has been to run before the wind, reducing sail, until the weather increased to force 8 or so, and then heave-to for the duration. This strategy has served us well, but the gales and storms we weathered did not include breaking waves.

A boat can survive huge waves unless they are breaking. The inherent force and extremely steep face of even a relatively small breaking wave, however, will capsize and possibly roll a sailboat if it is caught beam-on. Researchers have found that the size of a wave required to capsize a sailboat depends in part on the boat design and ranges from 30% to 60% of the boat length. This means that some 40 foot sailboats will capsize if a 12 foot breaking wave is encountered beam-on, and virtually all 40 foot sailboats will capsize if a 24 foot breaking wave is encountered beam-on.

Likewise, a breaking wave taken on the bow or stern will cause the boat to slalom down the face of the wave until it reaches the bottom of the trough. If the wave is big enough, the boat will either broach and capsize, or worse, pitchpole. Fortunately, most storms do not produce breaking waves.

So how do the various tactics fare in a storm with breaking waves? Let’s look at the options.

  • Heaving-to. This is a good tactic to employ up to moderately severe conditions. This is not a comfortable or safe tactic for winds and seas beyond about Force 8 or 9, or when the waves are breaking. In addition, some fin keeled boats cannot heave-to.

hove to

  • Lying a-hull. This was the most popular tactic in the 1979 Fastnet storm, and is traditionally the next step when heaving-to is no longer feasible. When the waves are breaking, however, the boat is quite susceptible to capsize and rolling, with a high likelihood of injury to the crew and loss of rigging and mast.

lying ahull

  • Running before the storm. With a fresh, skilled crew and a maneuverable boat, running is a reasonable tactic, even with breaking seas. It is important to keep the boat at an optimum angle to the waves. Too much angle and you risk broaching. Too little angle and you risk pitchpoling. It is a less viable tactic in a typical shorthanded cruising boat as the crew becomes fatigued.

  • Warps. Deploying warps from the stern when running before a storm has as many deterrents as proponents. Some sailors, such as Robin Knox-Johnson have reported good success with warps, and many others have had unsatisfactory results. The usefulness of a warp may vary with the length of the warp as well as with the height and period of the waves.
  • Sea anchors. Deployed from the bow, a sea anchor or parachute keeps the bow into the wind. The Pardeys use this technique to keep their boat hove-to in severe conditions. Critics say that sailboats, especially high windage vessels, tend to yaw as the boat passes into the trough of the wave. If a wave hits it when it is off the wind, it is susceptible to high stresses on the rode, damage to the rudder and possible knockdowns.

sea anchor

  • Drogues. Deployed from the stern, a drogue slows the forward speed of the boat and keeps the stern pointed to the wind. Its drawbacks are that it is difficult to recover, and the boat is susceptible to being pooped.

series drogue

What is clear is that there does not appear to be a universally acceptable solution for all vessels and all conditions. Sailors who survive storms with no breaking waves often conclude that the tactics they employ such as heaving-to, lying a-hull or running with the storm are adequate to prevent capsizing. After our research and experience, we concluded that a drogue trailed from the stern seems the best tactic for severe conditions with breaking waves. The conclusions drawn from a multi-year study by Donald Jordon in cooperation with the US Coast Guard convinced us that a drogue was the right approach. The study incorporated computer simulations, model testing and actual testing on full size boats and concluded that a suitable drogue deployed from the stern of the boat was the best method to avoid being capsized in breaking waves. An independent study by the prestigious Wolfson Unit of the University of Southampton had similar findings.

Once the conclusion was reached that the drogue was the best tactic, the study attempted to determine which drogue design was the best. In their estimation, a line with a series of small cones attached had several advantages over a single large cone or parachute type drogue.

  • The series drogue is simple and safe to deploy under difficult storm conditions. Assuming the boat is either running or lying a-hull under bare poles, the drogue can be payed out over the stern, building up load gradually.

  • It is unlikely to foul or entangle enough to make it ineffective.

  • The series drogue rides below the waves and is not affected by a following sea. There are known cases where a parachute or large cone has been pulled out of the water and even catapulted ahead of the boat.

  • The series drogue can be weighted whereas the parachute or single large cone cannot. When the boat is in the trough of a large wave, the towline tends to go slack. With the series drogue, the weight sinks, pulling the towline backwards and taking some of the unwanted slack out of towline.

  • The load and stress on any one cone is small, making each less susceptible to fatigue-related failure. Since the number of cones is large, the failure of one or even several cones has little effect on the performance of the drogue.

  • When a breaking wave strikes, the drogue must catch the boat quickly to prevent a broach. The series drogue, since some of the cones are near the boat where towline stretch is low, will build up load faster than a conventional cone or chute at the end of the towline. Similarly, if the breaking wave strikes at an angle to the towline rather than directly astern, the series drogue will build up load much faster than other types.

  • It can be modified for any size boat by increasing the number of cones, as well as the line length and size.

As with all drogues, however, the two biggest drawbacks are that it will not be easy to retrieve until the storm has abated, and if the breaking seas are large, you can expect to be pooped. Larger center cockpit boats would be less susceptible to being pooped. Assuming you have reasonably sized cockpit drains, there is little to be done topsides. It is usually best to batten down everything in the cockpit, latch all hatches and washboards, and go below and get whatever rest you can.

Once we made the decision that we wanted a series drogue, we explored our options. It is possible to purchase a complete series drogue from at least two sources. You can also purchase a kit from Sailrite and save considerable money by doing the labor yourself. All the design information is available, so another option is to make your own. Since we were in South America at the time, making it difficult and expensive to obtain parts, we decided to make our own.

In the next Blue View, I'll cover the design details of a series drogue and how to go about making your own.

The Blue View - Electric Winch Handle

A frequent theme of my blogs is making Nine of Cups more geriatric friendly. As Marcie and I get older, we keep thinking of ways to make her (Cups, not Marcie) easier to handle. One thing we've contemplated is an electric winch. It often takes a lot of stamina and a fair amount of upper body strength to hoist the dinghy onto and off the foredeck, reef down the headsail, or hoist the main the last few feet, and having an electric winch that requires only a push of a button to do the job makes a lot of sense. winch

On the other hand, there are several negatives to an electric winch. One is that they are expensive – could we get by replacing only one winch or would we need to replace several? They are also power hogs, if only for a short time – running an electric winch might make the difference between having to run the engine to recharge the batteries on a given day or not. The biggest problem in my mind, however, is that there is no feedback with an electric winch. For example, when we are manually winching the main up and it seems more difficult than usual, there is usually a problem – the halyard is fouled, we forgot to release the vang, I forgot to remove a reefing pendant … Perhaps I'm particularly inept, but these things seem to happen frequently, and if we were using an electric winch, we probably wouldn't notice there was a problem until something broke.

One compromise that may make sense is an electric winch handle. These are handheld motors that plug into a winch in lieu of the normal winch handle, and rotate the winch electrically. I have seen several versions of these, ranging from a homebrew, do-it yourself type to an off-the-shelf purpose made device. The pros are that they are far less expensive than the cheapest electric winch; they are portable, and so can be used with any winch; and they provide a little more feedback than a standard electric winch. On the downside, they are large, clunky things, requiring a secure place to keep them stowed when not in use; and they are either battery operated and need to be kept charged or require a cable and electrical connections.

I looked into the alternatives, and here is what I found:

Home-Brew 1 - I found a clever design online by a sailor who dismantled a 12 VDC automotive winch and had an adapter machined for it that allowed it to be connected to the winch handle socket on a standard winch. He attached a couple of handles, complete with rocker switches to operate the motor. Power is provided via a heavy-duty cable and fuse. The winch motor is geared down, making it low RPMs and high torque. It looks kludgy, but it probably works. Its portability is limited by the cable. I think the cost would be around $200.

homebrew winch

Home-Brew 2 - Another do-it yourself option uses a right-angle, battery powered drill and a purchased bit. The drill of choice is a Milwaukee 28v, as the more common 18v models don't provide enough torque or battery life. If it is used frequently, an extra battery may be needed. A weakness is the chuck screw, which has a tendency to shear off, especially when the drill is reversed. The total cost is about $400. It is also available with a reinforced chuck screw and a neoprene or hard cover from a couple of sources for between $700 and $1200.

better homebrew winch

WinchRite - WinchRite makes a self contained, battery powered winch handle that is a little less industrial looking. Friends I've talked to who have one have mixed reviews. One said that although they had several problems, the customer service was good, while the other had no problems. WinchRite has recently introduced a new model that is more robust and uses a lithium-ion battery. The cost from Defender is about $800. The battery is not removable, so there is no spare battery option.

winchrite

So, what have we done? We are keeping the electric winch handle as a future possibility. In the meantime, we've made the two hardest winching tasks easier. I routed the dinghy hoist up to the windlass so Marcie, Cups' winch wench, can hoist it with a foot press. I also now climb the mast using ascenders, so she no longer needs to grind a winch to hoist me up. And, although there is still a little grumbling as one of us reefs down the genoa when the wind picks up, we can still manage to get it done. Plus, you ought to see Marcie's biceps after a long passage!