The Blue View - HF Radios on the Cheap

In this day and age, almost every offshore cruising boat we encounter has the capability of long distance communications at sea. While more and more boats have both satellite transceivers and high frequency (HF) radios aboard, because of the upfront and ongoing costs, most of us have to choose one or the other. Both have their pros and cons, and when we started cruising, the cost/benefit ratio definitely favored the HF radio. Now, however, with the costs of satellite communications dropping and the reliability improving, the decision is not so clear cut. For us, the much lower operating expenses and the ability to participate in radio nets were the deciding factors, and if we were starting out again today, I think we would still opt for an HF radio. The upfront expenses of a complete HF radio system can be quite high. Installing a quality radio and all the components it takes to get the system up and running can easily cost more than $5000! We installed our system for far less than that. Here are some of the ways we used to save money without compromising quality.

hf radio components

The heart of an HF radio setup is the radio transceiver. We opted to go with an Icom IC-706MKIIG HAM radio for a couple of reasons. It was considerably less expensive than the typical marine radio, and it allowed us to communicate on the HAM radio frequencies, as well as the marine channels. It has a maximum transmission power of 100 watts vs. the 200 watts of most marine transceivers, but this hasn't been a problem. The 706 is no longer available, but the newer Icom 718 will work just as well. The cost of the 718 is $600 versus $1850 for an Icom M802 marine radio. There are a few compromises to be made, however. The biggest is that since the Icom 718 is essentially a HAM radio, the assumption is that the operator is more knowledgeable – more of a geek – than the typical marine radio operator, and the radio isn't as straightforward to program and operate. In addition, while the radio operates on both the HAM and marine frequencies, the operator must have a HAM license to transmit on the amateur radio frequencies.

icom 718

Since we use our radio for sending and receiving emails and text weather reports as well as voice communications, we needed a way to connect our computer to the radio. This was done with a PACTOR modem. We chose an SCS PTC-IIIusb modem. The newer Pactor DR-7400 transmits and receives at twice the speed and is a few hundred dollars more. The older unit works fine, but I would opt for the faster model if I was starting from scratch. Expect to pay about $1700 for the modem and all the cables.

pactor modem

If we always transmitted at the same frequency, we could tune our antenna length to that frequency and simplify the system, but since we transmit at a number of different frequencies, we need an antenna tuner in the system. We use an Icom AH-4 tuner that works as well as some of the more expensive marine models. The cost for an AH-4 tuner is around $225 while the marine version, the AT-140, costs about $450.

The next component is the antenna. Most boats use the backstay as a single long line antenna. Since the backstay is usually grounded at one or both ends, for it to act as an antenna it must be electrically isolated using backstay insulators. I'm not a big fan of this approach. One reason is the cost – each insulator costs between $250 and $450 depending on the size and brand. Another reason is that we know of two boats that were dismasted when a lightning strike disintegrated a backstay insulator. Instead, we use insulated lifeline wire and have rigged an antenna that is totally separate from the backstay. The cost is much less, the performance is just as good, and we don't worry about losing our backstay in an electrical storm.

backstay insulator


antenna

So, adding everything up, the cost of our system if we were to install it today would be $2750. That would be a big hit to our budget, but it would be a lot easier to manage than the $5300 that the typical marine version would cost.

The Blue View - Using the Series Drogue

series drogue 
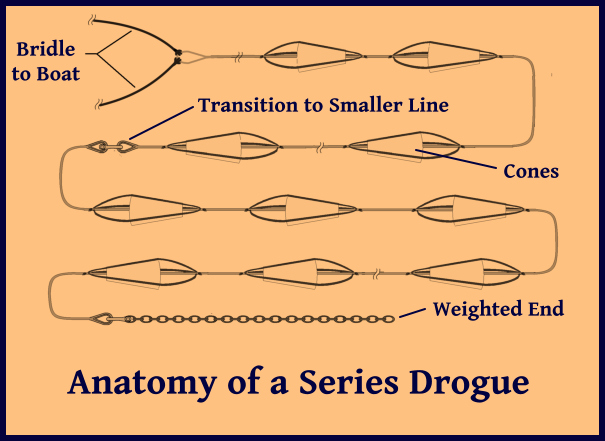
Deploying the series drogue...

Let's assume we are way offshore and the GRIBs and Buoy Weather are predicting some nasty weather coming our way. We have our trusty, handcrafted Jordan series drogue safely aboard. How are we going to deploy it?

Don Jordan recommends having the drogue bridle attached to the dedicated chainplates and the drogue flaked in a bag or container, ready for instant deployment, during any bluewater passage. It's probably good advice, but we don't normally do this. We do have it ready and accessible on a passage, however, and if the weather forecasts are indicating anything near a gale or worse, we get it prepped and ready well in advance.

To prep it, I begin by attaching the two bridle lines to the end of the drogue. Each of our bridle lines has an eyesplice in one end. Each is run through the drogue eyesplice then through its own eyesplice to form a larkshead knot around the drogue line. The drogue is positioned on the aft deck, and the other end of each bridle line is routed over the stern rail and back to the strong point on either side of our transom.

larkshead knot

Next, I connect all the drogue segments together and attach the chain we use as a weight. The drogue is then flaked out on the aft deck, starting with the bridle on the bottom and working up to the weighted end. The flaked pile is secured in place, ready to deploy.

When the weather starts getting bad, we drop and secure our sails, remove the lines securing the drogue, then drop the weight over the stern rail and let the drogue run out. Once it is properly deployed, we check that the wheel is centered, then close the hatches and go below. We make sure the AIS and radar alarms are on, then try, as best we can, to rest while we wait out the storm.

Retrieving the series drogue...

Whew – that was quite a blow! It's now two days later and we're pretty much over our seasickness. The seas are calming down, the wind has dropped to around 30 knots, and it's safe to retrieve the drogue. I use a variation of Don Jordan's method for bringing it back aboard.

I use two lines that are about twice the length of Nine of Cups – about 90 feet. I have two retired jib sheets that work well for the purpose. I rig snatch blocks to either side of the bow pulpit, then run the lines from each of the genoa winches forward to the snatch blocks and back to the stern rail. I run the port line over the rail, attach it to the starboard bridle with a rolling hitch and take the slack out of the line. Before I can start winching the drogue in, however, I have to release the bridle from the strong points on the transom. What works for me is to run the starboard line through the starboard aft hawsehole,and attach it to the bridle with a rolling hitch. Then I crank on the starboard genoa winch until the starboard bridle can be removed from its strong point on the transom. Once the bridle end is free, I slack off on the starboard line until the port line is tensioned. Next, I winch the port line in until the end of the bridle is on the aft deck. Then, I release the port bridle from its strong point, untie the starboard line from the starboard bridle, and pull it back aboard through the hawsehole.

The next steps are as follows:

  1. I winch the port line until the rolling hitch reaches the snatch block. As the drogue is winched forward, I keep an eye on it to make sure none of the cones catch on anything.
  2. Then I tie the end of the starboard line to the drogue with a rolling hitch and winch it tight enough to take the tension off the port line.
  3. Next, I release the port line from the genoa winch, walk forward, untie the rolling hitch, and bring the end of the line back to the stern rail. I also pull the portion of the drogue that lies on the port deck back to the aft deck.
  4. Finally, I winch the starboard line in until the rolling hitch reaches the snatch block.

retrieving the drogue

I repeat the process until the drogue has been retrieved. Since our bridle is about 375 feet long, I have to winch each side about four times.

I don't want to stow a wet drogue, so I flake it on the aft deck and secure it. At the next opportunity, I will separate the drogue sections, hose them off with fresh water and set them out to dry. Then I will flake and secure each section and stow them below.

The process isn't as complicated as it sounds, but it isn't something I do everyday. We might go a year or more without even thinking about the drogue, which is about 11 months longer than I need to forget most of the details. I keep sketches and notes stashed in a ziplock, which is taped to the drogue so I can refresh my memory when it comes time to deploy it.

The Blue View - Series Drogue DIY Pt. 2

Drogue2 Making a Drogue

In the last Blue View, I talked about why we liked the idea of a series drogue and why we think it is as good as any other method for handling major storm conditions. I also discussed why we felt it is far superior to any alternative tactic we know of when the waves are breaking. In this blog, I'll talk about how to make your own series drogue. The design and construction details of a series drogue were published as part of a publicly funded study completed by the U.S. Coast Guard and Don Jordan, and are freely available to the public. I used this as my guide when we made ours along with lots of practical advice from our friends at Sailrite.

The illustration gives an overview of the construction. The cones are the same size for any boat – larger boats simply add more line length and increase the number of cones. As the number of cones increases, the initial line size must also increase to handle the added load.

construction of a drogue

The bridle performs two functions. It splits the load, distributing it between two strong points on the transom, and it provides a turning moment to keep the boat stern-to to the waves. Each leg of the bridle should be 2.5 times the transom width, plus an allowance for the splice and for attachment to the boat.

The following table provides a quick summary of line sizes and the number of cones needed for different size boats. Use the gross tonnage for your vessel and then add 10%. The total load on the boat is shown in the second column. The third column in the table shows the load on the attachment points on each side of the transom. The line lengths shown in the fourth column is the length for the towing line. These lengths also include 5 feet at each end for splicing. A double braid line should be used rather than a three strand, which has a tendency to unlay as it is towed. The line sizes specified in the table are based on average strengths for double braid nylon line from several manufacturers. Check the breaking strength of the line you purchase.

Monohull

Displacement

(lbs)

Load

(lbs)

Load at

Attachment

Points (lbs)

Line Length

Required

(ft)

Line Size

(inches)

No. of

Cones

Weight at end of line

(lbs)

10,000

8000

5600

250

5/8”

100

15

15,000

12000

8400

260

3/4”

110

15

20,000

14000

9800

150/150

3/4”,5/8”

120

15

25,000

17000

11900

155/155

1”,5/8”

130

25

30,000

20000

14000

165/165

1”,5/8”

140

25

35,000

23000

16100

170/170

1”,5/8”

150

25

40,000

25000

17500

125/125/125

1”,3/4”,5/8”

160

30

45,000

28000

19600

130/130/130

1-1/8,3/4”,5/8”

170

40

50,000

30000

21000

135/135/135

1-1/8,3/4”,5/8”

180

50

For example, Nine of Cups has a gross tonnage of 18 tons, so we used 40,000 lbs as our displacement when designing the drogue. We needed to make and attach 160 cones to three lines, each 125 feet long. This seemed daunting at first, but it proceeded quickly once we got into the project. We set goals for ourselves to complete a given milestone each evening, e.g. draw and cut out 25 cones or cut 100 strips of nylon tape.

A 1-1/2 ounce ripstop nylon material was recommended for the cones. We used an old mainsail, which was much heavier than necessary. The emphasis is on the word ‘old’ in the last sentence. This sail had been retired for about four years and stowed on the forward bunk. Before we spent a lot of man-hours making all those cones, we wanted to be sure the sailcloth had not deteriorated and lost too much of its strength. To test the material, we made up a dozen cones, attached them to a line and, during one passage, dragged them for 24 hours. Our speed varied between 4 and 6 knots. The cones held up fine, but we did learn a few things about the construction and stitching.

The illustrations below show the recommended size and placement of the cones. We made a pattern out of cardboard to mark the outline of each cone for cutting. We also used the pattern to mark each cone to aid in aligning the nylon tape for sewing. We first tried cutting each cone using a hot knife, but found this to be too slow. We switched to a pair of electric scissors and then used a butane lighter to seal the edges.

cone dimensions

cone placement

cone pattern

The next step was to cut and mark each length of nylon tape. We placed pieces of masking tape on a flat surface to serve as a template for measuring, cutting and marking each strip of nylon. These strips were then sewn to the cones. One thing we discovered with our test run was that it was important to double stitch the tape at each end.

Each piece of cone material was then folded in half and double stitched together. The last step was to turn each cone right side out so that the seam was on the inside. It probably doesn’t matter, but we sewed each cone so that the tape was on the outside of the finished cone. We next began attaching each cone to the line. The first step was to mark the line at 20 inch intervals, leaving 5 feet or so at each end for splicing. Each cone was threaded onto the line, then the end of each strip of tape from the cone (six per cone) was pulled through the line and tied with an overhand knot using either the single or double pass method. We already had a splicing wand that worked well for this process, but you can make a tool using seizing wire bent into a loop and taped to a wooden handle.

attaching cones

tool

The next issue was the attachment of the line segments, towing line, bridle and anchor. A proper splice is stronger than any knot. The line we bought, however, was manufactured in South America and we found it was almost impossible to splice eyes into it, unlike the line we were used to that was made in the U.S. Instead of splicing eyes into each end, we resorted to using knots to attach the line segments together. Ideally, we would have spliced heavy metal thimbles in the ends of the lines and attached them together with heavy duty shackles. For the weight at the end of the line, we used a 20 foot length of 3/8” chain. We attached it with a shackle to a standing bowline at the end of the line.

eyesplice and thimble

An important aspect of the overall system is the attachment points on the boat. These must, of course, be strong enough to withstand the load. The bridle splits the total load between the two corners of the transom, making the load at each attachment point no more than 70% of the total load. Most cleats and sheet winches, however, are not designed to withstand stresses of this magnitude. The ideal alternative is to make attachment points similar to chain plates by bolting stainless straps to each corner of the transom. These should be through bolted and utilize backing plates. Use heavy shackles to attach each tow line.

cone attachment

The following table lists conservative size straps and shackles for several boat sizes. If cleats are used, make sure they are rated for the load and are bolted through the deck with substantial backing plates.

Load at attachment

point (lbs)

Strap Size (Inches)

Bolts

Shackle Size

10,000

¼ x 2.25 x 14-3/8 inch

4 each

½ Inch

14,000

¼ x 2.25 x 18-3/8 inch

6 each

5/8 Inch

18,000

3/8 x 2.25 x 22-3/8 inch

8 each

¾ Inch

22,000

3/8 x 2.5 x 26-3/8 inch

10 each

¾ Inch

Chafe may be an issue as well. We actually used dyneema for the bridle which is more chafe resistant than nylon, and enabled us to use a smaller diameter line. The last issue is the stowage of the drogue. The total weight of our drogue system was too much to handle, so we separated the line segments and only connected them together when we needed to deploy it. We stow each segment the way we stow our spare rope anchor rode using figure-eight flakes.

faked line secured for stowing

Now that the drogue is all designed and built, how do we deploy it? How do we get it back aboard again? I'll cover that in the last installment of this 3-part series next week.