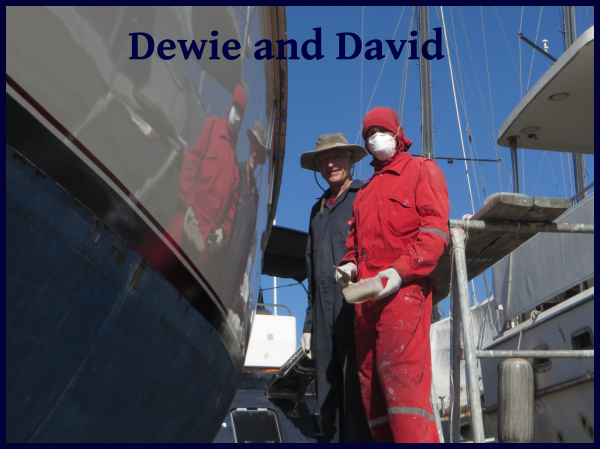
The Blue View - Working in d' Trini Style
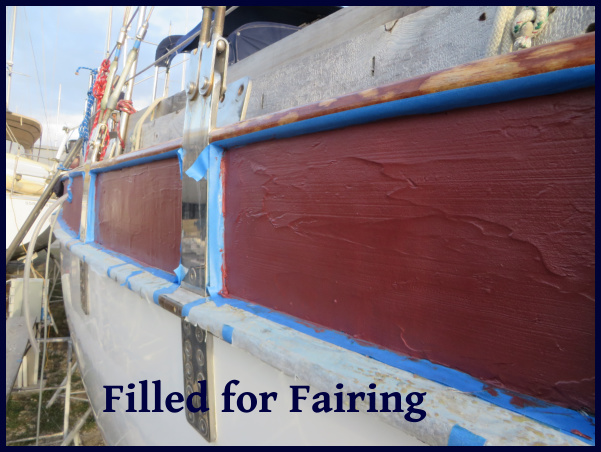
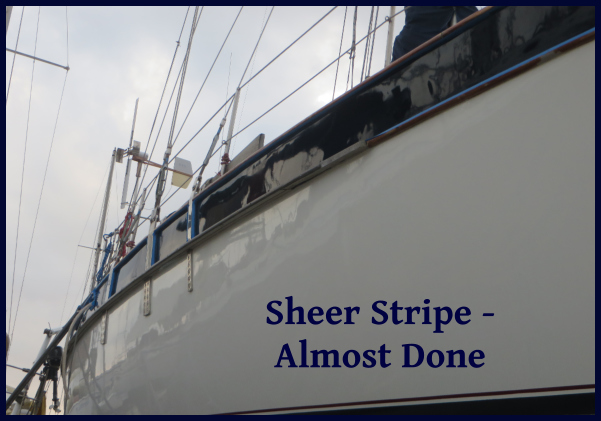
One of the tasks we wanted to accomplish here was to address some core de-lamination problems in the bulwarks of Nine of Cups. This involved cutting away sections of the fiberglass sheer stripe, removing the old core, replacing it with new marine plywood, embedding everything in epoxy, and re-attaching the fiberglass outer layer. Once this was all done, a layer or two of glass cloth would be applied, then the entire area would be faired and repainted. I did the same to several sections of the deck where our old teak decks had caused de-lamination of the deck core, and while the process took longer than I expected, the end result was a deck that was stronger than new. Since we were on a tight timetable, I thought I'd enlist the help of the Trini guy who had done such a good job painting our hull. To avoid any embarrassment, l'll call him Dewie. sheer stripe

Working with Dewie is both endearing and annoying. To begin with, he repeats everything at least three times, followed by "You unda stand me captn? You hear what ahm sayin?". These last two sentences will be repeated until I verbally acknowledge that I have, indeed, heard and understood him. Now in his defense, he is used to working with us old cruisers. Many of us are hard of hearing and aren't used to the Trini dialect, (nor do they always understand our accents and idioms for that matter) so if something important is being communicated, it is best to make sure everything is being understood. Dewie carries this to the extreme, however. "We work togetta, eh captn... it's easier to clap wit two hands than one. You unda stand me captn? You hear what l'm sayin?" Pause. "You unda stand me captn? You hear what l'm sayin?" . This will be repeated until I respond enthusiastically. If my response is less than enthusiastic, he will inform me that "It a lot easier to work wit someone who enjoy his work and not be in a foul mood all d' time".

dewie and david

Dewie also likes to share his Trini knowledge with me. Some of his tips and "tricks" are well worth knowing. I've learned a lot from the various tradesmen I've encountered around the world, and I try to be open minded and receptive to new ideas. Dewie must think I'm the village idiot, however, and finds it necessary to explain how he does the simplest tasks. When we were setting up a scaffolding to work on the sheer stripe, we needed to round up some additional planks. Dewie informed me that "the captn on dat catamaran is gone for a long time - we can use his planks. Let me show you d' trick for carrying dem. You pick up one end and I pick up d' otter end and we carry it just so. You see my trick? You unda stand me captn? You hear what l'm sayin?" Now if I were to foolishly respond "gee whiz - that is clever...I thought we'd put the planks between our legs and hop over to Cups", all I'd hear for the next hour would be his muttering "It sure is hard working wit someone who always be in d' foul mood."

the plywood

Dewie was used to working with epoxy, but I knew he had never replaced the core of a deck before. It was important to him that he didn't appear to lack knowledge on the subject, however. "I done dis work plenty of times, captn, but everybody does it diff'rent. How do you like ta do it?". So I explained 'how I like ta do it'. As we were cutting the plywood to fit into the first section of the sheer stripe, I was numbering each piece of wood to make it easier to figure out which piece of ply went where. Dewie insisted this wasn't necessary - "I can figure dis out jus fine when we gluing dem in", so I stopped numbering them. When it was time to place each piece of ply, we had a few miscues, and while we eventually got everything in its place, it took longer than necessary. The next day, Dewie told me he had a little trick to show me. "We should number each piece of timber like so. Dis is how we do it in Trinidad. Dat way, it's easy to figure it out when it time to glue the timbers in. You unda stand mah trick captn? ..." I wish I had thought of that.

filled

Early on it the process, when we were cutting and grinding the old fiberglass, Dewie came attired in a full Tyvec suit and a respirator. I commented on how I was happy to see he took his health seriously. He said "Yah captn, dat fiberglass is nasty stuff. I try not to bree'd it or any of dem bad chemicals. Mey'be I live to be as old as you, skippah!". I think he was smiling inside his respirator.

almost done

Working with Dewie really has been fun and a positive experience. He works hard, always shows up when he says he will, and his work is good, which is more than I can say about most of the guys I've worked with in dozens of other places. His paint work was first rate and we were quite surprised to find it all done on our return to Trini.

south american dust mask

Now, if only I can keep from being in d' foul mood all d' day...

The Blue View - Replacing a Cutlass Bearing

When we hauled Nine of Cups in December, as soon as the power wash was done and all the sea life was removed from her bottom, I took a walk around looking for problems. For the most part, everything looked good – no blisters, the anti-fouling looked depleted but good, no play in, or issues with the rudder. We hadn't run aground since the last haulout, so there wasn't any damage below the waterline. There were several expected maintenance issues, but the only surprise was that the cutlass bearing needed replacing. The cutlass bearing supports the propeller shaft as it exits the hull, and the actual name is a stave bearing. Originally, they were made of the hardwood, lignum vitae, which is resistant to rot, is very hard and doesn't swell when wet. We know of at least one sailboat that replaced their worn cutlass bearing with a locally fabricated hardwood version when the modern equivalent wasn't available, and it worked just fine.

The name 'Cutless' is actually a tradename owned by Duramax Marine for their molded rubber stave bearing. This then evolved to cutlass bearing and became the generic name. I think if I walked into a marine chandlery and asked for a stave bearing, I'd get some puzzled looks – but everyone knows what a cutlass bearing is. For a boat the size of Cups, the bearing consists of a bronze tube with a grooved nitrile, rubber-like lining.

Since it was eight years since we last replaced it, I was half expecting that it might be time again. To determine whether it needed replacing, I took hold of the end of the prop shaft and wiggled it up and down and from side to side. There should be virtually no movement with a good bearing. I was seeing considerable play in the shaft, so I knew it was time for a new bearing.

removing the prop nut

The first step in removing the cutlass bearing is to remove the propeller. It is pressed into place with a large nut and cotter pin. These come off easily, but the prop itself is always reluctant to come free. I remember the first time I tried getting ours off – I spent most of a day prying, heating, tapping and pulling on it before renting a prop puller tool. All boatyards have such a tool, usually homemade, that makes the job quite easy. Here at Power Boats in Trinidad, I couldn't rent just the tool – I had to hire the guys along with it. The cost was higher, but they had the prop off in just a few minutes.

bearing romoved

Next, the prop shaft has to be removed. On Cups, this entails disconnecting the hydraulic piston connected to the rudder, removing the anode on the rudder, then removing the shaft coupler and shaft seal. I also had to remove the pulley for the prop shaft generator. Once these were all loosened and pulled off, the shaft slid right out. I used a scouring pad to clean and polish the shaft.

cleaning the prop shaft

Removing the cutlass bearing itself is next. It is held in place with two set screws and, in theory, once these are removed, the end of the cutlass bearing can be gripped with a pair of vice-grips or pipe wrench and the bearing can be pulled out. If only it were true. We were in Tahiti the last time we replaced it, and I spent two days trying to extract it. I tried all sorts of schemes and finally resorted to cutting it in half, patiently sawing through it with a hacksaw blade. This time I hired the same guys that had the prop puller. They cut through the old bearing in just a few minutes, using a SawzAll fitted with a 10” blade. In order to pull the bearing out, however, they had to perform some surgery to the end of the shaft tube as well.

new bearing

The new bearing was slid into the tube, and I gave it a few taps with a piece of wood and hammer to ensure it was seated. The set screws were screwed into place, and with help from Marcie, the prop shaft was slid back in. It was a tight fit in the new bearing, and lubricating it with a little dishwashing soap and water helped. The rest of the process was the reverse of the removal process.

shaft reattached

The final step was to repair the fiberglass that was cut when the old bearing was being removed. I mixed up a batch of West System epoxy, thickened with 403 filler to about the consistency of peanut butter, and built up and faired the damaged edge. Once it cures, I will sand it, then give it a couple of coats of anti-fouling.

Hopefully, it will be another decade before we have to replace it again.

The Blue View - Alternative Antennas

In the last Blue View, I talked about a long line antenna, which is what most cruising boats use for transmitting, either on the marine bands or on the HAM frequencies. As I mentioned, probably 95% of the cruising sailboats we see use a long line type antenna for their HF radios, but there are a couple of other alternatives. antennas

One alternative is a whip antenna. This is a 23' fiberglass antenna that is mounted to a rail, usually near the stern of a sailboat. The rail is typically used as the counterpoise. The whip antenna is more often used on power boats, but we have seen a number of sailboats using them as well. The drawbacks: they are expensive (although no more so than buying and installing a couple of backstay insulators); the mounting method must be robust as a 23' pole aboard a sailboat that is rolling in a seaway will put a lot of stress on the mounting point; the transmission range is typically less than that of a properly installed long line antenna – some estimates I've seen indicate as much as 30% less.

dipole antenna


Another alternative is a dipole antenna. A dipole antenna may be the most widely used antenna for shore-based systems. The most common version is made up of two identical length conductors placed end-to-end. The radio signal connection is made at the junction of the two wires. The dipole antenna is only resonant within a small frequency range (example: 14.0Mhz-14.5Mhz), and is tuned by adjusting the length of the two conductors. If it is operated at the tuned transmission frequency, no antenna tuner is needed – the dipole can be connected directly to the radio. We commonly transmit in the 14Mhz range, so the dipole I built was tuned for this range. I found, however, that if I connected it through my antenna tuner, it transmits reasonably well throughout the 10Mhz to 18Mhz range – maybe not quite as well as the long line, but not bad. On the other hand, within its resonant frequency band, it is superior to our long line antenna.

dipole construction

I built a rather simple version. I used coax cable from the antenna tuner to the junction of the two dipole conductors. As an insulator, I used a one foot section of 1x2 wood, and soldered the connections between the coax and the dipole conductors. Each of the conductors were secured with cable ties, and the entire insulator was wrapped in rigger's tape to protect it from the elements. I used a spare halyard to hoist one end of the antenna and secured the other end to the stern rail. The coax wire was led from the insulator to a cable tie on the backstay, then to our antenna tuner.

The length of the two dipole conductors should be 1/2 wavelength in total which, if you're not a radio geek, is determined by the formula: length in feet = 468/frequency in megahertz. So if you want to transmit at 14.2Mhz, the theoretical length of the conductors should be 468/14.2 = 32.96 feet, and each conductor should be half of this, or 16.48 feet. Note that this is the theoretical length. The optimal length will vary from the theoretical based on a host of variables – the type and length of feed line, other rigging, masts, angle of the dipole, etc.

dipole rigged

To tune the antenna length, I used my radio's built in Standing Wave Ratio (SWR) meter. I was at anchor, but if I was at a marina, I would have moved Nine of Cups to an anchorage or mooring to avoid any interference from other boats or structures. I started by making the length of the dipole conductors slightly longer than the theoretical lengths, hoisted it into position and checked the SWR. The SWR will be lowest at the resonant frequency of the dipole, and to start, the center of the resonant frequency was lower than the desired frequency of 14.2Mhz. I lowered the antenna and trimmed off an inch from each conductor, then repeated the process until the the resonant frequency was centered around 14.2Mhz.

The purists out there will know this wasn't the optimal method of building a dipole. I should have used a balun between the coax feed line and the dipole conductors, or alternatively used a twin lead feed line instead of coax. There are also ways to build a multi-frequency dipole that will transmit at three frequency ranges. This was my first attempt, however, and I wanted to keep it simple. As it turns out, I was quite happy with its performance and didn't modify it.

multi frequency dipole

If I didn't have a SWR meter, I would have made the lengths of the conductors the theoretical lengths and used an antenna tuner between the dipole and the radio. This is the configuration I use anyway, since I often use the dipole at other than the resonant frequency.

So what do we actually use? Most often we rely on our old long line antenna, and the dipole is our backup. Since it doesn't require a ground plane, I also dig it out when we are on the hard where the performance of the long line drops dramatically.

Well – to paraphrase my dear old dad – I've taught you everything I know about HF radios and antennas and you still don't know nuthin'.

Next week I'll move on to a totally new subject – stay tuned.