The Blue View - Anchor Snubbers

snubber 
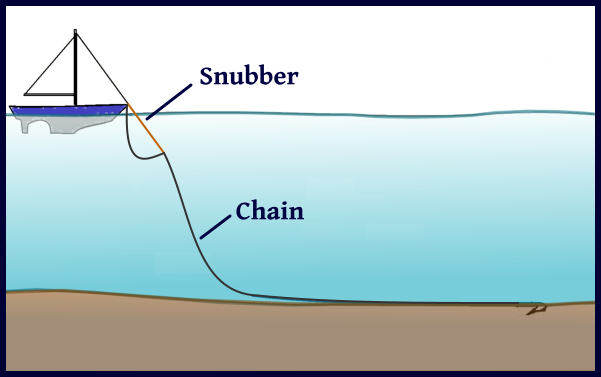
Nine of Cups has all chain rode, and we never anchor without using a snubber. This is a stretchy nylon line attached between a strong point on the boat and the anchor chain. In strong winds, the anchor chain will stretch out almost straight, and as the wind and waves cause the boat to buck and jerk, there is no give in the chain, causing tremendous stress on the boat - not a good thing. Even worse, the sudden jerks on the anchor can cause it to break free from the bottom – even less of a good thing. The elasticity of the rope snubber reduces the sudden tugs on the anchor and the stress on the windlass and chain stopper.

Over the years, we've gone through dozens of snubbers. We tried smaller diameter line, but found that these would snap when the weather got rough. We tried heavier line, but this didn't have enough stretch. For Cups, the perfect size is 5/8” three strand line. Now we have two. One is about 25 feet long, and we use it in most conditions. The other is 60 feet long, and is our heavy-duty snubber for the “batten the hatches, lash everything down, take the seasick medicine” kind of weather.

When we anchor, we let out enough chain to give us the scope we want, usually five times the depth. If a blow is expected, and there is adequate swinging room, we increase this to at least seven times the depth. Then we set the anchor by backing down on it with a heavy hand on the throttle. Once I am sure it has set, I attach one end of the snubber to a forward cleat and the other end to the anchor chain, and let out enough extra chain so that the snubber is taking the load. Then I let out more chain until the it hangs at least 3-4 feet below the taut snubber. The goal is to make sure there is always slack in the chain no matter how much the nylon snubber stretches.

I use half hitches rather than a spliced eye to attach the snubber to the cleat. That way if I need to adjust the amount of snubber that is deployed or release it entirely, all that needs to be done is to undo the half hitches. If a spliced eye is used, the chain must be brought in enough to take the tension off the snubber, or the snubber must be cut before it can be released. Using half hitches also allows me to go forward periodically and let out a few more inches of snubber if there is any chance the snubber might be chafing – quite important if we are anchored in strong winds.

There are several different ways to attach the snubber to the chain. The methods we’ve used fall into three categories: hooks with no retainers, hooks with retainers and knots. I’ve talked about the knot I use for attaching the snubber to the chain in a previous blog, so I’ll focus on snubber hooks in this blog.

Hooks with No Retainers

snubber hook with no retainer

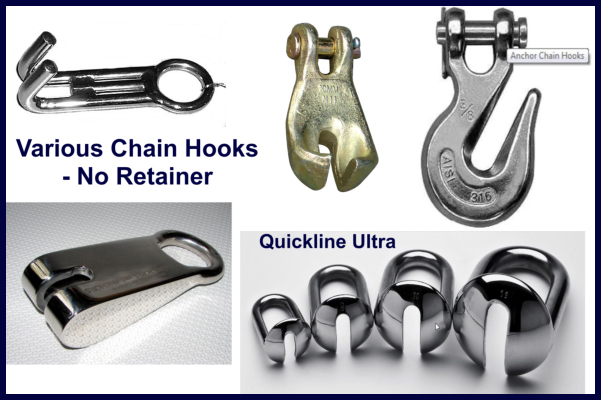
There are several varieties of hooks without retainers. The biggest advantage of these types of hooks is that they are quick to attach and remove. One downside of this type hook is that the snubber line must be kept tight while deploying the chain to prevent the hook from falling off. Once the chain is deployed and the snubber is tensioned, however, the hook will usually stay in place as long as there is enough slack in the chain. Another downside is that if the snubber line ever breaks, the hook will be lost.

It is important to ensure the hook is strong enough - we’ve bent or deformed a few hooks when anchored in rough weather. Check the SWL before buying one.

snubber bridle

Another type of hook without a retainer is the chain grabber. It is intended to be used with a bridle, which many sailors prefer – especially catamaran skippers. The biggest advantage of using a bridle is that the boat yaws less when the wind picks up. I find it tricky to keep it in place while deploying the chain, however. As with any hook, make sure it is strong enough for your boat.

Hooks with Retainers

snubber hook with a retainer

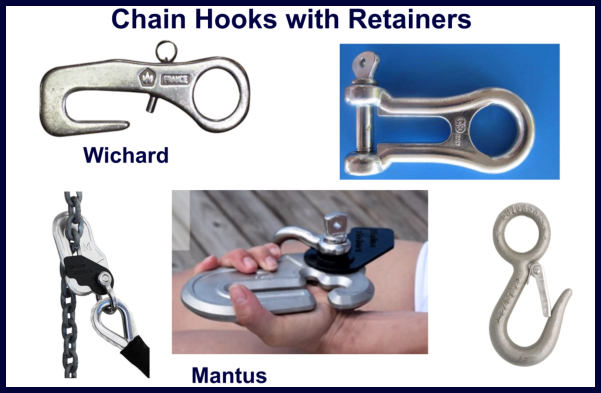
There are also several varieties of hooks with retainers. Most of these take only a second or two to attach, and won’t fall off the chain once in place, even if the snubber line breaks. The only disadvantage is that on some versions, the retainer can become jammed. This happened to us with both the Lewmar version and with a simple hook that utilized a spring-loaded retainer. In one case, it required a hammer and pry-bar and more than a half hour to free the hook.

The shackle-type hook pictured in the upper right of the collage above looks like it would be quite strong and immune to jamming. On the other hand, it would not be quick to attach or remove.

The Mantus hook looks like it has potential, but a friend that has one reports the retainer didn’t last long and was removed after a few months’ use.

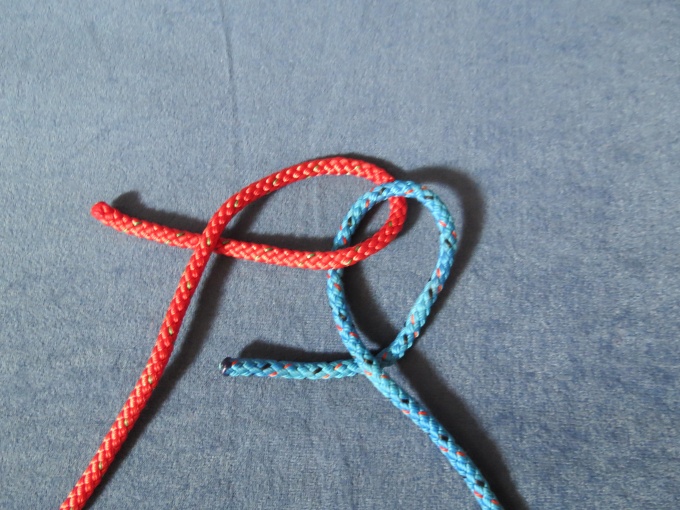
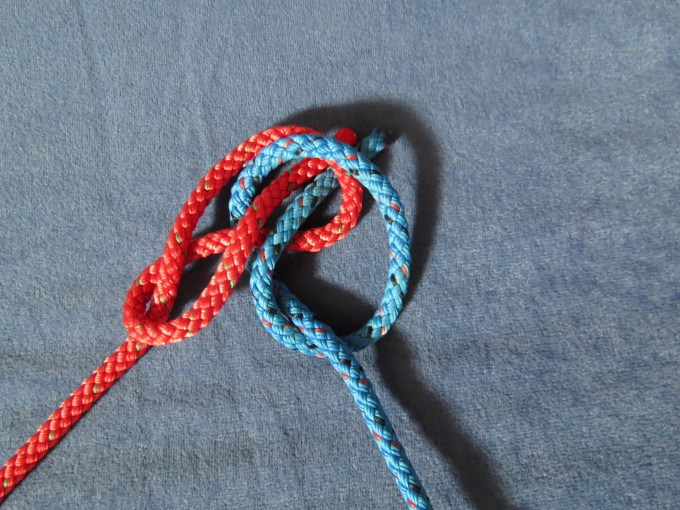
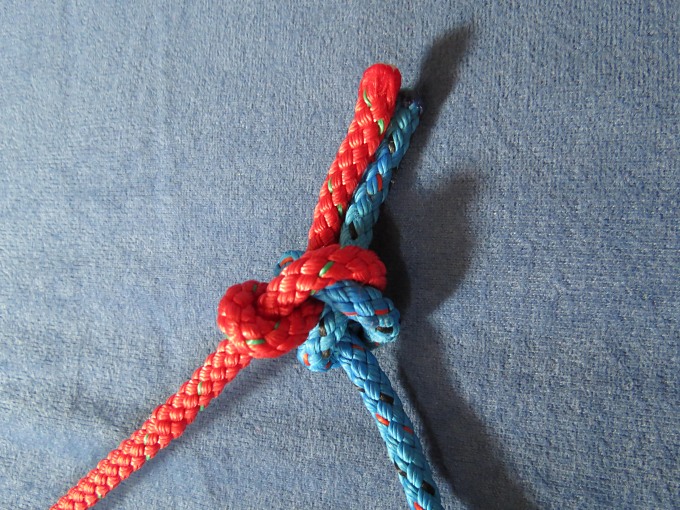
We’ve tried perhaps half a dozen different hooks over the years, some with good success and some that we would categorize as somewhat less than successful. In the end, I always end up going back to my old faithful rolling hitch. It is quick to tie, easy to remove, never fails to hold – and best of all – it’s free.

Our Daily Bread (repost)

This is a repost of a blog from David about making fresh bread on passage. One of the first things we run out of when on a long passage is fresh bread. It is also one of the easiest problems to remedy. My night watches are the perfect time for making bread. It helps pass the time, and I can still pop my head up and take a look around every five minutes or so.

I make the dough during my 9 PM to midnight watch...

kneading the dough

let it rise while I'm sleeping...

rising dough

then try to time it so that it is hot and just out of the oven at the end of my 3 AM to 6 AM watch.

done

The smell of the freshly baked bread greets Marcie when she gets up, and we enjoy a slice or two over our morning cuppas while discussing whatever happened (or broke) during the night.

Kalamata olive bread is one of our favorites. This recipe makes one large loaf.

Kalamata Bread

Ingredients

Starter

  • ½ cup (100 ml) warm water
  • 1 tsp (3g) dry yeast
  • ½ cup (75g) flour

Dough

  • 1/3 cup (66 ml) warm water
  • 1 Tbs (20ml) honey or ½ Tbs (6g) brown sugar
  • 2 tsp (6g) dry yeast
  • 1 Tbs (5g) rosemary
  • 1 Tbs (5g) oregano
  • 1/8 cup (30ml) olive oil
  • 2-1/2 cup (375g) flour
  • 1 cup (200g) kalamata olives, pitted and sliced lengthwise
  • 1 tsp (15g) salt
  • optional: ½ cup (125g) sunflower and/or pumpkin seeds
  • cornmeal as needed

Starter:

Water should be just warm to the touch. If it is too hot, it will kill the yeast. Dissolve the yeast in the warm water, then add the flour and stir until thoroughly mixed. Cover and let it stand 30 minutes.

Dough:

Combine water, honey or sugar, and yeast, and mix until yeast is dissolved. Add herbs, oil, flour, the starter, olives, and seeds, and mix well. Move to a floured surface, and sprinkle salt over dough. Knead for 5 minutes, adding flour as needed. Put the dough in a greased bowl, cover and let rise until doubled, about 1 hour. Transfer to a floured surface, punch it down to get rid of air bubbles, and shape (don't knead again). Grease a cookie sheet and dust with cornmeal, then transfer the dough to the cookie sheet. Let rise in a warm place for two hours. (On my night watch, I let it rise for 3 hours during my off-watch).

Preheat oven to 450F (230C). Raise the upper oven rack to the second level above the flame and slide an oven proof pan onto the lower rack. About 5 minutes before putting the bread in the oven, add about 1 cup (250ml) of water to the pan. This produces steam for the first 5-10 minutes of baking. The steam keeps the outer layer of dough soft and flexible for a few more minutes, allowing the yeast to continue rising. The result will be a slightly lighter loaf with a brown crust. Score the top of the loaf with a sharp knife or razor and slide the bread into the oven. Bake at 450 (230C) for 10 minutes, then reduce heat to 400F (200C) and continue baking for another 20-30 minutes. Bread is done when you get a slightly hollow sound when the loaf is rapped with a knuckle.

The Blue View - Knots Revisited

A couple of weeks ago, I had the honor of presenting a seminar on anchors and anchoring techniques. One of the questions asked was what knot I used to attach a snubber to an anchor rode. This brought two things to mind: first, at least one person stayed awake for the presentation, and second, what a knot geek I am. I must have twenty books and apps for knots aboard Nine of Cups, but only two get used regularly. One is the terrific app, Animated Knots by Grog. This is loaded on my iPad, and includes dozens of animations showing how to tie many more knots than I’ll ever use. When I want to refresh my memory on how to tie a particular knot, a quick look at Grog’s app is all it takes. For example, I like the Zeppelin Bend, which is not only good for securing a Zeppelin, should I ever encounter one, but also works well for tying a loop in bungee cord, and glancing at the animation reminds me how to tie it.

The other reference is every knot geek’s bible, the Ashley Book of Knots by Clifford Ashley. I wrote a Blue View on the topic a few years ago, and thought it might be fun to share again.

Knots hold a real fascination for me. I particularly appreciate a well-tied knot that is perfect for a specific application. There are a handful of knots that most sailors know and use frequently…the bowline (BO-lin), the reef knot, and the clove hitch come to mind. Marcie knows the basic knots, and in fact, can tie a bowline faster than anyone I know. But beyond these, and maybe tying a bow in her shoelaces, she quickly loses interest in knots.

I have several books aboard that show how to tie a number of useful knots, but to my knowledge, the absolute best reference is The Ashley Book of Knots. If you’ve ever read The Shipping News by Annie Proulx, you might remember that each chapter begins with an excerpt from Clifford Ashley’s book.

He spent his life not only identifying and cataloging knots, but researching their uses and history. It took him eleven years to compile them in his book, which describes 3,854 knots. While the majority of the knots are intended for the sailor, there are knots for every purpose imaginable. Want to secure a bale of cotton? Knot #2073 is the one to use. Want to hoist a horse aboard your boat? Knot #2192 is the one for you. Want to make a snare? You might look at Knot #477.

A couple of decades ago, Marcie bought me a copy of Ashley’s for my birthday. It is now falling apart from heavy use. It’s water stained from a dousing it endured a few years ago. The dust cover has long since left this world. It still remains one of my favorite books.

One of my many uses for it is to identify a knot I’ve encountered somewhere. In a recent blog post, Marcie wrote about visiting the bell ringers at St. David’s Cathedral. Something I noticed was that all 12 bell ropes were secured in nice coils using the exact same knot. I asked the bell ringer whether this knot had a name and whether all bell ropes were secured in this fashion. He didn’t know if it had a name, but he said that that was the knot he was taught to use. When we returned to Cups, I looked through Clifford’s book, and sure enough, knot #172 is the Bell Ringer knot. Knot #173 is an alternative that is used if the bell rope is extra long or heavy.

bellringers knot

While we were traveling in the interior of Ecuador once, we happened onto a farmers’ market. All sorts of local animals, including dozens of pigs were being taken to the market for sale. I noticed that each of the pigs was being led by a rope using the same unusual knot. All the farmers seemed to know and use this knot for their pigs. It was a three-loop harness, one loop going around the pig’s neck, and the other two loops going around the pig’s front legs. I later found this exact knot in Ashley’s. It was Knot #1110, a knot originating in South America and used widely as a hackamore or emergency bridle. Apparently, it is also the preferred knot to lead a pig to market.

Ashley invented a number of knots as well. He was a modest man and never named them after himself, but over the years, many were given his name. My favorite of his knots is called the Ashley Bend. A bend is a type of knot used to unite two ropes or the ends of the same rope. The Ashley Bend, only referred to as Knot #1452 in his book, is easy to tie, is strong, but never jams or slips. I find it particularly good for tying bungee cord into a loop. The following photos show how to make it.

Ashley 1


Ashley 2


Ashley 3