The Blue View - Anchor Swivels

anchor swivels An anchor swivel is often used to attach the anchor to the end of the chain. I say often, because not everyone sees any advantage to using a swivel.

The purpose of an anchor swivel is to prevent the anchor rode from twisting excessively. If a boat is anchored for a long period of time in an area of large tidal and/or wind changes, it’s possible that it will do a complete 360 degree swing once or twice a day. Eventually, the rode could twist enough to unlay a 3-strand rope rode or put enough twist into a chain rode to introduce torque stress on the chain and shackles. The twists may also cause a chain rode to bind up and jam a windlass gypsy.

typical swivel

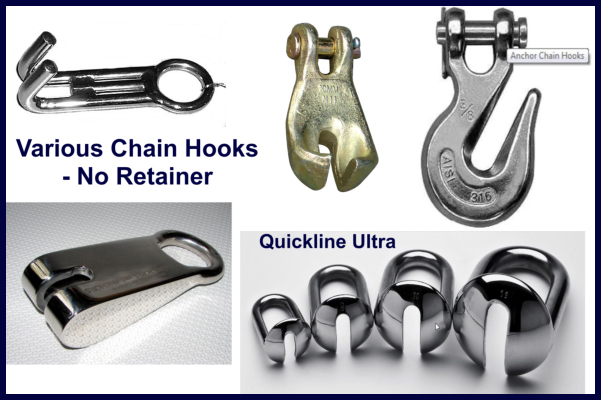
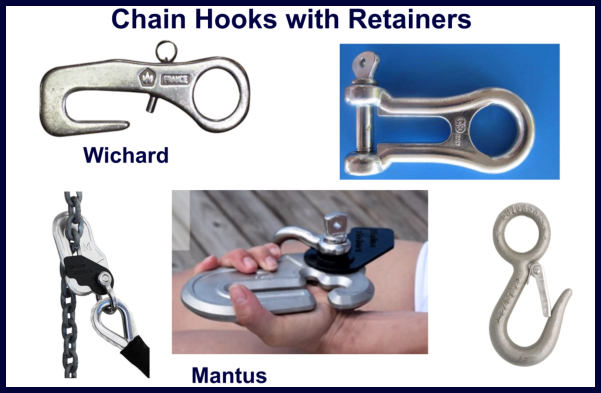
There are potential problems with several swivel designs, however. Some swivels are weaker than the ground tackle for which they are designed. Some are subject to internal corrosion and cannot be easily inspected. Others have no way of seizing the pins and/or bolts, introducing the possibility of the swivel coming apart while in use.

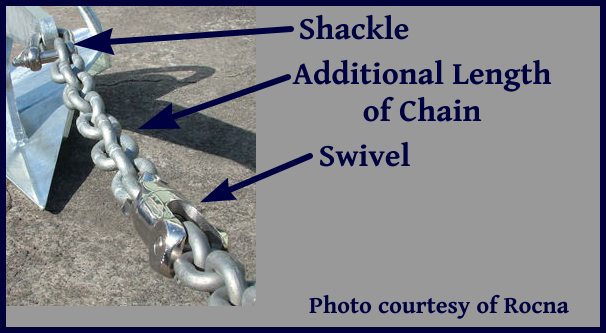
Additionally, some swivels can be damaged or weakened if the pull is side-to-side rather than along the axis of the anchor. The Rocna website suggests adding a short length of chain between the swivel and the anchor shackle to eliminate this problem. On Nine of Cups, however, there isn’t enough distance between the anchor shank and the windlass to add chain between the swivel and the anchor.

swivel with chain

In our view, we’ve always thought the risks introduced by adding a swivel outweighed the benefits. While we’ve certainly had the occasional problem in the thousands of times we’ve dropped the hook, none that I recall was due to the lack of a swivel. We do have a heavy bronze bow roller with a groove in it that prevents any twists in the chain from making their way to and jamming the gypsy, and this no doubt helps. And perhaps we’ve never been anchored anywhere long enough in the type of conditions that would introduce sufficient twists in the rode to cause a problem. The only issue – and it is more of an inconvenience than a real problem – is that our anchor sometimes comes out of the water with the flukes facing forward, but this is usually corrected by dipping it back into the water while the boat is moving or by rotating the anchor with a boathook. At any rate, I’m not convinced that a swivel will prevent this.

mantus swivel

mantus swivel

I like to keep an open mind about new ideas, however, and at a recent boat show I saw a new swivel, made by Mantus, that seems to have overcome all my objections. My first impression was that it’s a very large hunk of 316 stainless steel. It not only looks strong, but the manufacturer’s specs indicate that it is stronger than the 3/8 HT chain we use. It is easily dismantled for inspection, and all the pins are oversized and can be seized. Finally, the business end that attaches to the anchor is terminated in a large shackle, making it unlikely to have problems with side-to-side pulls. Mantus was offering it at a discounted show price with free shipping, and in the interest of keeping myself informed, I bought one.

mantus swivel

We’ll be returning to Cups in a little over a week, and I plan to install it then. I’ll keep you posted on my thoughts, good and bad, as it gets used.

The Blue View - Anchor Snubbers

snubber 
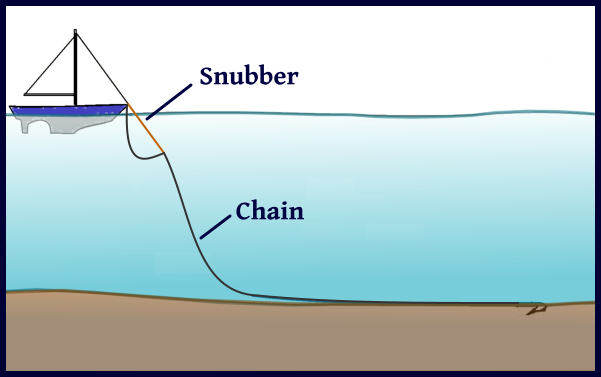
Nine of Cups has all chain rode, and we never anchor without using a snubber. This is a stretchy nylon line attached between a strong point on the boat and the anchor chain. In strong winds, the anchor chain will stretch out almost straight, and as the wind and waves cause the boat to buck and jerk, there is no give in the chain, causing tremendous stress on the boat - not a good thing. Even worse, the sudden jerks on the anchor can cause it to break free from the bottom – even less of a good thing. The elasticity of the rope snubber reduces the sudden tugs on the anchor and the stress on the windlass and chain stopper.

Over the years, we've gone through dozens of snubbers. We tried smaller diameter line, but found that these would snap when the weather got rough. We tried heavier line, but this didn't have enough stretch. For Cups, the perfect size is 5/8” three strand line. Now we have two. One is about 25 feet long, and we use it in most conditions. The other is 60 feet long, and is our heavy-duty snubber for the “batten the hatches, lash everything down, take the seasick medicine” kind of weather.

When we anchor, we let out enough chain to give us the scope we want, usually five times the depth. If a blow is expected, and there is adequate swinging room, we increase this to at least seven times the depth. Then we set the anchor by backing down on it with a heavy hand on the throttle. Once I am sure it has set, I attach one end of the snubber to a forward cleat and the other end to the anchor chain, and let out enough extra chain so that the snubber is taking the load. Then I let out more chain until the it hangs at least 3-4 feet below the taut snubber. The goal is to make sure there is always slack in the chain no matter how much the nylon snubber stretches.

I use half hitches rather than a spliced eye to attach the snubber to the cleat. That way if I need to adjust the amount of snubber that is deployed or release it entirely, all that needs to be done is to undo the half hitches. If a spliced eye is used, the chain must be brought in enough to take the tension off the snubber, or the snubber must be cut before it can be released. Using half hitches also allows me to go forward periodically and let out a few more inches of snubber if there is any chance the snubber might be chafing – quite important if we are anchored in strong winds.

There are several different ways to attach the snubber to the chain. The methods we’ve used fall into three categories: hooks with no retainers, hooks with retainers and knots. I’ve talked about the knot I use for attaching the snubber to the chain in a previous blog, so I’ll focus on snubber hooks in this blog.

Hooks with No Retainers

snubber hook with no retainer

There are several varieties of hooks without retainers. The biggest advantage of these types of hooks is that they are quick to attach and remove. One downside of this type hook is that the snubber line must be kept tight while deploying the chain to prevent the hook from falling off. Once the chain is deployed and the snubber is tensioned, however, the hook will usually stay in place as long as there is enough slack in the chain. Another downside is that if the snubber line ever breaks, the hook will be lost.

It is important to ensure the hook is strong enough - we’ve bent or deformed a few hooks when anchored in rough weather. Check the SWL before buying one.

snubber bridle

Another type of hook without a retainer is the chain grabber. It is intended to be used with a bridle, which many sailors prefer – especially catamaran skippers. The biggest advantage of using a bridle is that the boat yaws less when the wind picks up. I find it tricky to keep it in place while deploying the chain, however. As with any hook, make sure it is strong enough for your boat.

Hooks with Retainers

snubber hook with a retainer

There are also several varieties of hooks with retainers. Most of these take only a second or two to attach, and won’t fall off the chain once in place, even if the snubber line breaks. The only disadvantage is that on some versions, the retainer can become jammed. This happened to us with both the Lewmar version and with a simple hook that utilized a spring-loaded retainer. In one case, it required a hammer and pry-bar and more than a half hour to free the hook.

The shackle-type hook pictured in the upper right of the collage above looks like it would be quite strong and immune to jamming. On the other hand, it would not be quick to attach or remove.

The Mantus hook looks like it has potential, but a friend that has one reports the retainer didn’t last long and was removed after a few months’ use.

We’ve tried perhaps half a dozen different hooks over the years, some with good success and some that we would categorize as somewhat less than successful. In the end, I always end up going back to my old faithful rolling hitch. It is quick to tie, easy to remove, never fails to hold – and best of all – it’s free.

Our Daily Bread (repost)

This is a repost of a blog from David about making fresh bread on passage. One of the first things we run out of when on a long passage is fresh bread. It is also one of the easiest problems to remedy. My night watches are the perfect time for making bread. It helps pass the time, and I can still pop my head up and take a look around every five minutes or so.

I make the dough during my 9 PM to midnight watch...

kneading the dough

let it rise while I'm sleeping...

rising dough

then try to time it so that it is hot and just out of the oven at the end of my 3 AM to 6 AM watch.

done

The smell of the freshly baked bread greets Marcie when she gets up, and we enjoy a slice or two over our morning cuppas while discussing whatever happened (or broke) during the night.

Kalamata olive bread is one of our favorites. This recipe makes one large loaf.

Kalamata Bread

Ingredients

Starter

  • ½ cup (100 ml) warm water
  • 1 tsp (3g) dry yeast
  • ½ cup (75g) flour

Dough

  • 1/3 cup (66 ml) warm water
  • 1 Tbs (20ml) honey or ½ Tbs (6g) brown sugar
  • 2 tsp (6g) dry yeast
  • 1 Tbs (5g) rosemary
  • 1 Tbs (5g) oregano
  • 1/8 cup (30ml) olive oil
  • 2-1/2 cup (375g) flour
  • 1 cup (200g) kalamata olives, pitted and sliced lengthwise
  • 1 tsp (15g) salt
  • optional: ½ cup (125g) sunflower and/or pumpkin seeds
  • cornmeal as needed

Starter:

Water should be just warm to the touch. If it is too hot, it will kill the yeast. Dissolve the yeast in the warm water, then add the flour and stir until thoroughly mixed. Cover and let it stand 30 minutes.

Dough:

Combine water, honey or sugar, and yeast, and mix until yeast is dissolved. Add herbs, oil, flour, the starter, olives, and seeds, and mix well. Move to a floured surface, and sprinkle salt over dough. Knead for 5 minutes, adding flour as needed. Put the dough in a greased bowl, cover and let rise until doubled, about 1 hour. Transfer to a floured surface, punch it down to get rid of air bubbles, and shape (don't knead again). Grease a cookie sheet and dust with cornmeal, then transfer the dough to the cookie sheet. Let rise in a warm place for two hours. (On my night watch, I let it rise for 3 hours during my off-watch).

Preheat oven to 450F (230C). Raise the upper oven rack to the second level above the flame and slide an oven proof pan onto the lower rack. About 5 minutes before putting the bread in the oven, add about 1 cup (250ml) of water to the pan. This produces steam for the first 5-10 minutes of baking. The steam keeps the outer layer of dough soft and flexible for a few more minutes, allowing the yeast to continue rising. The result will be a slightly lighter loaf with a brown crust. Score the top of the loaf with a sharp knife or razor and slide the bread into the oven. Bake at 450 (230C) for 10 minutes, then reduce heat to 400F (200C) and continue baking for another 20-30 minutes. Bread is done when you get a slightly hollow sound when the loaf is rapped with a knuckle.