

Blue's Electrical System, Part 2
/Last week's blog covered the AC system I'm in the process of installing in Blue. This week, I'll discuss my plans for the DC side of things.
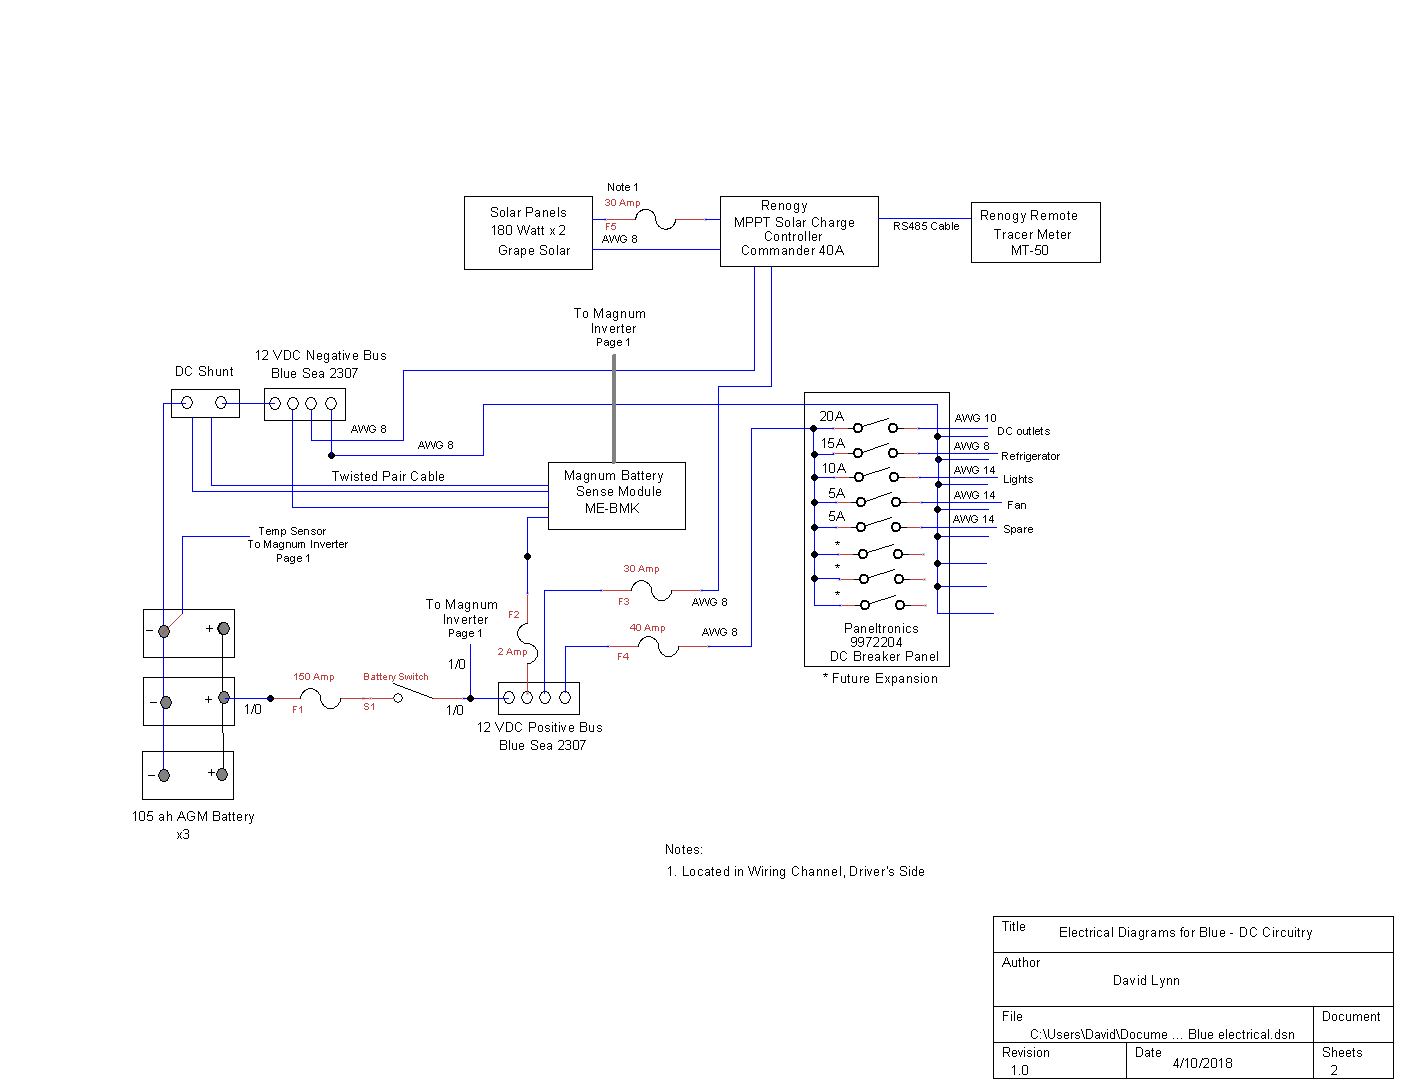
Blue's 12 vdc system
Batteries
The heart of the system is the batteries. A little over a year ago, when we were still aboard Nine of Cups, it was time to replace our house batteries, and I spent a fair amount of time investigating the options. Our old Lifeline AGM batteries lasted seven years, not bad at all, but battery technology has changed a lot over that timeframe, and I wanted to see whether any of the new products would be better for Cups.
Lithium-ion technology was high on the list, but despite all its advantages, I couldn't justify the extremely high cost. There were also some new improvements to AGM battery technology that looked promising, especially Thin Plate Pure Lead (TPPL) and carbon foam batteries. I gave the carbon foam a slight edge, but they had a several month backlog, so in the end, I went with TPPL batteries. Since Cups spent the better part of last year in marinas, however, I can't really rate the performance of the new batteries - $99 Walmart starter batteries would have been just fine for that.

Renogy 105 ah AGM Battery
I took another look at the available technology for Blue, but not much has changed over the last year. Carbon foam batteries are still on backorder and lithium-ion batteries are still very expensive. One new option I looked at was 're-purposing' lithium batteries that were salvaged from wrecked electric cars. There are two problems with that approach. First, all the fail-safe, protection circuitry that is necessary to prevent either destroying or igniting lithium batteries would have to be designed and constructed before they could be safely used in a van. Secondly, even at 1/2 to 1/3 the price of new batteries, they are still considerably more expensive than AGM batteries.
I finally decided on reasonable quality AGM batteries. My thought is that, with a little care, we should be able to get 3-4 years out of them, and by then, lithium-ion technology may be more affordable. We'll see. I bought three, 105 ah, group 31 batteries from Renogy, a solar power equipment company, for $180 each with free shipping, for a total of $540. The equivalent TPPL or carbon foam (assuming I could get them) would have been closer to $2000, and lithium-ion batteries would have been around $6000. The salvaged lithium-ion battery option would have been around $2000 for the basic batteries, plus whatever the cost and time involved in implementing the safety circuitry.

Battery Switch
The batteries are connected in parallel with short, 1/0 AWG cables, resulting in a 12 vdc, 315 ah battery bank. The positive side of the battery bank is fed to a 150 amp fuse, then to a battery switch. The switch has two positions – On and Off. Switching the switch to the Off position allows me to completely disconnect the battery bank.
Isolation
Blue's house batteries will be totally separate from the vehicle batteries. The house batteries don't use the vehicle chassis ground for the negative return, either. All the 12 vdc devices running off the house batteries require two wires, one for the positive 12 vdc and one for the ground return.
DC Circuits
The batteries are connected to three circuits via the 12 vdc positive bus: the DC breaker panel, the Magnum battery monitor, and the Renogy solar charge controller. The house batteries also connect to the Magnum inverter/charger.
DC Breaker Panel

DC Breaker Panel
The wires that feed the DC breaker panel are AWG 8, and are protected with a 40 amp fuse. The breaker panel has room for eight circuit breakers, five of which are installed.
The largest, a 20 amp breaker, feeds the DC outlets. For our initial installation, we have two standard cigarette lighter type sockets, one on each side of the bed, and two double USB sockets, also located on each side of the bed.
A 15 amp breaker serves the fridge/ freezer. The fridge/freezer automatically switches from 12 vdc to 120 vac when it is available, or runs from dc power when no ac is present. I used AWG 8 wire for this circuit as well. That's overkill for the circuit, but the larger wire reduces the voltage drop to the fridge. We had some low voltage issues with this fridge when it was aboard Cups, and increasing the wire size should help.
The lighting is on a 10 amp circuit. Currently we have six LED lights located in various locations, each of which draw about 600 ma. Even if every one of them are on, the current draw is only 3.6 amps, so we can add quite a few more if desired.
The ceiling fan is on a five amp circuit, which is about double what it requires.
There is one unused five amp breaker for future expansion, and if ever needed, three more breakers can be added to the panel.
As I write this, we are on our first foray on our minimally configured Blue. We'll be taking a break from the upfitting for a couple of months to see how everything works, what can be improved and what we really need. No worries about blog material, however. I have a backlog of a dozen or so blogs that cover all the work done so far.

Next week's blog will discuss how the batteries are charged, the inverter and the battery monitor.