

The Blue View - Marking the Anchor Rode
/Whether you have all rope, all chain, or a combination rope/chain, you need to know how much anchor rode has been deployed to ensure you have the correct scope. Some cruisers keep track by counting the seconds as the rode goes out or the rotations of the windlass, but this is a rough approximation at best. Nine of Cups has a chain counter with a digital display that keeps track of how much chain or rope is out – and sometimes it works. Our backup method, which is much more reliable and almost foolproof, is to mark the rode in some fashion, so that the amount of anchor rode deployed is easily determined visually.
Marking Rope Rode
Marking rope rode is easy. For less than $10, you can buy a set of pre-marked strips of nylon. Each strip of nylon is labeled with the number of feet, usually in some convenient increment – 25 feet, 30 feet or 10m. You stretch the line out and weave each nylon strip into the 3-strand rope at the appropriate length.
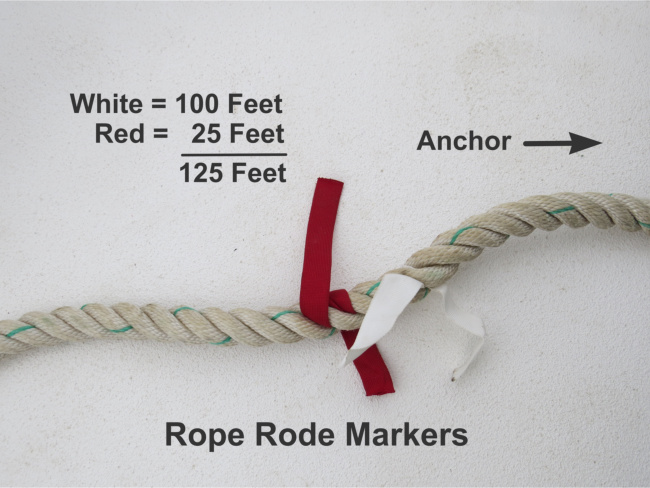
Alternatively, you can cut your own nylon strips in different colors from rolls of ribbon and use a color code to determine the length of rode. We use red, white and blue nylon. The first strip indicates how many hundred feet are deployed. If it is red, there is less than 100 feet; if white, there is between 100 and 199 feet; and if the first strip is blue, there is between 200 and 299 feet. The second strip indicates how many multiples of 25 feet are deployed. A red strip means 25 feet, a white strip means 50 feet, and a blue strip indicates 75 feet. To determine how many feet of rode are out, we look at the first strip to determine how many hundreds of feet are out, then add the number of 25 foot intervals indicated by the second strip. A few examples: a single white strip would indicate that we had 100 feet of rope deployed; a blue strip followed by a red strip would indicate 225 feet, and a red strip followed by a blue would mean we had 75 feet out. This method works reasonably well for us. It is not entirely foolproof, however. There is always the possibility that a marker might come loose, or that a muddy bottom might make it difficult to discern the colors the next time it is used. Sometimes the arithmetic required to calculate how much rode is out is a stretch for our addled minds after a rough passage. Generally, however, we have a pretty good idea how much rope has been deployed.
Marking Chain Rode

We have tried several methods for marking chain. We once used different color cable ties. We found that if we didn't cut the tails off the cable ties after securing them to the chain, they sometimes got jammed in the windlass. If we shortened the tails, the rough cut edge would sometimes chafe the snubber. If we cut the tails flush, there wasn't enough cable tie to discern the color in less than bright sunlight, and it still had a tendency to chafe the snubber.
We have also painted sections of the chain in different colors, using a color coding system similar to the one we use for rope rode. This works quite well and lasts a long time, but only if done properly. Normal alkyd and oil-based paints won't adhere well to galvanized chain. Most spray paints are in this category. Most acrylic latex based paints, on the other hand, do adhere to galvanized surfaces. Krylon H2O spray paint is the only acrylic latex top coat paint I know of that comes in a spray can, but is somewhat difficult to find. The alternative is to prime the area to be painted first with a latex-based primer such as Kilz 2 or Zinsser Bullseye 1-2-3. Both are water-based primers that can be over-painted with alkyd or oil-based paints, and the Zinsser product is even available in spray cans.
We like to have a mark every 25 feet, starting at 50 feet. We paint a 1-1/2 foot section of chain for each color. A single white section would indicate 100 feet of chain, a blue section followed by a white section would indicate 250 feet, and a red section followed by a blue section would indicate 75 feet.
There is a little prep work that must be done before painting. This is the process we use to get the longest lasting results:
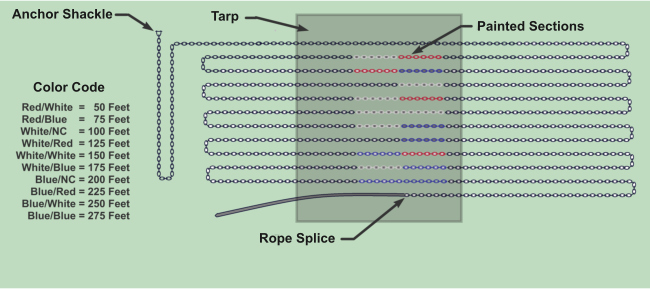
- We stretch the chain out on the dock or boatyard in loops so that each of the 25 foot lengths are alongside each other. It is easier if the sections to be painted are in the middle rather than at the ends of each loop (see figure). Once this is done, the chain must be degreased and cleaned whether it is fresh from the galvanizer or has been used for a few years. We start with a bucket of degreaser and a deck brush and go over each section that will be painted. We rinse it well, then use a general purpose cleaner to remove any dirt (or sea life if the chain was previously used). We rinse well one more time and let it dry – usually overnight.
- Next we tape a painter's plastic drop cloth or a tarp underneath the section that will be painted. We prefer to use cans of spray paint rather than trying to paint the chain with brushes. Whether we are priming first or using an acrylic latex topcoat, the process is the same. We paint one side of the chain, wait the re-coat time, then spray on a second coat. Since the rows of chain are usually quite close together, we use a section of cardboard to shield the chain lying next to the one being painted. After the re-coat time, we roll the chain over and apply two coats to the other side of the chain. If we are priming the chain, we repeat the process with the topcoat paint.
- We let the paint dry thoroughly before feeding it back into the chain locker.
When we last had our chain re-galvanized, the paint we had previously applied was removed, of course, and we used a different method for marking the chain. We bought 18 feet of ¼ inch line in the three basic colors and cut each into 3 foot lengths. Our preference is polypropylene line as it is inexpensive, can be found in bright colors and is less likely to become discolored from a muddy bottom, but any type line will work. At each 25 foot segment of the chain, we wove the appropriate line segments through the chain links. We staggered the starting point of each line so we could tell which color was the first digit and which was the second. We initially thought we might have to whip the ends of each line to the chain to keep them from unraveling from the chain, but this has proved unnecessary. We've been using the method for two years, and it is now our preferred method.
Marking a Combination Chain/Rope Rode
On Nine of Cups, we have 300 feet of chain attached to another 200 feet of rope rode. We marked the chain at 25 foot intervals up to 275 feet and know that when we reach the end of the chain we have 300 feet out. The rope rode color coding starts from zero again, so when we see a red followed by a blue marker, we know we have 300 feet of chain plus 75 feet of rope rode deployed.
If the length of either the chain or the rope rode was ever more than 300 feet, we would repeat the color code. There is little likelihood of confusion - if the color combination white/red appeared, it should be obvious whether the amount of chain/rope deployed was 125 feet or 425 feet.
One key component of using the color-coded visual method is to make sure we have a written record of the color codes used. With our failing memories we find that after we've been away from Cups or sitting in a marina for awhile, we can't remember if red/blue is 75' or 175' … which definitely makes a big difference when deploying the right amount of scope.