The Blue View - Replacing the Windlass
/After making the decision to buy a new windlass, we contacted the dealer, Michael Date at McIntyre Marine (aka Southern Seas Marine) in Queensland. He gave us a great price on the new model, which supposedly had the same footprint and should fit the same holes as the old unit. He even went to the trouble to un-package the new unit and repackage it in two boxes so it could be shipped via the postal service – saving us almost $800 in shipping. A good man to work with! The new unit arrived on schedule, and the marina called to let us know the two 40 lb (18.4kg) packages had arrived. Now all that was left was the minor part – installing it.
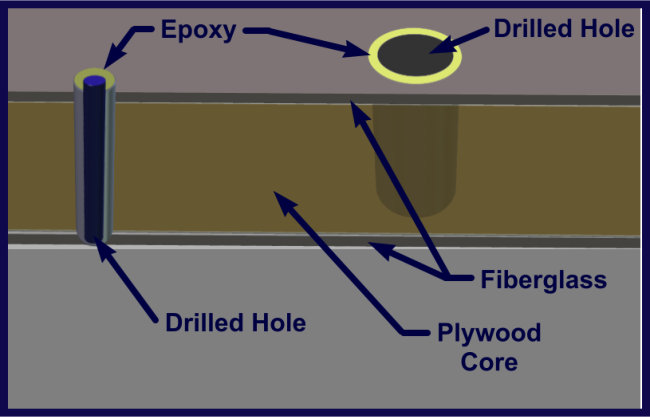
When we installed the previous windlass, it was quite a bit different from the original windlass. In order to mount the newer one, I had to first fill all the old holes with epoxy. Then I used the drill template provided by the manufacturer to mark the five small holes and two large holes required for the new windlass. The decks on Nine of Cups consist of two fiberglass layers with a core of plywood. When drilling holes in the deck, it is important that the outside diameter of each hole is sealed to prevent water from making its way into the plywood core. I drilled each hole considerably oversized, and then filled the five smaller holes with thickened epoxy. Once it kicked, I drilled the holes again in the correct size This not only stiffened the deck around the mounting bolts, but also provided a waterproof barrier to protect the plywood core.
The finished size of the two larger holes was almost exactly the same as a can of tomatoes. I covered the bottom of each over-sized hole with cardboard, and taped it in place. Then I took two empty tomato cans, each with both ends removed, wrapped them in waxed paper, and set them in place in their respective holes. I used tape to keep them in place, then filled the area around each of the cans with epoxy, thickened to the consistency of catsup. Once the epoxy kicked, I used a hammer to collapse the two cans so they could be removed. Then I let the epoxy cure completely.
This whole process took a day or two, then required a couple more days for the epoxy to cure. If the new windlass did fit the old holes as advertised, none of this would be necessary and the new installation would be straightforward.
I unwrapped the top half of the windlass and carried it forward. I aligned all the bolts with their respective holes and lowered it into place. It fit perfectly! I pulled it back up, then positioned the gasket, caulked underneath the entire assembly and lowered the top half back into place.
Mounting the bottom half was the part I was dreading. The motor and gearbox are quite heavy, about 40 lbs (18.4kg), and would have to be wrestled into the forepeak, then lifted with one outstretched arm, aligned with the mounting studs, and held in place until I could get a nut started with the other hand. I used a plank to slide the assembly into the forepeak as I wriggled my way in. Marcie handed me a nut, I gritted my teeth and I lifted the motor – and it slid right into place! I quickly started the nut to hold it, then took my time securing it with the remaining washers and nuts. This was going too well – surely some big setback was waiting for me.
The chain pipe was next. It fit around the new windlass without a problem, and I bolted it in place.
The new windlass also came with a new solenoid. The old one was working fine, but as long as I was upgrading the windlass, I might as well install the new solenoid and keep the old one as a spare. This, along with the replacement of a few wires that were showing corrosion took the remainder of the day.
The following morning, I coated all the wire terminals, connections and the motor housing in Boeshield T9® to help prevent future corrosion, then routed the chain up through the chain pipe and re-connected it to the anchor. The only thing left to do was to test everything. I lowered and raised the anchor. I used the capstan to lift and lower the dinghy. I checked the chain counter, and it was working. I searched the deck, looking for some critical part I had forgotten to install, but found nothing. Everything appeared to be working.
This is extremely troubling. Never in the history of my boat projects has one gone so smoothly, nor can I ever remember completing a project ahead of schedule. Perhaps this was the exception that proves Murphy's Law. Perhaps the odds were finally in my favor – if it's a 1000:1 that everything will go as planned, then perhaps this was the one. Or perhaps I'll discover what I missed when we next try to anchor at Cocos-Keeling.


