The Blue View - Another Way to Climb the Mast

climbing the mast  

It is frequently necessary to climb up to the top of the mast. At least twice a year and before any major passage, I climb up and check all the fittings and rigging. Occasionally, there are problems with some of the myriad of gear mounted on the mast: anchor light, mast mounted navigation lights, wind speed/direction transducer, radar, sail track, radio antennas, sail furler heads or blocks that necessitate going up the mast. A couple of times, it was necessary to climb the mast while at sea to correct a problem. All told, I probably average a trip up the mast at least once a month.

There are two usual methods of climbing the mast. We've seen a number of young riggers and the occasional cruiser that are very adept at climbing the rigging. They sit in a harness that is attached to a halyard and hoist themselves up the rigging, while another person keeps tension in the halyard. Tom, on the famous sailboat, Sunstone, is amazing at this method, but while I might have been able to manage it when I was 30, it's not even a consideration now. The other method is to sit in a harness or bosun's chair and have someone else use a winch to hoist the crew member up. This method is easy for the one being hoisted, but is a lot of work for the one working the winch.

I am the designated mast climber on Nine of Cups, if for no other reason than Marcie doesn't like heights. This means, of course, that since there are only two of us aboard, Marcie gets stuck with the winch cranking duty. Hauling me up the mast gets old in a hurry, and when the project involves more than one trip up the mast, it can be downright tedious.

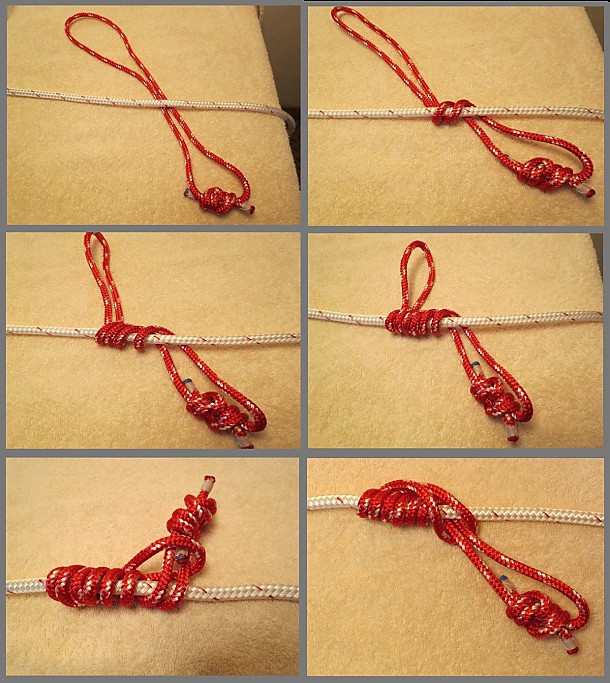
Another method of climbing the mast that works for us and eliminates most of the drudgery is a technique mountain climbers and arborists use for climbing and descending a vertical rope using a friction knot. This is a knot made with a short length of line that forms a loop around another tensioned line. When no weight or tension is applied to the friction knot, it will slide freely up or down. When you apply weight or downward tension to it, it locks in place and will not slide. There are several similar knots that are commonly used to ascend a rope. One of these, the Klemheist or French Prusik knot, is the one I prefer as it is unlikely to jam, is simple to tie and is easy to use when ascending or descending the halyard.
 

klemheist knot


To make the Klemheist knot, I start with two 5' lengths of 1/4” (6mm) quality double braid line formed into loops using a Double Fisherman's knot. I keep these loops permanently made up and stowed in my “mast climbing kit”. When it is time to climb the mast, the loops are attached to the halyard, one above the other, using a Klemheist knot.


foot sling


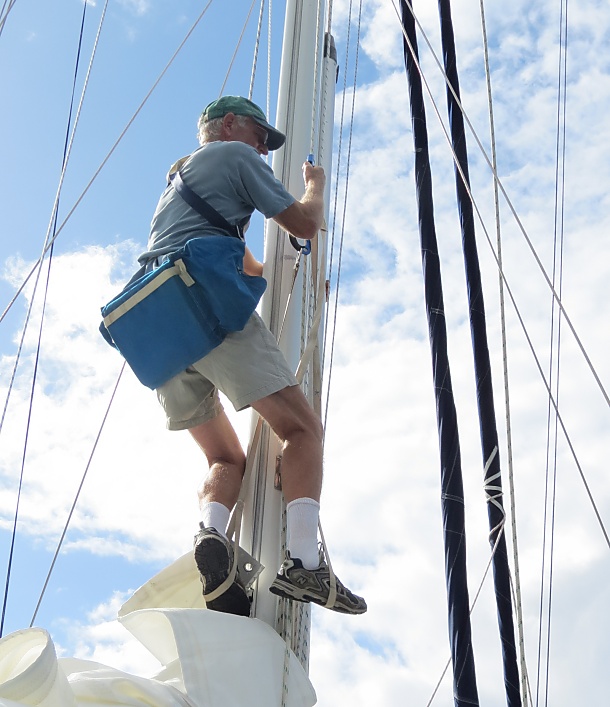
Attached to the knots are foot slings that Marcie made for me using heavy webbing. Each foot sling is a length of webbing with a small loop sewn in one end and a large loop sewn in the other. The small loop is about 3” in diameter while the large loop is big enough for me to slide my foot into. Each loop is double stitched across the top and the bottom, with two extra diagonal lines of stitching for good measure. Since one friction knot will always be higher than the other, the two slings were made to slightly different lengths so the foot loops are at the same height. My preference is to have the upper friction knot at about mid-chest height when I am standing in the foot loop. The foot sling attached to the lower friction knot is enough shorter that my feet are even when I am standing in both loops. I attach each foot sling to its friction knot by looping the foot loop through the small loop.

Usually when I go up the mast, it is to work on something. I use a bosun's chair to provide a platform to sit on that frees up both hands and has pockets to carry the tools, lubricants and whatever parts that I will need. It also provides a little added safety.

The technique I use to climb the rope is straightforward. I attach the main halyard to the foot of the mast and tighten it as much as possible - the tighter the better. There is one big difference between ascending a rope attached to a mountain and climbing the mast. Rarely does the mountain yaw, roll and/or pitch. If the halyard is not attached at the bottom, any boat motion will be magnified by the movement of the mast, causing the halyard (with me attached) to start swinging in large arcs. This might almost be fun except for the part where I swing back from a 20 foot arc and smack into the mast or a shroud.

Next I attach the loops to the tensioned halyard using the Klemheist knot, and then the foot slings to the knots. I attach the topping lift to the bosun's chair with a bowline, strap myself into the chair and clip my harness to the bosun's chair.

Marcie and I have done this enough times that we have the system pretty organized. I sit in the bosun's chair and slide both friction knots up the halyard as high as I can reach. Then I stand in both foot slings. As soon as the topping lift goes slack, Marcie tugs on it to take up the slack. Then I sit back in the bosun's chair, slide the knots up the halyard again and the process is repeated. Watching from below, it looks like I am climbing a ladder, and after a little practice, it is just about as fast. Once I reach the desired height, be it the masthead or elsewhere, I clip my harness to a secure fitting on the mast as a safeguard.

When it is time to come back down, usually I remove the knots and Marcie lowers me down in the bosun's chair. It is not all that difficult to descend with the knots, however. I put my weight on the sling attached to the upper knot. Once the tension is removed from the lower knot, I loosen it by pushing up on it and then slide it down. Then I put my weight on the lower sling and slide the upper knot downward.

However you go up the mast, I have a couple of other suggestions:

I take a small line with me that is long enough to reach the deck from the masthead. One end is tied to the bosun's chair and the other is attached to a small weight. When I realize I need another tool or part, I lower the weighted end of the line to Marcie who either attaches the part or tool directly to the line or puts it in our canvas bucket and ties the bucket to the line. Then I hoist it back up. This is much easier and quicker than descending and ascending the mast.

We use small hand-held radios to communicate. That way, when I am trying to explain which tool it is that I forgot and which little locker it is located in, I can do it over the radio rather than having a shouted conversation from the masthead for the entire anchorage to enjoy.

I make sure no one is underneath me while I'm working. I rarely complete a job on the mast without dropping something. It is bad enough listening to the inevitable two bounces on deck that precede the splash as the part or tool goes into the drink – I hate to think what a screwdriver or box wrench would do to someone after falling from that height.

Note: This is a condensed form of an article that was published in Ocean Navigator Magazine in the September 2012 issue. The full article also described the use of mechanical ascenders as an alternative to a friction knot. For a copy of the full article in .pdf form, let us know and we will send it along to you.

The Blue View - Securing the Floorboards

floor anchor  

I was perusing a cruisers' forum a couple of days ago, and I came across a thread that was discussing methods of securing the floorboards on a sailboat. In each area of the boat, like the salon, galley, and cabins, there are removable floor sections that allow access to the area below the sole. This is technically the bilge area, but in many sailboats, it is also used for fuel and water storage tanks, as well as storage. On Nine of Cups, these areas are home to our tanks as well as several pumps. It is also used to store canned goods, small batteries, gallon jugs of engine oil and coolant, and several odd shaped tools and spares. One section is devoted entirely to hoses and tubing.

Normally, the floorboards stay in place quite well on their own. It takes a major knockdown, or worse, a rollover or pitch-pole to dislodge them. If that should happen and the floorboards were not secured, there would be flying hunks of wood, cans, pickle jars, and large tools everywhere. If we weren't badly injured from the rollover, getting battered by a spare water pump and half a dozen cans of beans would probably do the trick. Then, if and when the boat righted itself again, the crew and all the other flying cannonballs would be flung back towards the now gaping holes in the floor. Not a pretty picture.

The thread was quite long, and most of the entries were rather flippant – something like “Try keeping your boat upright...that's always worked for me. Haw – haw”. I guess if the writer is a coastal cruiser, the possibility of a major knockdown or rollover is pretty remote. But I think to most serious offshore sailors, especially those that venture into the high latitudes, these events are real possibilities. Hence, the question of how to secure the floorboards was perfectly valid in my opinion.

When we bought Nine of Cups, I dreamed of sailing to some of these remote parts of the globe, and I felt it was important to make Cups as safe as possible. This included finding a method of securing the floorboards. I had several criteria in mind. We access the storage areas under the sole frequently – sometimes several times a day. In addition, some emergencies require immediate access to the bilge. If we suddenly start taking on water and need to close a thru-hull, for example, it is important to be able to get to it quickly. Thus, the method of securing the floorboards should be quick and easy to engage and disengage. A second criteria was that it not be too expensive. We have 16 floorboards, so the costs add up quickly. It should also be fairly quick and easy to install. If each of the 16 floorboards takes several hours to install, the project would take a long time to complete. Finally, the system should look good. The interior workmanship on Cups is quite beautiful, and despite my innate clumsiness and irritating propensity to add dings and divots to the woodwork, I try not to intentionally damage it.


floor anchor latch


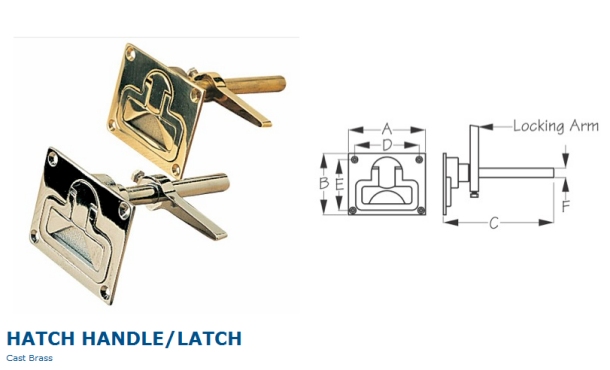
I found several possible solutions, but most did not meet all my criteria. There are some elegant handles that sit flush, and twist to lock the floorboards in place. These are expensive, require a fair amount of time to install, and since the floorboards already have lift rings that wouldn't match the new hardware, it wouldn't look all that great. Other than that, they were perfect.


PYI floor anchor


PYI has some nifty little floor anchors made for the purpose. They lock with half a turn using a screwdriver and they look good. The only problem is that I would need 2 to 4 for each floorboard, and at a price of about $15 each, the total cost for the quantity I needed plus the installation tools would have been about $800. That was quite a bit more than I was hoping to spend.

I was still pondering the problem when a friend on another boat offered a solution he had seen using bungee cord. It sounded like a gimcrack solution, but he thought it was used by the Swedish manufacturer Hallberg-Rassey on its production boats. I was never able to verify this or to see exactly how they implemented their version, but the idea turned into a workable solution.


floor anchor bungee


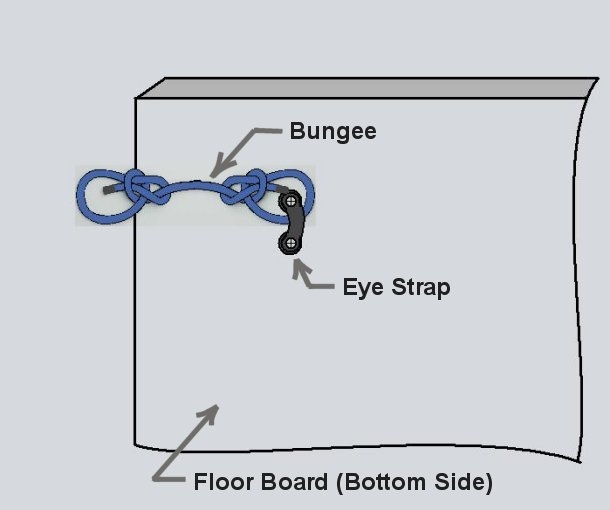
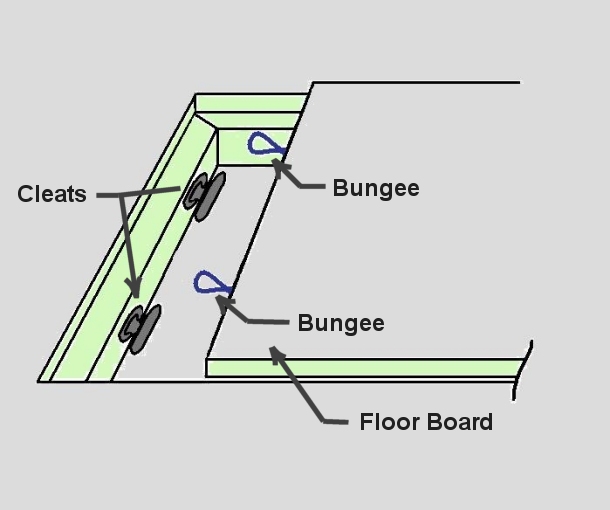
I started with a short length of 3/8” (10mm) bungee cord with a loop on both ends. Initially I secured the loops with crimps, but later found that just tying a bowline in each end worked just as well. One end was permanently attached to the bottom of the floorboard with a strong eye strap. A small cleat was attached to the side of the stringer that supports the floorboard. I made the length of the bungee just long enough to loosely reach between the eye strap and the cleat. I attached two bungee cords, to each end of a floorboard.

Before proceeding any further, I wanted to test the strength of the system. I found a couple of 6”x 10” timbers, placed them on the ground spaced slightly further apart than the length of the floorboard, and held them in place with some rocks. I screwed four cleats into the timbers, then attached the floorboard to the timbers by looping the ends of the bungee over the cleats. Then I stood on the floorboard. The bungee cords stretched a a few inches, but held fine. Then I piled about 20 pounds of miscellaneous objects onto the floorboard and stood on it again. It held the combined weight of 200 pounds without a problem.


floor anchor cleats


Once I was convinced the system was strong enough, I wanted to see how difficult it was to attach the bungee cords to the cleats under the sole once the floorboard was in place. I found that if I lifted the floorboard enough to get my hand underneath the end, it was not difficult to stretch the bungee cord and attach the loop to the cleat. With a little practice, it takes only a second or two to attach or detach each bungee cord.

For smaller floorboards that have nothing heavy stored beneath, I attached two bungee cords, one on each end. For larger floorboards, or those with heavy items stored below, I attached four bungee cords, two at each end. I melted the ends of each bungee cord to keep them from unraveling, then covered the ends with shrink tubing. When making a loop using a bowline, I found it held well as long as I applied enough tension to ensure the know was quite tight.

Part of our pre-departure routine when we set out on a long passage is to secure all the floorboards. It only takes a few minutes to attach all 16 floorboards. We check them again if a gale or storm is headed our way. We have suffered only one knockdown in all our passages, and none of the floorboards budged. While this was not a really good test of the system, like our liferaft, ditchbag and EPIRB, we dearly hope that we never have the opportunity to see how well it really works.

The Blue View - Life Rafts

life raft  

We have a lot of gear aboard that we have never used. Some was purchased because we thought it was a good idea at the time, but turned out to be things we didn't need. Some of it was purchased as spares and are good things to have aboard but haven't been used yet. And some are for last resort emergencies that we hope we never to have to use.

Our life raft falls into the last category. It is a four person, offshore rated life raft that is housed in a canister, and is secured to a cradle on deck. The life raft has a 30' painter that secures it to Nine of Cups. Most of the painter is tucked away inside the sealed canister. If we should ever need to deploy it, the process is to pull out 20 or so feet of the painter. The webbing that holds the life raft in its cradle is held in place with a quick release pelican hook, and this is opened. The entire canister is then picked up and thrown overboard. Once it is in the water, the remaining painter is pulled out of the canister. The painter not only attaches the life raft to the boat, but also triggers a CO2 tank that inflates the buoyancy tubes on the raft. The expanding tubes exert enough pressure to force the canister open. The canister sinks or floats away and the life raft is left floating at the end of the painter. The life raft isn't actually boarded and cut loose until there is no hope for Cups. There is an old adage that states that it's not time to move to the life raft until you need to step up to it.


life raft canister


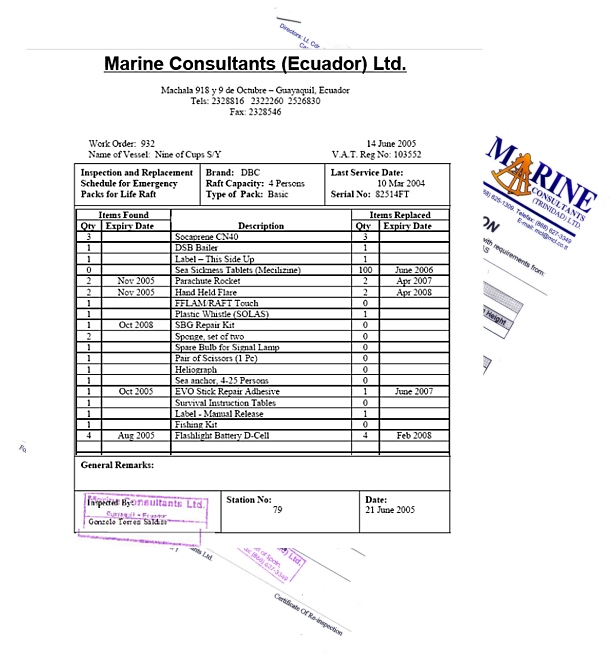
Our life raft spends 98.6% of its life inside the canister on deck. During the other 1.4% of the time, it gets treated to an annual trip off the boat to get inspected, resupplied and repacked. Since all ships carry life rafts that must be inspected annually, we have rarely been in a port that didn't have one or more companies that provided this service. It is not cheap – the basic inspection usually runs between $100 - $200. There is almost always something that needs replacing, however, like flares or gaskets or the patch kit, and it always seems to end up costing closer to $500 each year. Some of the newer life rafts only need to be inspected every three years, and would save a lot of money over the usual 10 or 12 year lifetime of the life raft.


recertification


Another way to save money is to provide the items we want to replace or update to the company doing the inspection. We have our own seasickness meds, for example, and the inspection company is usually amenable to letting us provide them instead of selling us some very expensive alternatives. On completion of the inspection, we are given a list of everything in the life raft and its expiration date. We always review the previous year's list so we know what will reach its expiration soon, and we provide replacements for what we can when we deliver the life raft. We have been able to provide food rations, meds, and the occasional replacement part for considerably less money than we would have been charged by the inspection company. We don't cut corners, however. Saving five dollars on a patch kit that may or may not adhere to the life raft fabric is pretty foolish.


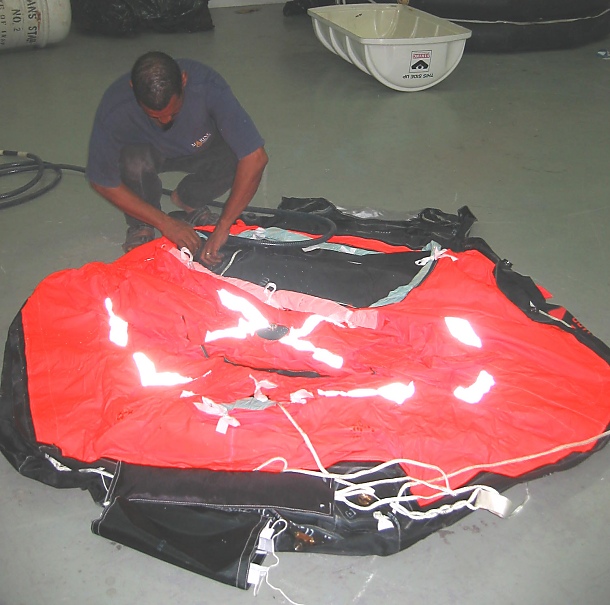
unfolding and inflating


As part of the inspection, the life raft is inflated with room air, and left inflated for a day to check for leaks and to let the fabric stretch out. The flares are checked and replaced as needed, and everything is inspected. While the process can be done in two days, we usually ask that it be left inflated for a few more days.

We try to visit our life raft while it is inflated. Most people never see this important survival gear deployed and inflated until it is needed in an emergency. We like to reacquaint ourselves with it each year. We check out all the gadgets it has, like the sea anchor, signal mirror, and flares, and how they are used. We climb inside and figure out how best to board it when we are soaking wet, wearing foul weather gear and PFDs. We sit in it for a few minutes and imagine how it would be to live in it for a few weeks - and what we would need to survive. Then it is repacked and sealed back in its canister, and we return it to its home on the deck.

The survival gear that is kept in the life raft is pretty minimal. We keep a Ditch Bag on board that has the majority of the things we would need to stay alive in the life raft until we were, hopefully, either rescued or made landfall. We used to keep more gear in the life raft, but since we can only access it during the annual inspection, it is difficult to service, inspect and update the gear and supplies ourselves. For those that are interested, I plan to devote a Blue View on our Ditch Bag in the near future.

We have four friends that were saved by their life rafts. One couple hit a rock off New Zealand, and their sailboat sunk in just a few minutes. Another boat was holed by a whale, and one suffered major damage after a propane explosion in the galley. The fourth vessel had a petroleum fire aboard, and while the steel vessel did not sink, the crew could not remain aboard. We hope not to join this elite group, but having the life raft on board is good security – just in case.