

The Blue View - Another Way to Climb the Mast
/
It is frequently necessary to climb up to the top of the mast. At least twice a year and before any major passage, I climb up and check all the fittings and rigging. Occasionally, there are problems with some of the myriad of gear mounted on the mast: anchor light, mast mounted navigation lights, wind speed/direction transducer, radar, sail track, radio antennas, sail furler heads or blocks that necessitate going up the mast. A couple of times, it was necessary to climb the mast while at sea to correct a problem. All told, I probably average a trip up the mast at least once a month.
There are two usual methods of climbing the mast. We've seen a number of young riggers and the occasional cruiser that are very adept at climbing the rigging. They sit in a harness that is attached to a halyard and hoist themselves up the rigging, while another person keeps tension in the halyard. Tom, on the famous sailboat, Sunstone, is amazing at this method, but while I might have been able to manage it when I was 30, it's not even a consideration now. The other method is to sit in a harness or bosun's chair and have someone else use a winch to hoist the crew member up. This method is easy for the one being hoisted, but is a lot of work for the one working the winch.
I am the designated mast climber on Nine of Cups, if for no other reason than Marcie doesn't like heights. This means, of course, that since there are only two of us aboard, Marcie gets stuck with the winch cranking duty. Hauling me up the mast gets old in a hurry, and when the project involves more than one trip up the mast, it can be downright tedious.
Another method of climbing the mast that works for us and eliminates most of the drudgery is a technique mountain climbers and arborists use for climbing and descending a vertical rope using a friction knot. This is a knot made with a short length of line that forms a loop around another tensioned line. When no weight or tension is applied to the friction knot, it will slide freely up or down. When you apply weight or downward tension to it, it locks in place and will not slide. There are several similar knots that are commonly used to ascend a rope. One of these, the Klemheist or French Prusik knot, is the one I prefer as it is unlikely to jam, is simple to tie and is easy to use when ascending or descending the halyard.
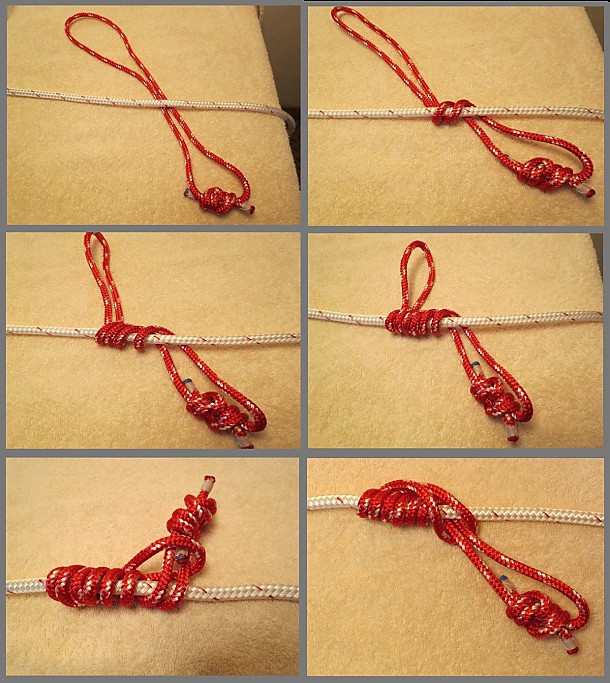
To make the Klemheist knot, I start with two 5' lengths of 1/4” (6mm) quality double braid line formed into loops using a Double Fisherman's knot. I keep these loops permanently made up and stowed in my “mast climbing kit”. When it is time to climb the mast, the loops are attached to the halyard, one above the other, using a Klemheist knot.

Attached to the knots are foot slings that Marcie made for me using heavy webbing. Each foot sling is a length of webbing with a small loop sewn in one end and a large loop sewn in the other. The small loop is about 3” in diameter while the large loop is big enough for me to slide my foot into. Each loop is double stitched across the top and the bottom, with two extra diagonal lines of stitching for good measure. Since one friction knot will always be higher than the other, the two slings were made to slightly different lengths so the foot loops are at the same height. My preference is to have the upper friction knot at about mid-chest height when I am standing in the foot loop. The foot sling attached to the lower friction knot is enough shorter that my feet are even when I am standing in both loops. I attach each foot sling to its friction knot by looping the foot loop through the small loop.
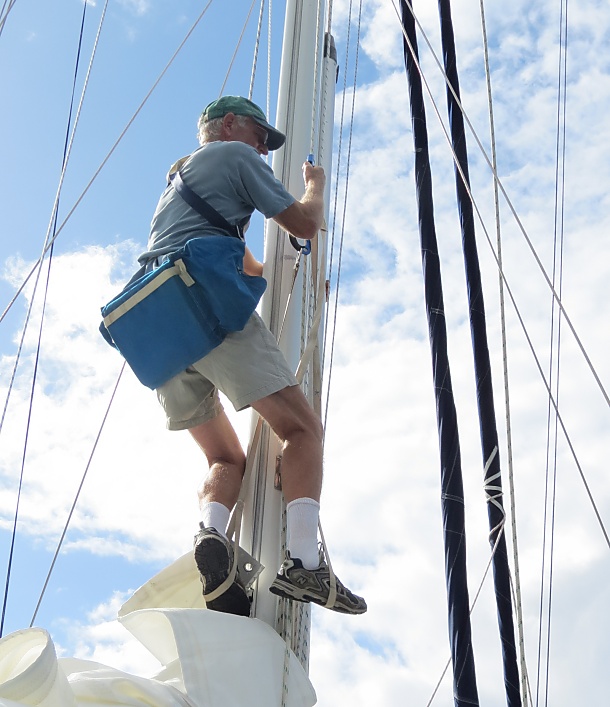
Usually when I go up the mast, it is to work on something. I use a bosun's chair to provide a platform to sit on that frees up both hands and has pockets to carry the tools, lubricants and whatever parts that I will need. It also provides a little added safety.
The technique I use to climb the rope is straightforward. I attach the main halyard to the foot of the mast and tighten it as much as possible - the tighter the better. There is one big difference between ascending a rope attached to a mountain and climbing the mast. Rarely does the mountain yaw, roll and/or pitch. If the halyard is not attached at the bottom, any boat motion will be magnified by the movement of the mast, causing the halyard (with me attached) to start swinging in large arcs. This might almost be fun except for the part where I swing back from a 20 foot arc and smack into the mast or a shroud.
Next I attach the loops to the tensioned halyard using the Klemheist knot, and then the foot slings to the knots. I attach the topping lift to the bosun's chair with a bowline, strap myself into the chair and clip my harness to the bosun's chair.
Marcie and I have done this enough times that we have the system pretty organized. I sit in the bosun's chair and slide both friction knots up the halyard as high as I can reach. Then I stand in both foot slings. As soon as the topping lift goes slack, Marcie tugs on it to take up the slack. Then I sit back in the bosun's chair, slide the knots up the halyard again and the process is repeated. Watching from below, it looks like I am climbing a ladder, and after a little practice, it is just about as fast. Once I reach the desired height, be it the masthead or elsewhere, I clip my harness to a secure fitting on the mast as a safeguard.
When it is time to come back down, usually I remove the knots and Marcie lowers me down in the bosun's chair. It is not all that difficult to descend with the knots, however. I put my weight on the sling attached to the upper knot. Once the tension is removed from the lower knot, I loosen it by pushing up on it and then slide it down. Then I put my weight on the lower sling and slide the upper knot downward.
However you go up the mast, I have a couple of other suggestions:
I take a small line with me that is long enough to reach the deck from the masthead. One end is tied to the bosun's chair and the other is attached to a small weight. When I realize I need another tool or part, I lower the weighted end of the line to Marcie who either attaches the part or tool directly to the line or puts it in our canvas bucket and ties the bucket to the line. Then I hoist it back up. This is much easier and quicker than descending and ascending the mast.
We use small hand-held radios to communicate. That way, when I am trying to explain which tool it is that I forgot and which little locker it is located in, I can do it over the radio rather than having a shouted conversation from the masthead for the entire anchorage to enjoy.
I make sure no one is underneath me while I'm working. I rarely complete a job on the mast without dropping something. It is bad enough listening to the inevitable two bounces on deck that precede the splash as the part or tool goes into the drink – I hate to think what a screwdriver or box wrench would do to someone after falling from that height.
Note: This is a condensed form of an article that was published in Ocean Navigator Magazine in the September 2012 issue. The full article also described the use of mechanical ascenders as an alternative to a friction knot. For a copy of the full article in .pdf form, let us know and we will send it along to you.


 , and if you're interested, it can be found on Amazon.
