The Blue View - Marking the Anchor Rode

Whether you have all rope, all chain, or a combination rope/chain, you need to know how much anchor rode has been deployed to ensure you have the correct scope. Some cruisers keep track by counting the seconds as the rode goes out or the rotations of the windlass, but this is a rough approximation at best. Nine of Cups has a chain counter with a digital display that keeps track of how much chain or rope is out – and sometimes it works. Our backup method, which is much more reliable and almost foolproof, is to mark the rode in some fashion, so that the amount of anchor rode deployed is easily determined visually.

Marking Rope Rode
 

marked rode


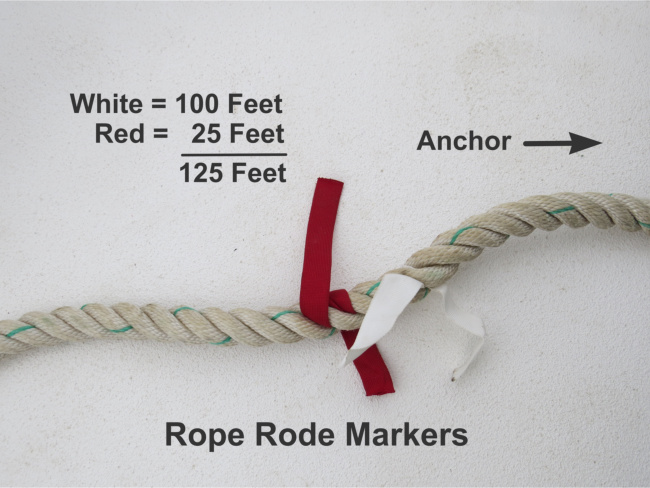
Marking rope rode is easy. For less than $10, you can buy a set of pre-marked strips of nylon. Each strip of nylon is labeled with the number of feet, usually in some convenient increment – 25 feet, 30 feet or 10m. You stretch the line out and weave each nylon strip into the 3-strand rope at the appropriate length.

Alternatively, you can cut your own nylon strips in different colors from rolls of ribbon and use a color code to determine the length of rode. We use red, white and blue nylon. The first strip indicates how many hundred feet are deployed. If it is red, there is less than 100 feet; if white, there is between 100 and 199 feet; and if the first strip is blue, there is between 200 and 299 feet. The second strip indicates how many multiples of 25 feet are deployed. A red strip means 25 feet, a white strip means 50 feet, and a blue strip indicates 75 feet. To determine how many feet of rode are out, we look at the first strip to determine how many hundreds of feet are out, then add the number of 25 foot intervals indicated by the second strip. A few examples: a single white strip would indicate that we had 100 feet of rope deployed; a blue strip followed by a red strip would indicate 225 feet, and a red strip followed by a blue would mean we had 75 feet out. This method works reasonably well for us. It is not entirely foolproof, however. There is always the possibility that a marker might come loose, or that a muddy bottom might make it difficult to discern the colors the next time it is used. Sometimes the arithmetic required to calculate how much rode is out is a stretch for our addled minds after a rough passage. Generally, however, we have a pretty good idea how much rope has been deployed.

Marking Chain Rode


marked rode chain


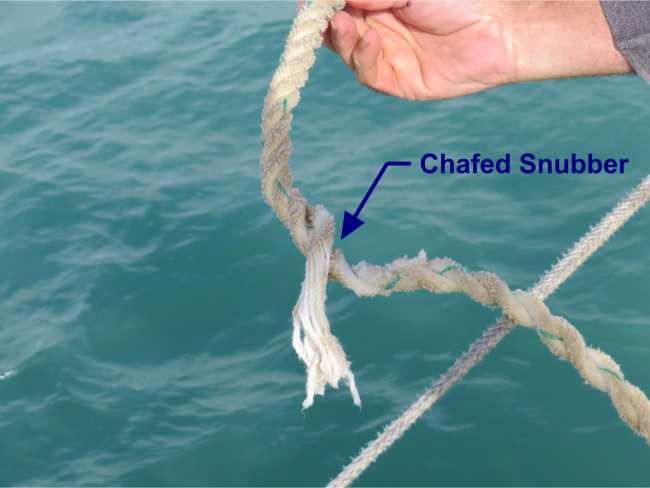
We have tried several methods for marking chain. We once used different color cable ties. We found that if we didn't cut the tails off the cable ties after securing them to the chain, they sometimes got jammed in the windlass. If we shortened the tails, the rough cut edge would sometimes chafe the snubber. If we cut the tails flush, there wasn't enough cable tie to discern the color in less than bright sunlight, and it still had a tendency to chafe the snubber.

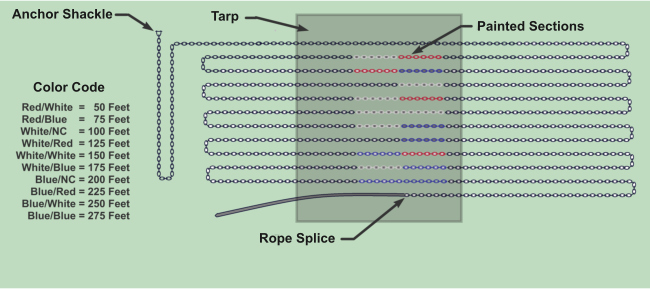
We have also painted sections of the chain in different colors, using a color coding system similar to the one we use for rope rode. This works quite well and lasts a long time, but only if done properly. Normal alkyd and oil-based paints won't adhere well to galvanized chain. Most spray paints are in this category. Most acrylic latex based paints, on the other hand, do adhere to galvanized surfaces. Krylon H2O spray paint is the only acrylic latex top coat paint I know of that comes in a spray can, but is somewhat difficult to find. The alternative is to prime the area to be painted first with a latex-based primer such as Kilz 2 or Zinsser Bullseye 1-2-3. Both are water-based primers that can be over-painted with alkyd or oil-based paints, and the Zinsser product is even available in spray cans.

We like to have a mark every 25 feet, starting at 50 feet. We paint a 1-1/2 foot section of chain for each color. A single white section would indicate 100 feet of chain, a blue section followed by a white section would indicate 250 feet, and a red section followed by a blue section would indicate 75 feet.

There is a little prep work that must be done before painting. This is the process we use to get the longest lasting results:
 

chain laid out


  1. We stretch the chain out on the dock or boatyard in loops so that each of the 25 foot lengths are alongside each other. It is easier if the sections to be painted are in the middle rather than at the ends of each loop (see figure). Once this is done, the chain must be degreased and cleaned whether it is fresh from the galvanizer or has been used for a few years. We start with a bucket of degreaser and a deck brush and go over each section that will be painted. We rinse it well, then use a general purpose cleaner to remove any dirt (or sea life if the chain was previously used). We rinse well one more time and let it dry – usually overnight.
  2. Next we tape a painter's plastic drop cloth or a tarp underneath the section that will be painted. We prefer to use cans of spray paint rather than trying to paint the chain with brushes. Whether we are priming first or using an acrylic latex topcoat, the process is the same. We paint one side of the chain, wait the re-coat time, then spray on a second coat. Since the rows of chain are usually quite close together, we use a section of cardboard to shield the chain lying next to the one being painted. After the re-coat time, we roll the chain over and apply two coats to the other side of the chain. If we are priming the chain, we repeat the process with the topcoat paint.
  3. We let the paint dry thoroughly before feeding it back into the chain locker.

When we last had our chain re-galvanized, the paint we had previously applied was removed, of course, and we used a different method for marking the chain. We bought 18 feet of ¼ inch line in the three basic colors and cut each into 3 foot lengths. Our preference is polypropylene line as it is inexpensive, can be found in bright colors and is less likely to become discolored from a muddy bottom, but any type line will work. At each 25 foot segment of the chain, we wove the appropriate line segments through the chain links. We staggered the starting point of each line so we could tell which color was the first digit and which was the second. We initially thought we might have to whip the ends of each line to the chain to keep them from unraveling from the chain, but this has proved unnecessary. We've been using the method for two years, and it is now our preferred method.

Marking a Combination Chain/Rope Rode

On Nine of Cups, we have 300 feet of chain attached to another 200 feet of rope rode. We marked the chain at 25 foot intervals up to 275 feet and know that when we reach the end of the chain we have 300 feet out. The rope rode color coding starts from zero again, so when we see a red followed by a blue marker, we know we have 300 feet of chain plus 75 feet of rope rode deployed.

If the length of either the chain or the rope rode was ever more than 300 feet, we would repeat the color code. There is little likelihood of confusion - if the color combination white/red appeared, it should be obvious whether the amount of chain/rope deployed was 125 feet or 425 feet.

One key component of using the color-coded visual method is to make sure we have a written record of the color codes used. With our failing memories we find that after we've been away from Cups or sitting in a marina for awhile, we can't remember if red/blue is 75' or 175' … which definitely makes a big difference when deploying the right amount of scope.

The Blue View - 8 Reasons to Keep a Maintenance Log

capetown log


In my last blog post, I listed all the things that broke en route across the Great Australian Bight from Streaky Bay to Esperance. Since then, most of the items have been fixed or put off and added to the lists of to-do's for our stops in Albany or Fremantle. Of course, I've had to start a new list with the next round of repairs and maintenance issues that have occurred since Esperance. Keeping a boat in good fit is a continual challenge, and gets worse once you actually leave the marina.

I keep a maintenance log to keep track of every repair, upgrade and maintenance item done on Nine of Cups. I enter what was done, as well as the place and date, and I find it is a great way to keep track of what was done when. I find that a hardbound laboratory book works perfectly.


lab notebook


Here are the top 8 reasons I find it useful to keep a maintenance log:

  1. There are many routine maintenance items that should be done at scheduled intervals: oil changes every 150 hours; finger zincs every 3 months; service the winches; check rigging tension... the list is long. By keeping all the information in one place, I can quickly check to see what is due to be done.
  2. It's a great place to keep notes on the repairs and maintenance that were done. For example, I have a page devoted to sketches of the winch parts and what goes where as it is reassembled after cleaning and greasing the innards. Another page shows the lengths of each lifeline section, so I don't have to remeasure the next time I need to replace them.
  3. It is a good place to record measurements and data. I noted how much shaft vibration I measured after the last engine alignment; battery capacity measurements for each battery before and after the last equalization; wind generator output vs rpms when it was new and when I suspected it was beginning to have problems with brushes; watermaker output in liters/hour when new and after the last time the membrane was replaced.
  4. I keep all my maintenance “recipes” in the logbook. How many drops of iroxide yellow needs to be added to white base gelcoat to match the color of our topsides when making repairs to dings and screw holes? How many drops of accelerator do I add to a tablespoon of hypalon adhesive when patching the dinghy?
  5. Some parts should be replaced periodically before a failure occurs. A quick look at the maintenance log will remind me how long it has been since I replaced the engine heat exchangers, the shaft seal bellows, or the prop zinc.
  6. It's a good way to keep track of how long a part lasted and whether I should be concerned. The cutlass bearing has too much play and was replaced only 3 years ago – maybe I should check the shaft vibration and engine alignment. The primary filter in the diesel line needs replacing after only 400 hours – it may be time to polish the fuel. The prop anode only lasted 3 months – I may have some galvanic corrosion issues.
  7. It's a good place to keep vendor/supplier/manufacturer information. We got a good price and a quick delivery on anodes from …; Which suppliers are still around to get parts for our old Ford Lehman engine...; A friend on another boat is looking for a welder in Bahia Caracas, Ecuador – I have an address and phone number in my log book for a good guy we worked with while we were there...
  8. And the #1 reason to keep a maintenance log? It's fun to look back at all the exotic places where we did our repairs. We have long lists of things that were done in Capetown, RSA, Piriapolis, Uruguay, Puerto Montt, Chile, and Suwarrow Atoll in the Cook Islands. I also found a list of repairs at Pitcairn Island and even Caleta Martial, a tiny anchorage about 10 nm from Cape Horn where we spent 3 or 4 days waiting out a gale. As I look back through my maintenance log to ascertain when I last changed the engine heat exchangers, I find myself recalling all the fond memories and great friends we met while making all those repairs in so many exotic places.

The Blue View - What Broke?

shaft seal  

The passage across the Great Australian Bight was pretty benign, all things considered, and we are counting our blessings. This stretch of water can be quite difficult, but we found places to tuck into when the wind wasn't cooperating. Benign or not, however, we had the usual list of items that needed attention or repair enroute or when we arrived in Esperance. The old, oft used adage that the definition of cruising is making repairs in exotic locations couldn't be more accurate.

Here is our list:

1. Shaft Seal. The propeller shaft seal tops the list. While were sailing along briskly at 7 knots or so on our last leg to Esperance, Marcie noticed that the bilge pump light was on. We have an indicator light located in the cockpit that lights up when the bilge pump is running. The automatic bilge pump rarely comes on unless we are taking a lot of water over the bow or there is a leak somewhere. Since we weren't taking any water over the bow, and the light was staying on, it was something that needed checking into – sooner than later.

After pulling up a few floorboards, I found the source, which was the prop seal. The propeller shaft is connected on one end to the back of the transmission, then extends about 3 feet (1m) or so where it passes through a hole in the hull to the cutlass bearing and then the propeller. There is a seal between the shaft and the hole that usually keeps the water on the outside of the boat. This seal consists of a substantial stainless steel disk that is attached to the shaft and a synthetic rubber bellows that is attached to a collar around the hole in the hull. To make the seal watertight, the disk is slid down the shaft until the bellows is compressed somewhat, and then the disk is locked in place using set screws (or grub screws for you non-Yanks).

The disk on our shaft had worked its way back up the shaft, no longer making a seal with the bellows, and was now leaking copious amounts of water. The fix was simple and completed in about an hour – loosen the set screws, coax the collar back into place with a hammer, pry bar and large screwdriver, then tighten the set screws. There was a slight complication because the shaft was spinning due to the flow of water against the prop, but once Marcie reefed us down and slowed the boat to about 3 knots, I was able to stop the prop and lock it in place using locking pliers. (Nine of Cups has a shaft brake, but I had removed it some time ago while I worked on a shaft generator – a project that is still in the works). It is a little disconcerting that the set screws were tight and the disk still slipped along the shaft.

So, add to the to-do list:

2. Put the shaft brake back on the shaft; 3. Figure out a way to make sure the disk doesn't slip again (maybe use a shaft anode?); and as long as I'm putting the shaft brake back on, I might as well (4.) check the engine mounts and (5.) engine alignment.

6. Jib Clew. The clew came loose from our 90% jib and needs repair. The old 120% genoa is back in place and doing well, but add the jib repair to the list.


clewless jib


7. Snubber. The anchor snubber chafed part way though while anchored in Eucla. I replaced it with a fresh line.


chafed snub


8. Main halyard shackle. The shackle that connects the halyard to the mainsail was bent and was replaced en route.


 bent shackle


9. Whisker Pole. The wire attached to the jaw release on the whisker pole is corroded and needs replacing. Also, the (10.) topping lift and uphaul lines need to be marked to indicate the correct height for the 120% genoa.

11. Chartplotter/GPS. Our seven year old cockpit chartplotter and GPS died. It would simplify things if we could buy the same model, but is is no longer available. It appears all the new gear either won't talk to our other electronics or it is a different size, meaning the teak panel on which the current one is mounted will have to be modified or replaced. Meanwhile, one of the handheld GPS's, the nav station chartplotter and the Navionics App on the iPad is getting us by.

12. Chain Stopper. Once the anchor is deployed, the chain stopper locks the anchor chain in place and takes the load off the windlass until I can get a snubber attached. Ours is showing some wear and should be replaced.

13. Leak over Nav Station. There is a leak over the nav station, and we are getting a drip during hard rains or when we take a lot of water on deck. Not sure whether it is the deck prism or porthole above the area. Needs to be investigated and repaired.

14. Staysail furler. The staysail furler line needs adjusting.

15. Stern Light. One of the cable ties securing the electrical wire that powers the stern light has broken and needs replacing. Meanwhile, the wire is hanging loose and is sure to get snagged by something if it isn't corrected.

16. Dinghy Leak. The inflatable continues to leak water. This is more of an annoyance than anything, as the groceries and backpacks get wet as we transport them. It looks like it is a seam on the starboard side, but my previous attempts at patching the likely spots hasn't corrected the problem. I'd welcome any ideas on how to isolate a water ingress problem on an inflatable.

17. Water Tank. We have some contamination in the starboard water tank. When we fill a clear water bottle, there is quite a bit of sediment in the water. It probably won't hurt us, but is somewhat unappetizing. Probably something we picked up from a water fill somewhere along the line, and now that we are churning up the tanks during our passage-making, it is being passed along. Time to clean out the tanks, but in the meantime we will start filtering our freshwater.

Seventeen items... that's probably pretty average for 3-4 weeks of sailing. To our Esperance list, we need to add a host of routine things like transporting fuel and water to the boat, laundry and re-provisioning. Several items were checked off enroute (the shaft seal leak was something that certainly couldn't wait) while some will be done in Esperance. Some are 5 minute jobs (well, maybe 1-hour jobs – nothing ever takes only 5 minutes to fix on Nine of Cups), while some items like the engine alignment will take a full day. A few of the items like the chartplotter and water tank will have to wait until we are staying put for awhile – probably in Fremantle.

I've made my to-do list for Esperance and started my list for Fremantle. I should have plenty of time to get everything done - assuming Marcie doesn't want to do any frivolous, unimportant things like seeing the local sights or visiting museums. We'll see how that works out.