The Blue View - Whisker Pole Repairs Pt. 2

On our last day en route from Geraldton, Western Australia to the Cocos Keeling Islands, we broke our whisker pole. It was entirely my fault. I was hand-steering Nine of Cups, something that is necessary when we are sending and receiving emails via HF radio (our autopilot causes too much radio interference). We were sailing almost downwind, and a combination of a moment's inattention coupled with a large, unexpected wave caused us to jibe. Before I could react, the poled out genoa started flogging, and in a flash, our 28-year-old whisker pole broke in half. BAM! broken whisker pole

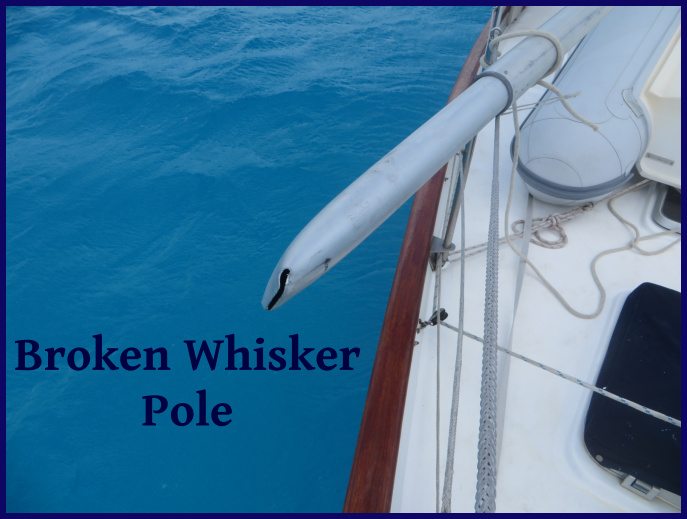
Our whisker pole is a telescoping Forespar pole, and it was the inside tube that broke. I cut the bent and broken section off the end and put it back together as best I could. It actually held together all the way to Durban - another 4000 miles or so. It did have a few issues, however. The toggle on the end that attaches to the mast was so badly bent that the pole could not be stowed on the mast, and we had to remove the pole and lash it to the lifelines whenever we weren't using it. Also, the small aluminum tube inside the pole, called the stinger, had more bends and “s” shapes than straight sections, making it very difficult to extend or retract the telescoping portion of the pole.

bent toggle

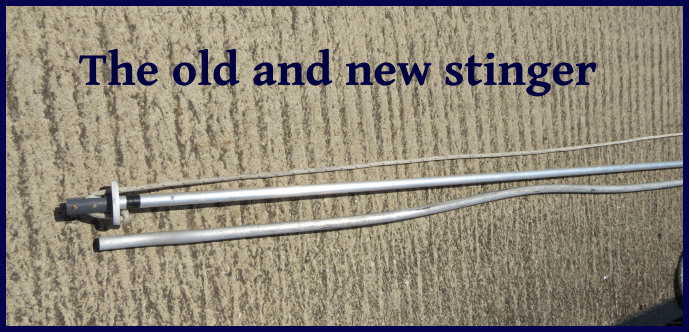
Now that we are in Durban, I wanted to repair it properly. I was able to find a new length of aluminum tubing in the right diameter to replace the stinger. I cut it to size, drilled the necessary holes and fitted it into place.

old and new stinger

Unfortunately, I can never seem to accomplish any task on Nine of Cups without a little drama. The pole has three large bushings that guide and constrain the inner tube when it is extended. While I was maneuvering the 24 foot pole on the finger pier next to Cups, I managed to lose one of these bushings. It slid off the end of the tube, bounced twice, then rolled unerringly off the side of the finger pier into the drink, never to be seen again. The good news is that I found a very competent and inexpensive machinist who was able to fabricate a new bushing for me. Now the pole extends and retracts better than it ever has.

new bushing

The bent toggle was a bigger problem. The Forespar literature says that the toggle can be removed by pressing the pin on the side of the end fitting. In the 15 years we have owned Cups, I have never been able to budge this pin. I have heated it, cooled it and used all sorts of heavy tools and weaponry encouraging it to move – all to no avail.

push the pin

Since I couldn't remove the old toggle, my machinist friend wasn't able to make a new toggle, but he was able to straighten the toggle in situ. The pole now rotates nicely side to side and stows against the mast as it should. Despite assurances to the contrary from the machinist, however, I am somewhat concerned that the metal might have been weakened when the toggle was bent and then straightened. It might be time to think about a new pole when we return to the U.S.

straightened toggle

In the meantime, I welcome input from anyone who has suggestions on getting the pin to move and/or removing the old toggle. Any ideas out there?

The Blue View - Adapting to Change ... a new yogurt recipe

yogurt ala nine of cups My usual breakfast, especially while Marcie is away, is a cup or so of yogurt topped with some of Marcie's homemade granola. I prefer the unsweetened, very thick, Greek style yogurt. Way back in January of this year, we shouted the praises of  make-it-yourself yogurt using pre-packaged yogurt powders. It is not feasible to bring enough fresh yogurt with us on a long passage, so we have a yogurt maker aboard that was purchased in New Zealand a few years ago. It resembles a thermos on steroids. To make a batch of yogurt, we mix a packet of yogurt powder with water in a one liter container, and shake it up. The yogurt maker is then partially filled with boiling water, the yogurt container is placed inside, and the top is screwed on. After 12 hours or so, the yogurt is ready.

yogurt ingredients

The packets of yogurt mix were easy and inexpensive to come by in both New Zealand and Australia. When we set off across the Indian Ocean on Nine of Cups, we made sure we had enough of these packets to last us until we arrived in South Africa. What we discovered on arriving, however, was that yogurt powder isn't available here. When we arrived in Durban and couldn't find any, Marcie wrote to the company. They don't distribute in South Africa and we could find no substutions. No problem... since Marcie was returning to the States for a few weeks, she could bring some back. Unfortunately, it turns out that yogurt powder is difficult to find and very expensive in the U.S.

Certainly, the lack of yogurt powder availability wouldn't deter me. We typically keep a stock of both UHT and powdered milk aboard. I figured I  could find a recipe online for making yogurt with either or both of these as the base for the yogurt. I found several yogurt recipes, but none were for a really thick, Greek style yogurt. So I did some experimenting. The first batch was pretty watery, the second a bit better, and by the fifth batch, it was turning out pretty good.

Here is the recipe I use for Greek style yogurt:

Adapting to Change ... a new yogurt recipe
Author: David Lynn
another way to make Greek yogurt
Ingredients
  • 1 liter UHT milk
  • 1 cup whole milk powder
  • 1 tsp sugar
  • 2 tablespoons yogurt (this must contain live cultures – we save a little from the previous batch)
Instructions
  1. Combine half the UHT milk with the remaining ingredients in the yogurt container and shake until mixed. Add the remaining milk until the container is full. Then follow the directions for making yogurt for whatever type of yogurt maker you use.

Now that you have the recipe for yogurt, here is Marcie's recipe for crunchy granola to go on top. We've published it before, but we regularly get requests for it.

Marcie's Crunchy Granola (for printable version, click here)

2 cups rolled oats ½ cup almonds – sliced or whole ½ cup sunflower seeds ¼ cup sesame seeds 2 tablespoons vegetable oil 5 tablespoons honey ½ cup shredded coconut ½ cup raisins

Combine oats, almonds, seeds and coconut in a medium-sized bowl. In a small saucepan, heat honey and add oil until combined. Add to the dry oats mix and stir until oats are thoroughly coated. Spread in a very thin layer on a baking sheet. Bake for 15 minutes at 250F (120C), turn mix on pan and return to oven for 10 more minutes. Let cool, then add raisins or other dried fruit. Store in an airtight container.

Substitutions / Additions: Walnuts, pecans, hazelnuts Dried fruit pieces, dates

Don't have a yogurt maker? Here's what we use. It works quite well.

This is an affiliate link ... perhaps an idea for the Amazon gift card you received for Christmas?

The Blue View - Finding the Leak

On our Indian Ocean passage, we developed a deck leak. Whenever we took a big wave over the deck or when it was raining, we would get a slow, but steady drip from the header (ceiling) on the port side for an hour or so. It was particularly annoying when we were on a starboard tack, as this was when we use the port side settee as a sea berth. Each drip would land somewhere on the sea berth, until after an hour or so, the bedding would be sopping wet. This was bad enough, but probably one in three of these drips would splat right on the face of whichever of us was trying to sleep. All in all, it made for a very cranky crew. annoying drip

The deck of Nine of Cups, like most fiberglass boats is constructed like a sandwich. The top and bottom layers, the bread of the sandwich, are fiberglass, while the filling of the sandwich is marine plywood. Attached to the underside of the deck is the header, which on Cups is constructed of wood panels. The top surface of the deck can develop a leak in a myriad of ways. All of the hatches, stanchions, brackets and deck fittings are attached by drilling or cutting holes in the deck. While every attempt is made to make these holes watertight, over time, some of them will begin to leak. In addition, cracks often develop due to the flexing of the hull. Once water makes it through the top layer of fiberglass, it eventually finds a path down through the core to the bottom layer. If it finds another opening or crack,  it then drips down onto the header, and finally finds a screw hole or gap to make its escape into the interior – in this case, right above the sea berth.

Finding the source of a leak is important, not only to get rid of the annoying drip, but also because if enough water gets into the deck, the core will begin to deteriorate and/or lose its bond with the fiberglass layers.  The result is a weakened, spongy deck.

Locating the leak is not always easy, however. The point of ingress through the top layer of fiberglass could be several feet away from where the drip materializes in the cabin. If the header can be removed, the spot that the water is exiting the lower layer of fiberglass can sometimes be found, narrowing the search somewhat.

The next step is to go topsides and reconnoiter the deck area in the vicinity of the leak below.  The point of ingress will not necessarily be near the leak below, but it will most likely be uphill from it. Try to identify all the possibilities. The most likely candidates will be cracks or dings in the gelcoat or loose screws or fittings, but anything that pierces the upper layer of fiberglass is the possible source – no matter how watertight it appears.

The possible sources for the leak over our sea berth included, in the order of likelihood, the main salon hatch, which was close to and just uphill of the leak below, one of several blocks at the foot of the mast, the screws holding the track that secures the bottom of the dodger, or one of several cleats and clutches in the cockpit. Starting with the lowest possible source, inundate each candidate with water, one at a time and go below to see whether you've found the leak. Try to keep the water from running over other possible sources until they have been eliminated.

the culprit

My leak turned out to be none of my candidates. I discovered, after an hour or so of searching, that if I poured water into the seam between the instrument cover and the cockpit coaming, the drip would appear below. I removed the instrument cover and hatch slider, and found – way, way in back, under the cockpit coaming, a small crack in the gelcoat.  Sure enough, if I poured a cup of water onto it, the drip below would start and continue for half an hour or so. Other than the difficulty of reaching the crack, the repair was relatively easy – since it was hidden away under the coaming, the repair would not need to be faired and painted.

repair made

Don Casey's book, This Old Boat, is a great source of information on making repairs to the deck and rebedding fittings to prevent and repair leaks. Also, West System not only provides great epoxy, they are also are a wealth of information on making repairs.