The Blue View - Broken Rudder Arm...again

On a passage from Sarasota, Florida to Colon, Panama in 2009, the rudder arm on Nine of Cups broke. The arm connects the hydraulic steering system to the rudder, and without it we can't steer with either the wheel or the autopilot. The original rudder arm was a massive hunk of bronze, and I was amazed that the rudder built up enough force to break it. This occurred about 25 nm out of Colon, and with the heavy ship traffic into and out of the canal, it wasn't a good place to be without maneuverability. We dug out the emergency tiller and hove-to until I was able to jury rig something to get us into port. A few days later, I found a machinist, and I had him make a another rudder arm for Nine of Cups. The new one was considerably beefier than the old one. It was made from a 1” (25mm) thick steel plate, and was held in place on the rudder stock with two 3/8” (10mm) bolts. I thought this would certainly be up to the job, and it did fine for five years.

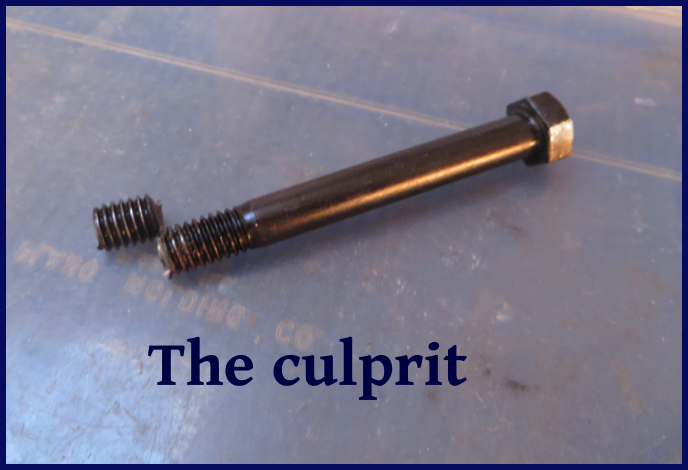
It broke again on the last leg of our Indian Ocean passage from Mauritius to Durban. We had following seas at the time, and apparently the force was sufficient to shear one of the 3/8” bolts in half. I suspect that one of the bolts loosened up, causing a little play between the arm and the rudder. As the waves overtook Cups and hit the rudder, this play would have increased the stress on the bolt.

removing the old arm

If it had to happen at all, we were fortunate that it occurred when it did. The weather was reasonably benign at the time and there were no ships bearing down on us. We were also fortunate in that there was enough remaining of the old bolt to grip it with a pair of pliers and back it out. Once again, we retrieved the emergency tiller and hove-to while I worked on it. It took about half an hour to remove the arm, back the broken bolt out, and secure the arm back in place with a new bolt.

the broken bolt

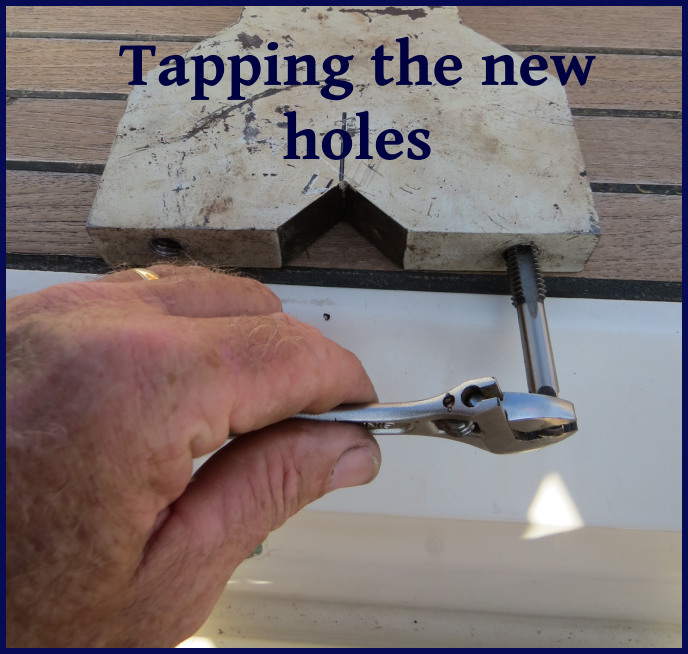
Here in Durban, I increased the bolt size to 1/2” (12.7mm) bolts. The yacht club boatyard next door was kind enough to allow me the use of their drill press, and I was able to drill and the tap the  holes myself. The new bolts have an extra dose of Locktite along with lock washers to keep them tight. I am optimistic this will do the job.

tapping the new holes

It's really good I didn't pick civil engineering as my career choice. If the first two iterations of the bridges I designed all fell down while I worked out the problems, it probably would have been a very short career.

ready to go back in

The Blue View - Whisker Pole Repairs Pt. 2

On our last day en route from Geraldton, Western Australia to the Cocos Keeling Islands, we broke our whisker pole. It was entirely my fault. I was hand-steering Nine of Cups, something that is necessary when we are sending and receiving emails via HF radio (our autopilot causes too much radio interference). We were sailing almost downwind, and a combination of a moment's inattention coupled with a large, unexpected wave caused us to jibe. Before I could react, the poled out genoa started flogging, and in a flash, our 28-year-old whisker pole broke in half. BAM! broken whisker pole

Our whisker pole is a telescoping Forespar pole, and it was the inside tube that broke. I cut the bent and broken section off the end and put it back together as best I could. It actually held together all the way to Durban - another 4000 miles or so. It did have a few issues, however. The toggle on the end that attaches to the mast was so badly bent that the pole could not be stowed on the mast, and we had to remove the pole and lash it to the lifelines whenever we weren't using it. Also, the small aluminum tube inside the pole, called the stinger, had more bends and “s” shapes than straight sections, making it very difficult to extend or retract the telescoping portion of the pole.

bent toggle

Now that we are in Durban, I wanted to repair it properly. I was able to find a new length of aluminum tubing in the right diameter to replace the stinger. I cut it to size, drilled the necessary holes and fitted it into place.

old and new stinger

Unfortunately, I can never seem to accomplish any task on Nine of Cups without a little drama. The pole has three large bushings that guide and constrain the inner tube when it is extended. While I was maneuvering the 24 foot pole on the finger pier next to Cups, I managed to lose one of these bushings. It slid off the end of the tube, bounced twice, then rolled unerringly off the side of the finger pier into the drink, never to be seen again. The good news is that I found a very competent and inexpensive machinist who was able to fabricate a new bushing for me. Now the pole extends and retracts better than it ever has.

new bushing

The bent toggle was a bigger problem. The Forespar literature says that the toggle can be removed by pressing the pin on the side of the end fitting. In the 15 years we have owned Cups, I have never been able to budge this pin. I have heated it, cooled it and used all sorts of heavy tools and weaponry encouraging it to move – all to no avail.

push the pin

Since I couldn't remove the old toggle, my machinist friend wasn't able to make a new toggle, but he was able to straighten the toggle in situ. The pole now rotates nicely side to side and stows against the mast as it should. Despite assurances to the contrary from the machinist, however, I am somewhat concerned that the metal might have been weakened when the toggle was bent and then straightened. It might be time to think about a new pole when we return to the U.S.

straightened toggle

In the meantime, I welcome input from anyone who has suggestions on getting the pin to move and/or removing the old toggle. Any ideas out there?

The Blue View - Adapting to Change ... a new yogurt recipe

yogurt ala nine of cups My usual breakfast, especially while Marcie is away, is a cup or so of yogurt topped with some of Marcie's homemade granola. I prefer the unsweetened, very thick, Greek style yogurt. Way back in January of this year, we shouted the praises of  make-it-yourself yogurt using pre-packaged yogurt powders. It is not feasible to bring enough fresh yogurt with us on a long passage, so we have a yogurt maker aboard that was purchased in New Zealand a few years ago. It resembles a thermos on steroids. To make a batch of yogurt, we mix a packet of yogurt powder with water in a one liter container, and shake it up. The yogurt maker is then partially filled with boiling water, the yogurt container is placed inside, and the top is screwed on. After 12 hours or so, the yogurt is ready.

yogurt ingredients

The packets of yogurt mix were easy and inexpensive to come by in both New Zealand and Australia. When we set off across the Indian Ocean on Nine of Cups, we made sure we had enough of these packets to last us until we arrived in South Africa. What we discovered on arriving, however, was that yogurt powder isn't available here. When we arrived in Durban and couldn't find any, Marcie wrote to the company. They don't distribute in South Africa and we could find no substutions. No problem... since Marcie was returning to the States for a few weeks, she could bring some back. Unfortunately, it turns out that yogurt powder is difficult to find and very expensive in the U.S.

Certainly, the lack of yogurt powder availability wouldn't deter me. We typically keep a stock of both UHT and powdered milk aboard. I figured I  could find a recipe online for making yogurt with either or both of these as the base for the yogurt. I found several yogurt recipes, but none were for a really thick, Greek style yogurt. So I did some experimenting. The first batch was pretty watery, the second a bit better, and by the fifth batch, it was turning out pretty good.

Here is the recipe I use for Greek style yogurt:

Adapting to Change ... a new yogurt recipe
Author: David Lynn
another way to make Greek yogurt
Ingredients
  • 1 liter UHT milk
  • 1 cup whole milk powder
  • 1 tsp sugar
  • 2 tablespoons yogurt (this must contain live cultures – we save a little from the previous batch)
Instructions
  1. Combine half the UHT milk with the remaining ingredients in the yogurt container and shake until mixed. Add the remaining milk until the container is full. Then follow the directions for making yogurt for whatever type of yogurt maker you use.

Now that you have the recipe for yogurt, here is Marcie's recipe for crunchy granola to go on top. We've published it before, but we regularly get requests for it.

Marcie's Crunchy Granola (for printable version, click here)

2 cups rolled oats ½ cup almonds – sliced or whole ½ cup sunflower seeds ¼ cup sesame seeds 2 tablespoons vegetable oil 5 tablespoons honey ½ cup shredded coconut ½ cup raisins

Combine oats, almonds, seeds and coconut in a medium-sized bowl. In a small saucepan, heat honey and add oil until combined. Add to the dry oats mix and stir until oats are thoroughly coated. Spread in a very thin layer on a baking sheet. Bake for 15 minutes at 250F (120C), turn mix on pan and return to oven for 10 more minutes. Let cool, then add raisins or other dried fruit. Store in an airtight container.

Substitutions / Additions: Walnuts, pecans, hazelnuts Dried fruit pieces, dates

Don't have a yogurt maker? Here's what we use. It works quite well.

This is an affiliate link ... perhaps an idea for the Amazon gift card you received for Christmas?