The Blue View - Replacing the Cockpit Rope Clutches

A rope clutch, when engaged, allows a line to be pulled in one direction, but not the other. When the handle on the top of the clutch is lifted, disengaging it, the line tension is released allowing it to be pulled in either direction. It is a handy invention, especially on a sailboat where there are dozens of lines that need to be controlled, adjusted and secured. One of the most common uses of rope clutches is to allow several lines to share one winch. Each line can be adjusted up or down using the winch, then locked in place with its clutch. replacing the rope clutch

Nine of Cups will be 29 in December 2015, and with each passing year, more of her original equipment reaches its “Use By” date. A case in point is the triple rope clutch in the cockpit that is used to control the main halyard, topping lift and spare halyard. It not only looked its age, it would no longer hold the lines in place once they were unwrapped from the starboard winch. Replacing it was on our to-do list for Durban, and a new Garhauer triple clutch was one of the parts Marcie brought back in her luggage from the States.

the old and the new clutch

Unfortunately, the new clutch had a different footprint than the old one, so the job involved more than merely unbolting the old and screwing down the new. A new teak pad to support the clutch would have to be made and finished, and and all but one of the bolts that secure the clutch to the coachroof would need to be repositioned.

As I learned when rebuilding the engine instrument box, teak is difficult to find and very expensive here in South Africa. I did have a small piece aboard left over from another project that would work for the pad, however. I cut it to size, drilled the necessary holes and sanded it down. I finished it using eight coats of a polyurethane finish I like. It is a New Zealand product called Uroxsys (now marketed in many parts of the world as Awlgrip Awlwood MA).

Our coachroof is constructed of a top and bottom layer of fiberglass laminated to a core of balsa. Screwing the clutch directly into the balsa core would be, at best, a short term solution. Even if the balsa had the initial structural strength to secure the clutch under the load of three heavily tensioned lines, which is doubtful, the lateral forces on the screws combined with any moisture that made its way into the screw holes would continually reduce the holding power of the screws. A much better solution would be to bed the bolts in epoxy.

epoxy graphic

I marked the bolt locations on the coachroof, then drilled oversized holes. The bolts were 1/4” (6mm), so I drilled 1/2” (12mm) holes, double the diameter of the bolts. I also drilled out the old holes that were no longer going to be used with a 5/16” (8mm) bit, only slightly oversized, and then cleaned out all the holes with a vacuum cleaner. I masked both the bottom of the teak pad (I didn't want to accidentally bond the pad to the deck) and the area around the holes. Next, I did a dry fit to make sure everything would go together smoothly later when my hands were all gooey with epoxy, then removed all the parts. The final step of the prep work was to lightly grease each bolt with silicone lubricant to prevent the bolts from bonding with the epoxy.

I keep West System epoxy on hand, and I mixed a small batch (2 full pumps or about 1.6 fl oz) of 105 resin with the equivalent amount of 206 slow hardener. I used a Q-tip to wet out each hole, then mixed 403 filler with the remaining epoxy until it was about the consistency of catsup. Using a small craft stick, I put about 1/2” (12mm) of the thickened epoxy in each new hole, and used all but a small blob of the remaining epoxy to partially fill the old holes.

The next step was to assemble all the parts before the epoxy kicked. I positioned the teak pad and clutch in place, then pressed each screw fully into its hole.

one old bolt and five new

Now the goal was to let the epoxy harden enough to hold the bolts in place, but not to harden beyond the point that it would still bond with additional layers of epoxy. The perfect point is when it is still slightly tacky and can be dented with a fingernail. Since the epoxy in the holes can't be monitored, I kept the mixing pot with the remaining blob of epoxy to check the cure rate. It was fairly hot that day, and it took about 1.5 hours to reach the right hardness. I carefully unscrewed the bolts, then removed the clutch and teak pad and screwed each of the bolts back into their holes. I mixed up another batch of epoxy, again adding 403 filler until it was the right consistency, then filled all the holes. I used a toothpick to probe each hole and release any trapped air bubbles. Then I let the epoxy completely cure for a few days.

I used Sika 291 as a bedding compound, sealant and adhesive between the teak pad and the deck. This raised the teak pad enough that the bolts didn't bottom out in the epoxy when they were tightened down. Alternatively, I could have added a washer under the head of each bolt.

All in all, a lot of work, but I am optimistic it will last another 25-30 years. If so, I'll be in my 90s when it wears out. I just might splurge and hire someone else to do it next time.

The Blue View - Creating Your Own Breaker Panel Labels

breaker panel When Nine of Cups was built in 1986, the designer provided several spare breakers in the DC distribution panel to make the job of adding new equipment and electrical circuits easier. All these spare breakers on our main breaker panel were used a long time ago as we added gear, and  over the years, we have added even more circuits, resulting in several fuses and breakers located in various locations around the boat. One of the things I wanted to accomplish here in Durban was to add a small sub-breaker panel to the electrical system on Nine of Cups, and re-organize at least a few of the added circuits.

the labels provided

Marcie brought the new breaker panel back with her when she returned from the States. The panel has a small, clear, backlit window adjacent to each breaker, so that each breaker can be labeled and its function clearly marked. It also came with a sheet of “standard” labels that could be peeled off and placed over the windows. Unfortunately, not one of the circuits I was adding to the panel could be accurately described by the labels provided.

blank labels

Making my own labels wasn't quite as straightforward as it might have been. Since the little windows are backlit, the labels needed to be a reverse image... the background needed to be black and the letters clear. This wasn't really all that hard using text boxes in Open Office Writer, but it did take a little experimentation to get the fonts and box size optimal. I printed each label on clear label stock, then applied a small square of laminating plastic over the ink to protect it from scratching and smearing. Then I stuck each label in place, and the result was quite acceptable.

The Blue View - Top 2000 Uses of WD-40

Our good friend and former cruiser, Jack Cooley, sent us a fun blog on the history of WD-40 and about 43 different uses for it. WD-40 is, of course, one of the fundamental and key components of any yachtie's tool kit, and I thought I'd devote a Blue View in tribute to it. To quote the Duct Tape Guys
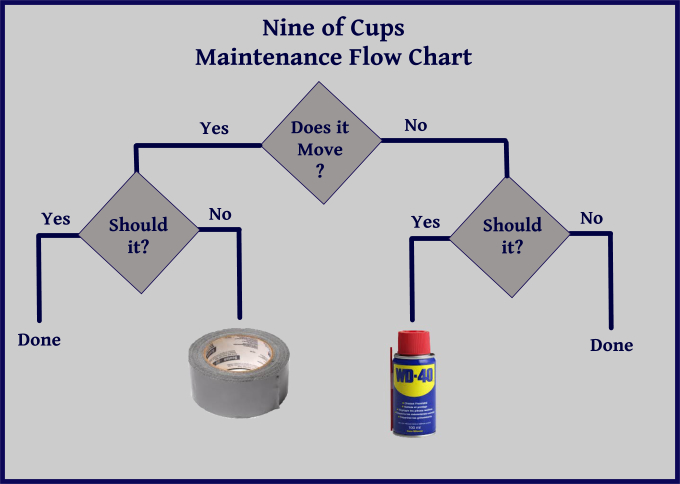
, “You only need two things in life: Duct Tape and WD-40®. If it moves and shouldn’t, use Duct Tape; if it doesn’t move and should, use WD-40®.” duct tape and wd40 flow chart

A little history... In 1953, the newly formed Rocket Chemical Company, with its staff of three, set out to create a line of rust-prevention solvents and degreasers for the aerospace industry. The first product was to be a water displacement product, and it took 40 attempts to get the formulation right... thus it had the internal name WD-40. Their first big customer was Convair, an aerospace contractor, who used the product to protect the outer skin of the Atlas Missile from rust and corrosion.

rochet chemical company

The name stuck, and a few years later, the company's founder, Norm Larsen, experimented with putting WD-40® into aerosol cans, reasoning that there might be a consumer market for the product in the home. It made its first appearance on store shelves in 1958. The company more than doubled in size, to seven people, who sold an average of 45 cases per day from the trunks of their cars to hardware and sporting goods stores in the San Diego area. In 1969, the company was changed from the Rocket Chemical Company to the WD-40 Company, Inc., which was its only product. Since then, the company has continued to grow, going public in 1973. It is now found in 4 of every 5 households, on every boat I know of, and in 176 of the 196 nations around the globe. We have personally seen it in some of the smallest, most remote hardware stores you can imagine – from remote jungle villages on the Amazon to tiny islands in Vanuatu.

uses for wd-40

A common myth... The main ingredient is fish oil. The actual formula is a tightly held trade secret, but reviewing the MSDS sheet shows WD-40® contains about 65% aliphatic hydrocarbons and 25% petroleum based oil. It has a slight odor of petroleum when used, and the can even has warnings about petroleum distillates and the perils of ingesting it. One of its many uses is most certainly NOT as a source of omega-3 fatty acids.

Common uses aboard... On Nine of Cups, my can of WD-40 sees a lot of activity. My own top 10 uses are:

Freeing seized bolts. This is always the first round in any attempt to free a seized bolt.

Removing masking tape residue.

Removing shoe marks. The officials in many countries insist on boarding your vessel wearing their black polished boots, not noticing or caring that they are leaving big black marks all over our decks and topsides. WD-40®  works well to remove them.

Lubricating drill bits when drilling stainless.

Preventing rust on tools

Lubricating blocks and pulleys

As a belt dressing on engine/alternator belts

Displacing moisture from electrical connections and wires

Freeing stuck zippers

Lubricating and protecting fishing reels

Other lesser known uses... The WD-40®  website lists more than 2000 uses for it. Here are some of my favorites:

Spraying it on bird feeder posts causes the squirrels to slide right off.

Removes adhesive from the tails of show calves

Use the bottom of the can to draw a perfect circle

Use to shine seashells from the seashore, Susie

Keeps snake and reptile skins pliable during taxidermy

Removes duct tape – in case what previously didn't need to move, now does need to move

Cleans gum from turtle shells and chicken feathers

Cleans raccoon traps

Cleans melted vacuum cleaner belts from carpeting

Creates pretty rainbow formations when applied to empty aquariums

Keeps kitty poo from sticking to electric cat-box rakes

I noted it is also good for removing lipstick stains and for freeing stuck zippers. So I guess it would also be good for removing lipstick stains from stuck zippers??