The Blue View - Splicing a Sleeve onto a Line

In a recent blog, Marcie mentioned visiting the Southern Ropes factory outlet store. What a great place!Not only did they carry every type of yacht rope, but climbing, fishing, water skiing and other specialty ropes as well. I could hardly contain myself as I checked out all the different rope types and discussed the pros and cons of each with the knowledgeable sales person. Marcie, on the other hand, was able to hide her excitement amazingly well.

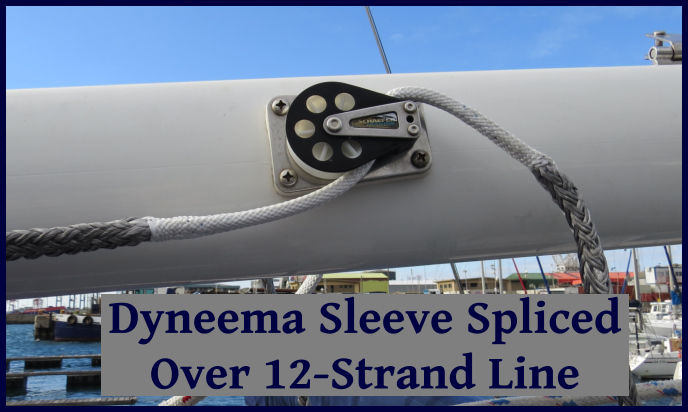
One item I discovered was protective sleeve material. This is a tubular outer cover that can be slid over an existing line and spliced in place to protect the line from chafe. The sleeve is made of UV resistant Dyneema – a material known for its high resistance to chafe. Our reefing lines have a tendency to chafe at one particular spot, and this would be a good remedy. The sleeve material should be purchased in one size larger than the line it is protecting. Since our reefing lines are 10mm, I bought a few meters of 12 mm sleeve material.

a chafed line

In some applications, the sleeve can be merely slid in place and stitched. This would be acceptable for dock and mooring lines. If the line will be passing through blocks and clutches, however, the sleeve should be spliced in place.

There are two types of splices that can be used, depending on the type of line the sleeve will be covering. If the line is a 12-strand type, like Amsteel for example, the splice is quite simple. Once the cover is in place, the combination of the sleeve and the line is essentially a double braid line. I use the method for stripping a cover on double braid class II rope provided by Samson Ropes.

cover over dyneema

If the line is a double braid type, the splice is more complicated. I cut the cover 12” (30cm) longer than needed. I attach the double braid line to a splicing wand or fid, and slide into the cover.

insert and measure

Next, I mark the cover 6” (15 cm) from one end, and then unravel the strands of the cover from that end back to the mark.

unravel

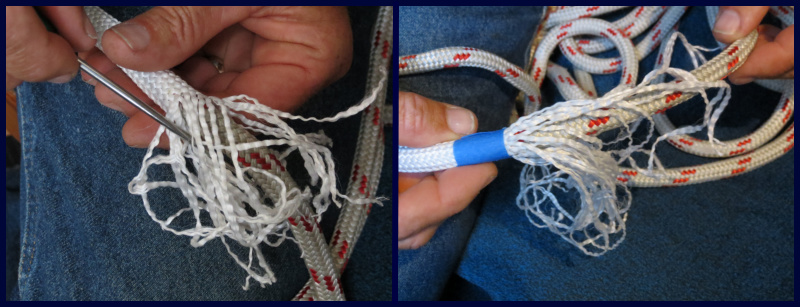
Using a large darning needle, I stitch four sets of strands at a time into the double braid. The splice needs to be tapered, so I vary how far along the double braid each set of strands is stitched. Then I snip off each set of strands where they exit the double braid, and stretch the line until the ends disappear.

stitch

(Note the bandaid – I am seldom allowed to use needles or other sharp instruments unattended). Once one end of the cover has been buried in the double braid, I stretch the cover tight and repeat the process with the other end.

done

The Blue View - Flaking the Dock Lines

flaked line After Nine of Cups is secured to a dock, jetty or finger pier, and the lines are all tied, there is always some excess dock line to deal with. Ideally, it should be flaked so that the line can be run out quickly, without tangling, in the event of an emergency. If the boat next to us is on fire or we just got a tsunami warning, I don't want to spend an extra few minutes untangling knots in my dock lines.

The most common method is to just neatly coil the line  in loops. This is quick, and easy, and if the line is short, it can be run out or untied from the cleat quickly. If the line is longer, it is often coiled in a figure 8 pattern, which prevents the line from kinking or tangling as it is uncoiled.

figure eight pattern

Another method is to use a daisy chain, aka a chain sinnet, to shorten the line. This makes an attractive chain that can be un-knotted, without tangles, by pulling on the end. It is an easy knot to tie, and Grog's Animated Knots shows how.

chain sinnet

Many yachties like to use a Flemish flake. The line is coiled in a tight spiral on the deck or dock, and the end result is quite pleasing. It does have a few disadvantages, however. It cannot be quickly uncoiled without introducing a number of kinks and tangles; it doesn't dry out easily; and people have a tendency to walk on it, grinding dirt into the fibers.

flemish flake

As we were walking up the dock the other day, I noticed that a Swiss flagged boat berthed near us, the Omoo-Faa, had a different method of flaking his docklines – one I hadn't seen before. Marcie took a picture of it (she almost always has her camera with her), and I spent an hour or so when we got back figuring it out and messing around with it. It looks quite attractive and seamanly. By pulling on the end, the coil runs out with nary a kink. The tight coils will probably still take longer to dry out, but the finished coil doesn't look like a mat, so maybe people will be less inclined to stand on it. The following photos show how to do it.

flake collage

BVFlake Collage2

There hasn't been anyone aboard the Omoo-Faa, so I haven't been able to ask the skipper about it.  I don't know the origin, whether the owner invented it or learned it from someone else and whether it has a name. If any of you salts out there have any information about this method of flaking a line, I'd be pleased to hear from you.

The Blue View - Repairing the GPS

We have a nice Raymarine chartplotter/GPS in the cockpit that we installed in 2004. The teak panel it is attached to has a cutout that was made to fit it. Unfortunately, it died about three years ago, and when we tried to order a replacement, we found that it was no longer being produced. This was somewhat of a dilemma since we couldn't find anything else that would fit the cutout. We did manage to find a used one on eBay, but it, too, died about a year later. gps repair

Eventually, we will buy another panel mount GPS and modify or replace the teak panel, but in the meantime, it isn't all that critical. We have several other GPSs aboard -  a couple of handhelds, an antenna that feeds locational information to our Nav station chartplotter, and our tablets all have GPSs built in. We like having GPS information displayed in the cockpit, however, so I mounted one of the handhelds on the pedestal.

The problem with our handhelds is that they run on two AA batteries which need to be replaced every ten hours or so. On a long passage, that's a lot of batteries. We have Garmin handhelds which do provide the option of using a power cable, however, so I routed a cable to the cockpit. Everything was fine for about six months. Unfortunately, the power cable is not all that weather resistant, and the contacts soon corroded. No problem – I cut the connector off and soldered the wires directly to the GPS contacts, then gooped it all up with silicone. That lasted about a year and a half, but eventually, enough moisture made its way in to corrode these connections as well. It stopped working about a week ago on our first attempt to leave Cape Town.

corrosion

So our options were: do without, find a GPS locally that will fit into the teak cutout, or start over with another handheld GPS. There was one more option. I could make a 12 VDC to 3.2 VDC power converter and connect it to the battery contacts inside the battery compartment of the GPS. Since the battery compartment is nearly watertight, the connections inside should last a long time.

The voltage converter is a trivial circuit, and the parts can be found at any electronic hobby outlet like Radio Shack, Jaycar, or Jayco. Being the geek I am, I actually had the parts I needed aboard. I built, tested and installed the circuit on a rainy afternoon.

repair lm317

The circuit is based on an LM317 adjustable voltage regulator. By selecting the correct resistors, the device will convert the vessel's 10.5-14 VDC to any voltage between 1.2 VDC to about 8 VDC. All that is needed is the LM317, two resistors and two capacitors, plus a small generic circuit board to mount everything.

schematic

The output voltage is determined by the two resistors based on the following equation: Vout = 1.25 * (1+R2/R1) + Iadj * R2 Iadj is very small, and if we keep R2 small, the last term can be ignored. This simplifies the equation to: Vout = 1.25 + 1.25(R2/R1)

For an output of 3.2VDC, if we select a value of 240 ohms for R1, the equation becomes: = 1.25 + 1.25(R2/240) Solving for R2: R2 = (3.2-1.25)*240/1.25 = 374 ohms. Since 374 ohms is not a standard size, I used the closest standard size of 360 ohms for R2.

I mounted the circuit board inside the battery compartment – it was smaller than one AA battery – using hot melt from a glue gun to hold it in place. I drilled a hole in the battery compartment just large enough to slide the power cable through, then soldered it to the input pins of the LM317. The output of the regulator was connected to the plus and minus battery connections.

circuit board

If your soldering technique is a bit rusty, we have three short videos on the subject. BTW, completing this project earns you a Geek 1st Class merit badge.

Editor's note from Marcie: I would rather suck water out of the bilge than re-read this blog post, but I know you geeks out there will appreciate it. ;-)