The Blue View - Replacing the Shaft Seal

pss shaft seal As part of the process of replacing the cutlass bearing, the old shaft seal had to be removed. I installed a 'dripless' shaft seal about 14 years ago, and while I've serviced it regularly over the years, I thought it might be a good time to replace it as well.

If you're not a yachtie or a boater, you may be asking “What the heck is a shaft seal and why do I care anyway”. Or, more likely, you've tuned out by now and decided to wait till Marcie's next blog tomorrow. If you're still with me, however, I'll talk about installing a new shaft seal.

The shaft seal, as its name implies, forms a seal around the propeller shaft as it exits the bottom of the boat through the stern tube. It prevents water gushing into the boat without causing any wear on the shaft while it rotates. Traditionally, this was accomplished by something called a stuffing box, which consisted of a threaded sleeve attached to the stern tube and a large nut. The sleeve was filled with wraps of a packing material – typically woven flax impregnated with wax, grease or lubricants, then the nut was tightened down until the flax was compressed against the shaft, forming a seal.

stuffing box

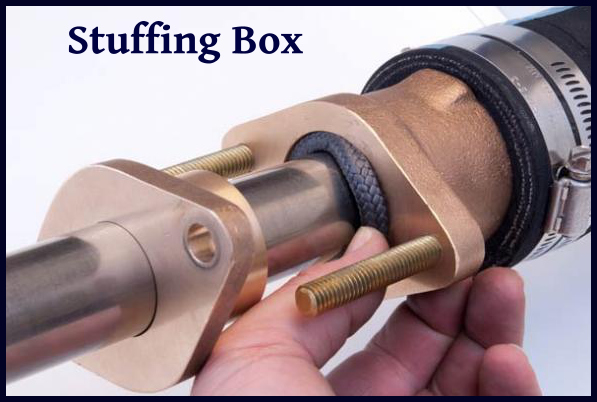
To keep the flax from drying out or overheating, it needed to be lubricated with seawater. The packing nut would be tightened or loosened from time to time to ensure the amount of water the stuffing box was leaking was optimal – on a sailboat this was about 10-15 drops per minute. Over time, the flax would harden and wouldn't seal effectively, so it had to be dug out and replaced every few years. Stuffing boxes are still quite common, but the packing material is now synthetic, rather than flax, and require less maintenance.

Nine of Cups originally had stuffing boxes on both the prop shaft and the rudder. Shortly after we bought her, I replaced the stuffing box with a new 'dripless' shaft seal. There were a few varieties available, and I chose the P.S.S. Shaft Seal made by PYI, Inc. It consists of a stainless steel rotor that attaches to the shaft and a carbon graphite flange that attaches to the stern tube with a bellow.

bellow

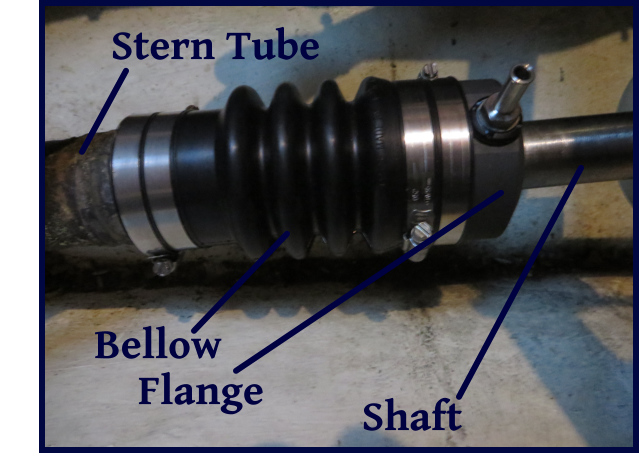
The stainless rotor is held in place with two set screws. I removed these, lubricated the shaft with some dishwashing soap, then slid the rotor off the shaft. The bellow is secured to the stern tube with two hose clamps. I removed these, worked the bellow free of the stern tube and slid it off the shaft as well. Note that we are on the hard... the stern tube will admit an amazing amount of water once the rotor is allowed to slide away from the flange if the boat is in the water.

rotor

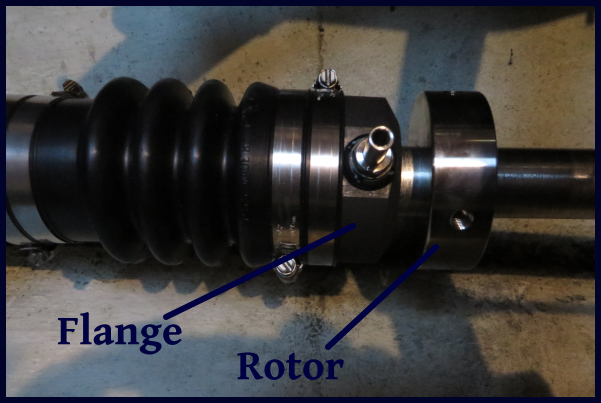
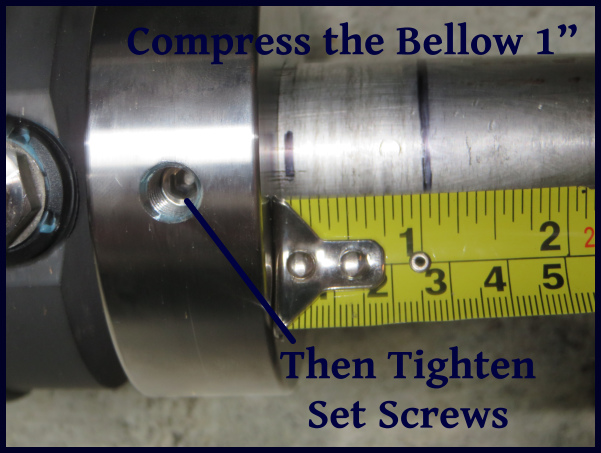
Installing the new shaft seal is straightforward, and complete instructions are provided by the manufacturer. Slide the new bellow-flange assembly in place over the stern tube and secure it with two hose clamps. Lubricate the shaft with dishwashing soap and carefully slide the new rotor into place. The rotor has two o-rings that seal it against the shaft, and some care should be taken to avoid damaging them as it is slid over the end of the shaft. Position the rotor so that it just touches the flange, slide it another inch or so, compressing the bellow, then tighten the set screws.

compressed

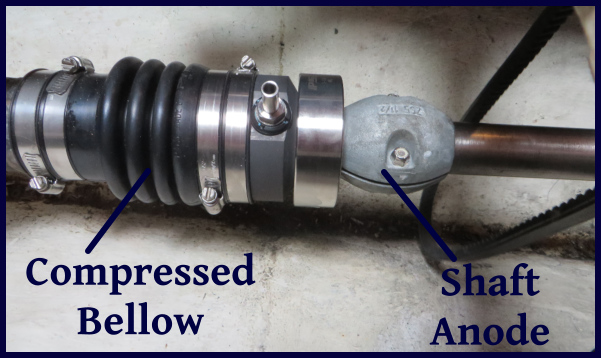
A few years ago, while we were sailing along the south coast of Australia, the rotor slid back along the shaft and we began taking on water. There was an adrenaline-filled hour or so while we figured out the problem and corrected it. A friend, John on Active Transport, had the same problem, and he prevented the possibility of a re-occurrence by mounting a shaft anode on the prop shaft. That seemed like a good idea, so we did the same.

anode

The shaft seal is lubricated and cooled by seawater. To make sure there is no airlock and that water is getting to the bearing, it is important to 'burp' the seal once the boat is back in the water. I do this by compressing the bellow, making sure water flows out.

So there you go … new shaft seal installed. Time to move on to the next project.

The Blue View - Working in d' Trini Style

One of the tasks we wanted to accomplish here was to address some core de-lamination problems in the bulwarks of Nine of Cups. This involved cutting away sections of the fiberglass sheer stripe, removing the old core, replacing it with new marine plywood, embedding everything in epoxy, and re-attaching the fiberglass outer layer. Once this was all done, a layer or two of glass cloth would be applied, then the entire area would be faired and repainted. I did the same to several sections of the deck where our old teak decks had caused de-lamination of the deck core, and while the process took longer than I expected, the end result was a deck that was stronger than new. Since we were on a tight timetable, I thought I'd enlist the help of the Trini guy who had done such a good job painting our hull. To avoid any embarrassment, l'll call him Dewie. sheer stripe

Working with Dewie is both endearing and annoying. To begin with, he repeats everything at least three times, followed by "You unda stand me captn? You hear what ahm sayin?". These last two sentences will be repeated until I verbally acknowledge that I have, indeed, heard and understood him. Now in his defense, he is used to working with us old cruisers. Many of us are hard of hearing and aren't used to the Trini dialect, (nor do they always understand our accents and idioms for that matter) so if something important is being communicated, it is best to make sure everything is being understood. Dewie carries this to the extreme, however. "We work togetta, eh captn... it's easier to clap wit two hands than one. You unda stand me captn? You hear what l'm sayin?" Pause. "You unda stand me captn? You hear what l'm sayin?" . This will be repeated until I respond enthusiastically. If my response is less than enthusiastic, he will inform me that "It a lot easier to work wit someone who enjoy his work and not be in a foul mood all d' time".

dewie and david

Dewie also likes to share his Trini knowledge with me. Some of his tips and "tricks" are well worth knowing. I've learned a lot from the various tradesmen I've encountered around the world, and I try to be open minded and receptive to new ideas. Dewie must think I'm the village idiot, however, and finds it necessary to explain how he does the simplest tasks. When we were setting up a scaffolding to work on the sheer stripe, we needed to round up some additional planks. Dewie informed me that "the captn on dat catamaran is gone for a long time - we can use his planks. Let me show you d' trick for carrying dem. You pick up one end and I pick up d' otter end and we carry it just so. You see my trick? You unda stand me captn? You hear what l'm sayin?" Now if I were to foolishly respond "gee whiz - that is clever...I thought we'd put the planks between our legs and hop over to Cups", all I'd hear for the next hour would be his muttering "It sure is hard working wit someone who always be in d' foul mood."

the plywood

Dewie was used to working with epoxy, but I knew he had never replaced the core of a deck before. It was important to him that he didn't appear to lack knowledge on the subject, however. "I done dis work plenty of times, captn, but everybody does it diff'rent. How do you like ta do it?". So I explained 'how I like ta do it'. As we were cutting the plywood to fit into the first section of the sheer stripe, I was numbering each piece of wood to make it easier to figure out which piece of ply went where. Dewie insisted this wasn't necessary - "I can figure dis out jus fine when we gluing dem in", so I stopped numbering them. When it was time to place each piece of ply, we had a few miscues, and while we eventually got everything in its place, it took longer than necessary. The next day, Dewie told me he had a little trick to show me. "We should number each piece of timber like so. Dis is how we do it in Trinidad. Dat way, it's easy to figure it out when it time to glue the timbers in. You unda stand mah trick captn? ..." I wish I had thought of that.

filled

Early on it the process, when we were cutting and grinding the old fiberglass, Dewie came attired in a full Tyvec suit and a respirator. I commented on how I was happy to see he took his health seriously. He said "Yah captn, dat fiberglass is nasty stuff. I try not to bree'd it or any of dem bad chemicals. Mey'be I live to be as old as you, skippah!". I think he was smiling inside his respirator.

almost done

Working with Dewie really has been fun and a positive experience. He works hard, always shows up when he says he will, and his work is good, which is more than I can say about most of the guys I've worked with in dozens of other places. His paint work was first rate and we were quite surprised to find it all done on our return to Trini.

south american dust mask

Now, if only I can keep from being in d' foul mood all d' day...

The Blue View - Replacing a Cutlass Bearing

When we hauled Nine of Cups in December, as soon as the power wash was done and all the sea life was removed from her bottom, I took a walk around looking for problems. For the most part, everything looked good – no blisters, the anti-fouling looked depleted but good, no play in, or issues with the rudder. We hadn't run aground since the last haulout, so there wasn't any damage below the waterline. There were several expected maintenance issues, but the only surprise was that the cutlass bearing needed replacing. The cutlass bearing supports the propeller shaft as it exits the hull, and the actual name is a stave bearing. Originally, they were made of the hardwood, lignum vitae, which is resistant to rot, is very hard and doesn't swell when wet. We know of at least one sailboat that replaced their worn cutlass bearing with a locally fabricated hardwood version when the modern equivalent wasn't available, and it worked just fine.

The name 'Cutless' is actually a tradename owned by Duramax Marine for their molded rubber stave bearing. This then evolved to cutlass bearing and became the generic name. I think if I walked into a marine chandlery and asked for a stave bearing, I'd get some puzzled looks – but everyone knows what a cutlass bearing is. For a boat the size of Cups, the bearing consists of a bronze tube with a grooved nitrile, rubber-like lining.

Since it was eight years since we last replaced it, I was half expecting that it might be time again. To determine whether it needed replacing, I took hold of the end of the prop shaft and wiggled it up and down and from side to side. There should be virtually no movement with a good bearing. I was seeing considerable play in the shaft, so I knew it was time for a new bearing.

removing the prop nut

The first step in removing the cutlass bearing is to remove the propeller. It is pressed into place with a large nut and cotter pin. These come off easily, but the prop itself is always reluctant to come free. I remember the first time I tried getting ours off – I spent most of a day prying, heating, tapping and pulling on it before renting a prop puller tool. All boatyards have such a tool, usually homemade, that makes the job quite easy. Here at Power Boats in Trinidad, I couldn't rent just the tool – I had to hire the guys along with it. The cost was higher, but they had the prop off in just a few minutes.

bearing romoved

Next, the prop shaft has to be removed. On Cups, this entails disconnecting the hydraulic piston connected to the rudder, removing the anode on the rudder, then removing the shaft coupler and shaft seal. I also had to remove the pulley for the prop shaft generator. Once these were all loosened and pulled off, the shaft slid right out. I used a scouring pad to clean and polish the shaft.

cleaning the prop shaft

Removing the cutlass bearing itself is next. It is held in place with two set screws and, in theory, once these are removed, the end of the cutlass bearing can be gripped with a pair of vice-grips or pipe wrench and the bearing can be pulled out. If only it were true. We were in Tahiti the last time we replaced it, and I spent two days trying to extract it. I tried all sorts of schemes and finally resorted to cutting it in half, patiently sawing through it with a hacksaw blade. This time I hired the same guys that had the prop puller. They cut through the old bearing in just a few minutes, using a SawzAll fitted with a 10” blade. In order to pull the bearing out, however, they had to perform some surgery to the end of the shaft tube as well.

new bearing

The new bearing was slid into the tube, and I gave it a few taps with a piece of wood and hammer to ensure it was seated. The set screws were screwed into place, and with help from Marcie, the prop shaft was slid back in. It was a tight fit in the new bearing, and lubricating it with a little dishwashing soap and water helped. The rest of the process was the reverse of the removal process.

shaft reattached

The final step was to repair the fiberglass that was cut when the old bearing was being removed. I mixed up a batch of West System epoxy, thickened with 403 filler to about the consistency of peanut butter, and built up and faired the damaged edge. Once it cures, I will sand it, then give it a couple of coats of anti-fouling.

Hopefully, it will be another decade before we have to replace it again.