The Blue View - Bilge Pumps

bilge pump 
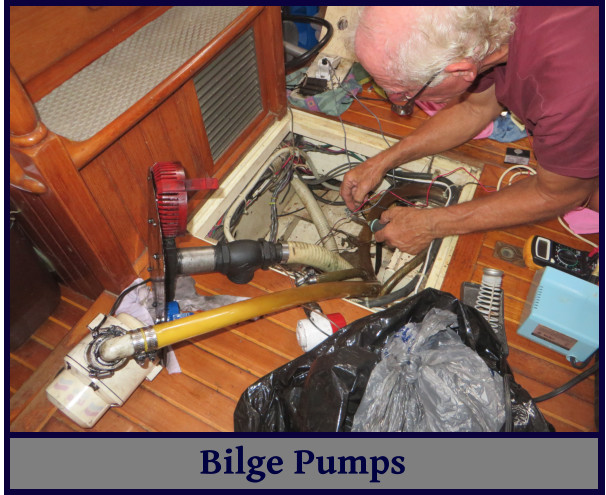
Nine of Cups has four bilge pumps in place – one electric pump with a 3700 GPH (gallon per hour) capacity, one electric with a 500 GPH capacity and two hand operated 3600 GPH pumps. And if all else fails, we have several buckets aboard. Discounting the buckets, if both electric pumps were running and Marcie and I were giving it our all at the pumps, we should, in theory, be able to pump more than 11,000 GPH, or almost 200 gallons per minute! That should handle just about anything, right?

If you've followed our blogs over the years, you may remember a few that talked about bailing water from Nine of Cups. I can recall three occasions when we were at sea and taking on water – a most distressing situation. The leaks turned out to be relatively small and easily repaired, but what was more distressing was that the combined output from three of the four bilge pumps would barely keep up with even those small leaks (Marcie was hand pumping while I tracked down the source of the leak). Had we suffered some serious hull damage, all four of the pumps would not have even come close to handling the water ingress. The best we could have hoped for was that our pumps would buy us enough time to fix the problem, get help, run Cups aground on a beach somewhere – or, sigh, get the life raft deployed and loaded.

On the other hand, our bilge pumps are adequate for routine water ingress, minor emergencies and pumping out all the collected water once the emergency has been handled. Here are my thoughts on a reasonable bilge pump system.

bilge pumps

  • Small Automatic Pump. We have a small pump (500 GPH) with an automatic switch located in the lowest part of the bilge. This pump takes care of routine water ingress. We almost always take on some water during rainstorms or from waves over the bow or into the cockpit during rough weather. A small capacity pump is desirable for this application. When a bilge pump runs, it has to pump water out of the bottom of the bilge to a height above the waterline of the boat. When the pump shuts off, all the water in the hose will eventually run back down through the pump and back into the bilge; the bigger the pump, the bigger the hose, and the more water that will make its way back into the bilge. Thus, a smaller pump with 3/4” diameter hose is preferable. It is controlled via a switch on the breaker panel and an automatic switch – see below for a discussion on automated switches.
  • Large Capacity Electric Pump. We have a large capacity (3700 GPH) electric pump located next to the small pump. It is not automatic, and is turned on via a switch on our breaker panel. This pump is used in emergencies or when more than the usual amount of water has made its way into the bilge. For example, when it's time to clean the bilge, we first use oil absorbent pads to collect any fuel or oil, then turn off both pumps and pour several gallons of fresh water mixed with an acceptable bilge cleaner into the bilge and let it set a day or so, allowing it to slosh around. Next we turn on both pumps, quickly pumping the cleaner out and cleaning the hoses at the same time.
  • Hand Operated Pump #1. This hand operated pump is permanently mounted below the cabin sole and while primarily intended for emergencies, is used more frequently than you might think. On passages, we usually turn off the automatic pump and use the hand operated pump once or twice a day to determine whether we are taking on more than the usual amount of water. By counting and tracking the number of pumps required each morning to empty the bilge, the early signs of a pending problem, like a leaking fitting, can be identified before it becomes an emergency.
  • Hand Operated Pump #2. This pump is attached to the underside of one of the cabin sole hatches, along with 15' (4.5m) of hose. In an emergency, the hose can be fed down into the bilge and the pump taken up into to cockpit and operated there.
  • Automatic Switch. I have tried a multitude of automatic bilge switches, most of which didn't work reliably. The mechanical float switches would sometimes stick, or would run the pump dry while on a heel. The automatic bilge pumps have a tendency to cycle on and off frequently as the water is pumped out of the bilge, then drains back down into the bilge from the hose. (See the further discussion below regarding non-return check valves in the discharge hose).I do like a few of the electronic sensors that detect water level by measuring the capacitance between two sensor pads. The capacitance will be different depending on whether there is air, water or fuel between the sensors, and since it can detect the difference between oil/fuel and water, the switch has been programmed to turn the pump on only when water is present. Since oil and fuel float on water, the switch will then turn the pump on only until all or most of the water is pumped out, and turn the pump off before any oil or fuel gets pumped overboard. The switch I use is the Water Witch Model 101*. One of its features is that it keeps the pump switched on for several seconds after the level of the water drops below the sensor. If the switch is mounted above the bilge pump, the pump will continue running until the water level drops well below the sensor height, so when the water left in the hose drains back into the bilge, the water level will still be well below the sensor, preventing it from cycling on and off.

water witch

  • Check Valves. A non-return check valve will prevent the water in the hose from draining back into the bilge. The ABYC allows the use of a check valve in the discharge hose of an automated bilge pump for just this purpose - to prevent the pump from cycling on and off. I'm not a big fan of check valves in bilge discharge lines. Since the bilge water often has debris in it, the check valve often becomes fouled, causing it to leak and rendering it useless.
  • Operational Feedback. Having some sort of feedback to let me know the automatic bilge pump is running is important. We have an indicator light on the alarm panel that illuminates when the pump is running. On my wish list is the addition of a cycle counter – a device that keeps track of how many times and for how long the bilge pump has turned on. An increase in the amount of time the automatic bilge pump has come on may well be an indicator of a problem that is simple to fix now, but which could be catastrophic if allowed to get worse.

alarm panel

  • High Water Alarm. We have a water activated switch located well above the normal level of water in the bilge. If the water ever rises to the level of the switch, it sets off audible and visual alarms both below deck and in the cockpit. I use a different model Water Witch switch for this application – the Model 10, which is identical to the Model 101 but without the shut-off delay. We installed it after our passage from Easter Island to Ecuador when we began taking on water and were blissfully unaware of the problem until the floorboards were almost awash with water.

So that, in a nutshell, is our bilge pump system.

BTW, I want to thank our JALF blog reader, Tony in California, for suggesting this blog. I thought I had covered the topic long ago, but neither Tony nor I could find an older Blue View on the subject. So, thanks Tony.

This is a link to the Water Witch bilge switch on Amazon. If you buy anything from Amazon using this link, it costs you no more, but we make a tiny percentage on your purchases.

The Blue View - Recycling a Hard Drive

For the next year or so, we don't plan to be sailing quite so far from home as we have been. This means we can offload a ton or so of provisions, spare parts, extra anchors and tools. The list of now non-essential gear includes a couple of older laptops we kept around in case we had major problems with our newer ones. The older laptops still have value to someone, and we thought we'd either sell them or donate them to some worthwhile charity. It isn't wise to divest of a computer without first sanitizing the hard drive, however. It contains all sorts of personal and security information like bank account numbers, credit card info, Social Security numbers and passwords. Any savvy 12-year-old can find your browsing history, then use the saved information on your hard drive to sign into your bank or credit card accounts. It's literally child's play.

Likewise, all those old tax returns and bank statements are hiding on the disk. It isn't enough to delete a file - this doesn't remove it from the hard drive. Deleting a file only moves the name of the file and its link from the main directory to the Recycle Bin. Emptying the Recycle Bin doesn't delete the file either – it only removes the file name and link from the Recycle Bin directory. The actual file data remains on the hard drive until it is written over by new data. Reformatting the hard drive is better, but a reasonably good hacker can still collect a lot of information.

When I was just a pup and in the Navy, I was stationed at a facility that had large rooms full of computers, and it was my job to help diagnose and repair computer hardware problems. If a hard drive crashed and needed to be sent off site, it had to be sanitized first to make sure no classified information made it into the hands of the bad guys. Those hard drives were the size of a 55 gallon drum on steroids (and had 1/1000th the capacity of a smaller memory stick these days), and every inch of the drum had to be degaussed using a handheld electromagnet.

Sanitizing the hard drive on our old laptops isn't that difficult, but does take time. Here are a few options. Don't forget to double check that you've copied and backed up any information you might want later!

  • Destroy the hard drive. If the hard drive is removed from the computer and physically destroyed (beaten into bits with a hammer, drilled through several times, melted into a gooey mess, etc.), no one will be able to recover any data from it. The computer is pretty much worthless at this point of course, unless someone wants to go to the trouble and expense of buying a new hard drive.

destroy the hard drive

  • Restoring the drive to factory condition. Free or inexpensive software can be downloaded that will create a bootable CD, then write the entire hard drive to ones and then to zeroes several times. The current thinking is that repeating this cycle three times is sufficient to make any pre-existing data unrecoverable. Once this process is completed, the original restore CD is used to load the operating system. Depending on the size of the hard drive, this process can take anywhere from several hours to a few days, but the end result is a usable, but sanitized computer.

back to factory settings

  • Manually clean the hard drive. It is possible to delete and overwrite all the data and remove all password and private information from the hard drive. This takes less time than restoring it to factory condition, but has a high risk of leaving something important on the hard drive.

So what did we do? We still had the original restore disk for one of the laptops, and I restored it to factory condition. The hard drive was 80 GByte, and the entire process took 18 hours. We somehow lost the restore cd for the second laptop – it's probably stowed in some safe place aboard Nine of Cups – so restoring it to factory condition was more problematic. Instead, I manually cleaned the hard drive as follows:

  • Uninstall programs. I uninstalled a few dozen apps and programs that weren't necessary. I left a few programs that might be useful to a new owner like Adobe Reader and Open Office.
  • Delete passwords. The computer saves website passwords and 'form content' – the information like our names, address, phone number, SSN, credit card numbers, etc. that we routinely use to fill in forms. This information makes it quick and convenient when we're ordering something online, but also makes it easy for a thief to steal our identities or access our accounts. I spent an hour or so researching the topic online and deleting all the browsing history, cookies, passwords and form content from the laptop.

deleting passwords

  • Delete data files. I deleted all data files, downloaded files, videos, pictures, .PDFs, etc. I went through every file and directory on the C drive. Then I emptied the Recycle Bin.
  • Defragment the hard drive. Files are stored on a hard drive in small blocks that are linked together. For example, a 1 MByte .JPG file might consist of 1000 1KByte blocks that are all linked together. When the disk is new, the blocks making up a file are stored contiguously, but over time as files are written and deleted, the newer files become fragmented. Defragmenting a hard drive moves all blocks of all the files to one contiguous region of the hard drive. I defragmented the hard drive to overwrite any small areas of the disk and to consolidate the free space into one large block.
  • Overwrite the free space. To make sure the data in all the free space was overwritten, I copied innocuous data files from an external hard drive to the computer's internal hard drive. The data I used were movies – I copied a few hundred movies from one of our external drives - enough to entirely fill the internal drive. Then I deleted the movies (from the internal drive only, of course) and emptied the Recycle Bin.

The process took about 10 hours for a 200 GByte drive. I'm feeling relatively confident that any sensitive data is either gone or more work than it is worth to recover – but then, ignorance is bliss. If there are any IT guys or benevolent hackers out there who have any suggestions, I'd appreciate any input, before the $27.97 in our checking account gets raided.

The Blue View - Sealing a Fuel Tank Hatch

When we first bought Nine of Cups, we had a lot of trouble with contaminated fuel. Water would make its way into the fuel tanks – either through the fill cap or due to condensation inside the tank - allowing grunge to start growing. This would sit in the bottom of the tank until we had a boisterous passage, when the rolling and pitching of the boat would stir it all up. Before long, our fuel filters would get clogged and the engine, starved for fuel, would quit. This usually happened at the most inopportune time, like when we were wending our way through a tight channel or fighting an ebbing current. I now visually check the fuel filters regularly – daily when we are motoring or the first time we start the engine each day. If the filters start accumulating grunge, I know it's time to inspect the fuel tanks and see what's growing in there. In addition, I clean each fuel tank at least annually, polishing the fuel as necessary (see the Blue View on polishing fuel).

hatch fuel filter

To inspect and polish the fuel, it is important to have inspection hatches on the tanks. All our fuel and water tanks have large, ~15” (380mm) inspection hatches, making it less of a problem to see and reach inside the tank. When it's time to open up a tank and take a look inside, I remove the eight bolts holding the hatch in place and lift it off.

The hatch is sealed with a rubber-like gasket. This works fine on three of our four tanks, but one of our fuel tanks – the one that was fabricated for us in Ecuador - leaks around the hatch. As the hatch is tightened down on this particular tank, the steel around the hatch warps, enough so that it leaks. Actually, it only leaks if we overfill it, or sail on a heel, or do any rolling and pitching – otherwise, it's fine. So one solution to the problem is to only fill it half full and never leave the shelter of a protected marina.

leaking gasket

Another solution, and probably the correct one, is to reinforce the hatch and hatch opening so that it doesn't warp. I can't think of a way of doing this that doesn't involve fabricating steel rings, then welding in-situ and/or drilling and tapping holes in the top of the fuel tank.

A third solution is to find the right gasket. Before I go to the trouble and expense of fabricating and attaching metal parts, I thought I'd try to find a gasket material that worked. I purchased rubber gasket material in various thicknesses and hardness, cut them to size and gave each one a try. None of these was a success.

hardware store

When we arrived in Puerto Rico, I bought some Permatex Gasket Maker – a goop in a tube that can be applied and used to form a gasket. It comes in a myriad of different types for different applications, and I got a version that was impervious to fuels. It was easy to apply, and set quickly. Best of all, it seems to have solved the problem. On our passage from Puerto Rico to St. Augustine, we leaked nary a drop.

gasket maker

ooze

The only downside is that the hatch has to be removed periodically. I suspect I will have to scrape off the old gasket and reapply fresh goop each time, but even so, as long as I have a tube of gasket maker on hand, this shouldn't cause any drama.