

The Blue View - Coast Guard Checklist
/Since it’s been quite a while since we sailed in U.S. waters, we thought it would be a good idea to review the US Coast Guard documentation and make sure we were in compliance with all the regulations. I suspect that if we were boarded for a routine safety inspection, they might want to check a few other things besides the expiration dates on our flares.

It took only a few minutes of online searching to find a host of documents describing the various guidelines and requirements for pleasure vessels. One particularly helpful document is A Boater’s Guide to the Federal Requirements for Recreational Boats. I found this 45-page pdf document to be quite informative and easy to read. The government writers did a good job of translating the federal code into something that was understandable and almost interesting. I read the entire booklet and found several requirements that were new since we left the U.S. all those years ago – not to mention a number of requirements I had forgotten. It also included a checklist which I found quite useful.
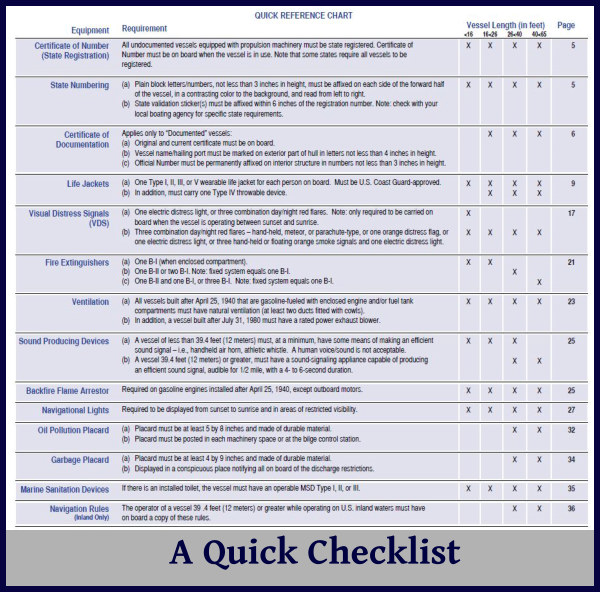
So, how did we stack up? We met nearly all of the safety requirements – life jackets, fire extinguishers, horns, bells, navigation lights, bilge pumps, etc. One safety issue I had missed was the requirement to cover all battery terminals to prevent a problem should a tool be dropped across them. I fabricated terminal covers from heavy plastic and, using cable ties, attached one to each battery terminal.

We also met most of the other requirements, such as a marine sanitation device (a holding tank in our case), and an on-board copy of the navigation rules. (The nav rules are also available digitally on line, in case you need to print them out.) We did, however, find a number of issues that might have been grounds for a citation had we been inspected.) To make sure we were in compliance with everything on the list, we spent the last two days before departing Chesapeake, VA, scurrying around making sure we found everything we needed.
For example, we didn’t have Cup’s documentation number permanently affixed in a conspicuous location inside the boat, with numbers that are at least 3” in height. We do have our doc number painted onto the interior of the hull under the aft bunk, but this is hardly a conspicuous location. We found stick-on letters at the local hardware store and stuck-em on, so we should now meet this requirement.

We also did not have a copy of the MARPOL regulations regarding the disposal of garbage and waste overboard. This should be in the form of a permanent placard, affixed in a conspicuous location, so that everybody on board will be aware that it is illegal to dispose of plastics, oil and garbage in U.S. waters. We found these, free of charge by the way, at the local West Marine. While we were there, we picked up a very nice placard with a written trash disposal plan to replace our rather old, weathered version – also free of charge.

Finally, we did not have an anchor ball. When we are anchored at night, we are required to have a white anchor light, visible from all directions. This is not only a requirement, it’s also common sense – we want to make sure other vessels see us at night. More than once, we’ve been run into by fishing boats while anchored, even while our anchor light was shining brightly. Thus, we usually augment our anchor light with our spreader lights, just to make sure we can be seen. When anchored during the day, we are required to display forward, where it can best be seen from all directions, a black ball. In our 16 years of cruising, I doubt I have seen more than half a dozen sailboats that actually do this, but it is a federal (and international) navigation requirement, and we should make an effort to comply. None of the local chandleries had a black ball in stock, so we decided to make our own, and went on a search for something that would work. We eventually found two large plastic, round black bowls for 97-cents each in the Halloween section of a local Walmart. We drilled holes in the top and bottom and attached a small line, then taped them together - using black duct tape, of course. It works quite nicely and should last until, if and when we decide we need a more permanent solution.

BTW, the volunteers with the U.S. Coast Guard Auxiliary will, at no charge, perform a courtesy safety and compliance check on your vessel. It is informational only - they do not issue citations nor report you for safety violations. If you pass their inspection, the vessel will be issued a signed statement to that effect, as well as a decal that can be affixed to the boat. If we stop anywhere long enough to schedule an inspection, we plan to have it done.
 Marcie was doing her


 , installed four C-cell alkaline batteries and tried it out. The light, which has a visibility of 10 miles, was as bright as expected. We stowed it and the orange flag in the ditch bag, and Marcie has changed her annual safety checklist to include changing the batteries.
 One of the items on my to-do list was to replace the galley freshwater foot pump. We have pressurized water for the freshwater system, but fresh water aboard the boat is precious, and we try hard to conserve it. When a constant stream of water is not required, like when brushing teeth or washing hands, a pump or two on the foot pump sends a long squirt of water to the faucet above, and provides just the right amount of water without wasting much at all. Our foot pump died while enroute from Puerto Rico to St. Augustine, FL, and it's been on the repair list since then. Now that we are tied up next to a boatyard in Chesapeake, VA, I am finally getting to it.


