The Blue View - What Size Wire Do I Need - Pt. 2

smoking wires Last week's blog discussed one aspect of determining the correct wire size for an electrical application – how much current a wire can safely carry. Another aspect that should be considered is the amount of voltage drop that will occur.

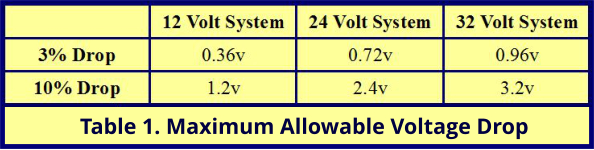
All electrical wire has resistance, and because of this resistance, as current flows through the wire, there will be a voltage drop. The amount of voltage drop that occurs depends on three factors: the length of the wire, the amount of current flowing, and the resistance of the wire. For some non-critical circuits, like cabin lighting, a 10% voltage drop is acceptable, but for most other circuits, a 3% voltage drop is the maximum allowable. Table 1 provides the maximum allowable voltage drop, in volts, for 12 volt, 24 volt and 32 volt systems.

table one

The first step in determining the voltage drop is to measure the wire length. I use my tape measure and measure each section of the wire run. I always round up and add a couple feet, or half a meter, for good measure - it is better to overestimate. I measure the return wire path to DC ground as well.

The second variable, the amount of current the wire will be carrying, may or may not be simple to calculate. If the wire is used for a single device – a bilge pump for example – all that is needed is to check the label on the device or refer to the owner's manual. If there are several devices connected to the circuit, the process is more complicated and involves a worksheet and a few calculations. I will describe the process in next week's blog. For purposes of this week's blog, let's assume we have a single device being powered by our circuit.

We now have all the information necessary to determine the necessary wire size. Follow these steps:

  1. Calculate the maximum resistance per foot using the formula:

Ohms per foot = Allowable Voltage Drop / (Current in Amps x Length of wire in feet)

  1. Use Table 2 to find the wire size. Select a wire size that has a lower resistance per foot than the calculated resistance.

For example, let's say we have a 12 volt system and are adding a circuit for a new chart plotter that draws 3 amps. The round trip length of wire is 35 feet. We want no more than a 3% voltage drop in the circuit. For the equation above,

Allowable voltage drop = 0.36 volts (from Table 1)

Current in amps = 3

Wire length = 35 feet,

so the maximum resistance per foot would be 0.36v/(3amps * 35') = .0034 Ohms/foot.

table two

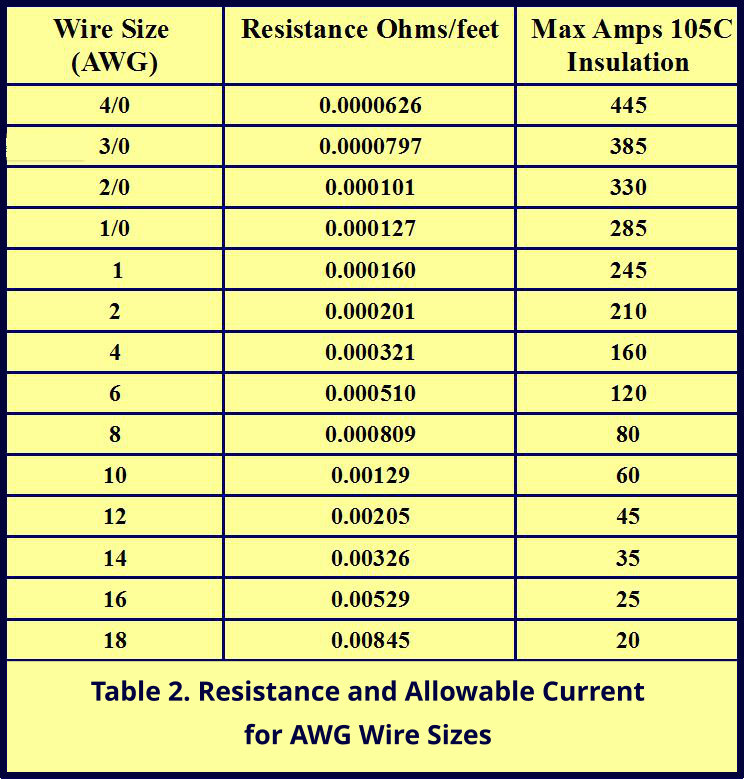
Looking at Table 2, wire size AWG 14 is the smallest wire that has a resistance less than .0034 Ohms/foot. So, AWG 14 wire is the smallest wire we can use and still have a voltage drop of less than 3% for our circuit.

The last column in Table 2 lists the maximum allowable current that the various conductor sizes can handle under ideal conditions. (This should look familiar if you read last week's blog.) This value is for quality marine wire with insulation rated for 105ºC. If more than the allowable current is passed through the wire, the wire will heat up enough to melt the insulation, creating a fire hazard. If you use wire with a lower temperature rating for the insulation, the wire cannot handle the same amount of current before the insulation begins to melt. Likewise, if the wire is run through an engine compartment with a higher ambient temperature, or if several current carrying wires are bundled together, the insulation may melt with a current less than the listed maximum current.

Table 3 lists some multipliers that can be used to estimate the reduction of the maximum allowable current for different situations. These are somewhat conservative values. If more than one situation applies, the multipliers should be combined.

table three

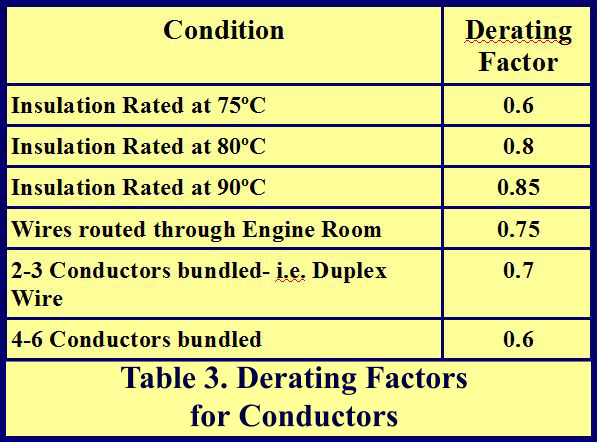
For the chart plotter example, if a two-conductor duplex cable with AWG 14 wires is run from the distribution panel, through the engine compartment, and on to the new chart plotter, the maximum allowable current would be less than the 35 amps shown for AWG 14 wire in Table 2. Since the wire has two conductors, we have to derate the current capability by 0.7, and because the cable passes through the engine room, it must be derated a further 0.75. So, the AWG 14 wire will only be able to handle 35* 0.75 * 0.7 = 18 amps. The chart plotter only draws 3 amps, however, so the AWG 14 duplex wire is more than adequate.

The important thing to remember is that the wire must be adequately sized to meet both criteria; it should have an acceptable voltage drop and be large enough so as not to overheat. Most often, if a given wire size meets the first criteria, it will also meet the second, but not always, so it is important to check both.

Next week, I plan to talk about the process of calculating the total load on a circuit when there are several devices connected. Stay tuned.

The Blue View - What Size Wire Do I Need?

In last week's blog on installing our new batteries, I promised to (or maybe warned of?) write a blog on how to determine the right wire size for marine applications. As an electrical current is passed through a wire, the resistance of the wire causes it to heat up. If the wire is too small for the current passing through it, it will heat up enough to melt the insulation, resulting in a possible short-circuit or, worse, a fire. How much current a wire can safely carry depends on the wire size, the melting point of the cable insulation, and the ambient temperature. If the plan is to add or replace an electrical circuit, or to upgrade equipment, it's a good idea to make sure the wire size is adequate for the electrical current it will be carrying.

Wire in the U.S. uses the AWG (American Wire Gauge) system to indicate the wire size. An 18 AWG wire is the smallest wire size allowed to be used as a current carrying wire aboard a boat. (Smaller wire sizes may be used for communications cables, electronics cables passing less than 1 amp of current, etc.). An 18 AWG wire has a conductor size of 1.02mm – slightly larger than the lead in a mechanical pencil. As the AWG number gets smaller, the wire size increases. Thus, a 10 AWG wire is larger than an 18 AWG wire. The numbers were originally derived from the number of times a wire had to be drawn through a tool to get the indicated size. A 10 AWG wire had to be drawn ten times while a 30 AWG wire had to be drawn 30 times.

I suspect that when the AWG system was invented, the largest wire size envisioned was a size 0 wire, which is slightly bigger than a ball point pen. Wire sizes larger than 0 are now commonly used, however, and, after considerable head-scratching no doubt, it was decided to add a zero for each size larger than size 0 AWG. The next size is 00 AWG, then 000 AWG, and so on. Eventually, it was decided to start using the cross-sectional area of the wire to define its size rather than continuing to add zeroes, so thankfully, there is no wire size larger than 000000 AWG wire (6/0 AWG) in the AWG system.

BTW, when you go to the chandlery to buy some wire, you don't want to sound like a dummy, so be sure to pronounce the wire size correctly. For sizes smaller than 0 AWG, the size can be stated as “18 AWG wire” or “Size 18 wire” - no surprises there. But for sizes larger than 1 AWG the colloquial pronunciation of zero – aught - is used. The wire size is stated as the number of zeroes followed by “aught”, so a size 0 AWG would be called a “one aught wire”, and a size 000 AWG wire would be called a “three aught wire”.

The first piece of information needed when calculating wire size is the amount of current the wire will be carrying. If the only thing connected to the wire is a bilge pump, all I need to do is check the amperage of the pump, which is usually printed on the pump or in the manual for the pump. If there are several loads on the circuit, I would add up the current required by each of the electrical devices likely to be running at any given time. For example, a circuit might have two fans, several lights and an outlet that is used for charging Marcie's laptop, and adding up the current required for each device might total 12 amps.

For the batteries I installed last week, the calculation is slightly more complicated. The biggest load is, by far, the windlass (not counting the starter, which is on a different battery bank and only runs for a few seconds at a time). We might also be running the deck washdown pump, the nav instruments, a few lights, and perhaps the refrigerator is also running. Adding all these loads up, the total current would be around 180 amps. (This is actually quite unlikely, since we would almost surely be running the engine while doing all this, but let's assume we have an engine problem and we need to raise anchor without it).

On the other hand, we have a very large alternator with a maximum charging current of 200 amps. This is higher than the maximum load of 180 amps we would ever expect to draw from the batteries, so I'll use 200 amps as the maximum current the battery cables need to carry.

The next piece of information I need is the temperature rating of the insulation for the wire type I will be using. Good marine-grade wiring, which is what I plan to use for my cables, is usually rated for 105° C. If I use a different type of cable, I will need to know its temperature rating.

Finally, I need to think about where the wire will be routed. If it passes through the engine room or some other area that is significantly hotter than normal room temperature, the insulation is already closer to its melting temperature, and the wire can't carry as much current before the insulation becomes overheated.

The first table below (which I extracted from the Code of Federal Regulations and modified slightly to make it easier, hopefully, to understand) lists the allowable current for cables of different sizes and types. It looks confusing at first glance, but is quite simple to figure out. My battery cables must be able to handle at least 200 amps, and I am using wire that has insulation rated for 105° C. The column for this type of wire is highlighted. If I look down the column until I find an allowable current of at least 200 amps, I see that I need a wire that is no smaller than 2 AWG. Just to be on the safe side, I actually decided to use cable size 0 AWG (“one aught”), which is rated for a current of 285 amps.

wire size table

This cable doesn't pass through the engine room, but the cable from the alternator to my battery switch does. It should also be able to carry 200 amps safely, but this time, since the cable passes through a much hotter area, the same size cable cannot carry as much current before the insulation begins to overheat. The second table above shows how much I must derate the cable. Looking down the column for wire with insulation rated for 105° C, I see that the allowable current must be derated by a factor of 0.85. If I use the same size cable as I did for the batteries, which was rated for 285 amps, it will only carry 285 * 0.85 = 245 amps, which is safe for the maximum alternator output of 200 amps.

Next week, I'll discuss how to determine the right size fuse or circuit breaker for a circuit.

The Blue View - Installing New Batteries

A few weeks ago, I did a blog on the latest and greatest in battery technology, and which type of battery would be best for Nine of Cups.  After a little analysis, a lot of hemming, hawing, and harrumphing, and a fair amount of pontificating, I finally narrowed the field down to either a replacement set of my old Lifeline AGM batteries or a set of Thin Plate Pure Lead (TPPL) AGM batteries.

My Lifeline AGM batteries had lasted longer than expected - a little over eight years. Buying a new set would make the installation quite easy as they would be identical to the old ones. On the other hand, after a few years of use, I had to equalize them frequently (every 3 months or so) to reduce the build-up of sulfation. They are also more expensive than the TPPLs. In the end, I did some shopping around and bought six new Odyssey 100 amp-hour TPPL batteries.

old batteries

The new batteries are smaller and lighter than the old batteries, but also only about half the capacity. (The six Odyssey batteries have a total capacity of 600 amp-hours vs. the original 820 amp-hour capacity of the four Lifelines.) Given that our plans for the next few years will more than likely be more coastal and shorter offshore passages rather than the major ocean crossings and high latitude sailing of the past, the smaller battery bank should suit us quite well, however.

Installing the new batteries took about two days. The hardest part was lugging the old 135 pound (61kg) batteries up out of their lockers and hauling them out and onto the dock. Removing the braces that held the old batteries and replacing them to secure the new wasn't difficult, but took most of the time.

crimper

Unless the new batteries are identical to the old ones, it is likely that at least a few of the battery cables will have to modified and a few new ones made. I have a lug crimping tool which was quite inexpensive on Amazon.

It is the kind that is smacked with a hammer, so I can make or modify battery cables myself. I strip one end of the cable, insert the wire into the lug, place the lug in the crimper and whack it a couple of times with a small sledge hammer. Then I measure the length needed, cut the cable to the correct length and repeat the process on the other end. Some suggestions:

  • I cut the cable with heavy rigging cutters, but it can be cut with a hacksaw, a small angle grinder with a cutting wheel or even a Dremmel tool.
  • Before crimping the second lug, I make sure the cable fits. I also rotate the lug if necessary – it's better if the cable doesn't twist in the lug after it is crimped. I use a marker to mark the proper orientation of the lug and wire.
  • I finish the lug with a short length of heat shrink tubing.

As the installation is planned, there are a few considerations to be aware of:

battery restraints

Mechanical security. Each battery must be secured so that it cannot move more than 1 inch in any direction – right, left, forward, back or upwards. To accomplish this, I built a frame around the base of each battery out of 1x2 lumber, then bolted it in place. This prevented the battery from moving horizontally. Then I attached pad eyes to opposite sides of the frame and strapped each battery down. I've used either webbing or light line.

Overcurrent protection. A short circuit between the positive battery cable and ground will create some terrific on-board fireworks. The ABYC requires a suitable fuse or circuit breaker on the positive cable within 72” of the battery. An exception is the starter battery. A direct, un-fused connection is permitted between the starter battery and the starter motor.

boot


Terminal isolation. The positive battery terminals should be protected, so that if a metal object is dropped onto the battery, it can't short the terminals. On terminals that have only one wire connected, I use a rubber boot. This doesn't work well if there is more than one wire connected, in which case, I use a small section of clear, heavy plastic to protect the terminal. The last time we replaced the windows in our dodger, I kept the excess plastic window material, and this works quite well. I hold it in place with cable ties. I also protect any other terminals connected to the positive side of the battery – terminal posts, fuse connections, etc. Another alternative is to enclose the entire battery in a battery box.

Ventilation. Most battery types – even the sealed ones – can release explosive hydrogen gas while charging. The battery compartment should be vented to allow this gas to dissipate. Since hydrogen is lighter than air, at least some of the vents should be at the top of the compartment.

Cables. The battery cables must be stranded, and obviously large enough for the current that will be carried. This is a whole subject unto itself and will be the topic of next week's blog.

Fuel fittings, tanks and filters.

  • Batteries should not be located directly above or below fuel tanks, filters or fittings.
  • Any metallic fuel lines located above or within 12 inches of a battery must be shielded with an insulating material.

new batteries

In actuality, it took more like three and a half days for the installation – two for the actual installation, half a day to round up all the supplies and another day to look up all the rules and regs and. The good news is that I only have to do this every 5-10 years – the bad news is that I will have forgotten all the regs by then and will have to look them up again.