In last week's blog on installing our new batteries, I promised to (or maybe warned of?) write a blog on how to determine the right wire size for marine applications. As an electrical current is passed through a wire, the resistance of the wire causes it to heat up. If the wire is too small for the current passing through it, it will heat up enough to melt the insulation, resulting in a possible short-circuit or, worse, a fire. How much current a wire can safely carry depends on the wire size, the melting point of the cable insulation, and the ambient temperature. If the plan is to add or replace an electrical circuit, or to upgrade equipment, it's a good idea to make sure the wire size is adequate for the electrical current it will be carrying.
Wire in the U.S. uses the AWG (American Wire Gauge) system to indicate the wire size. An 18 AWG wire is the smallest wire size allowed to be used as a current carrying wire aboard a boat. (Smaller wire sizes may be used for communications cables, electronics cables passing less than 1 amp of current, etc.). An 18 AWG wire has a conductor size of 1.02mm – slightly larger than the lead in a mechanical pencil. As the AWG number gets smaller, the wire size increases. Thus, a 10 AWG wire is larger than an 18 AWG wire. The numbers were originally derived from the number of times a wire had to be drawn through a tool to get the indicated size. A 10 AWG wire had to be drawn ten times while a 30 AWG wire had to be drawn 30 times.
I suspect that when the AWG system was invented, the largest wire size envisioned was a size 0 wire, which is slightly bigger than a ball point pen. Wire sizes larger than 0 are now commonly used, however, and, after considerable head-scratching no doubt, it was decided to add a zero for each size larger than size 0 AWG. The next size is 00 AWG, then 000 AWG, and so on. Eventually, it was decided to start using the cross-sectional area of the wire to define its size rather than continuing to add zeroes, so thankfully, there is no wire size larger than 000000 AWG wire (6/0 AWG) in the AWG system.

BTW, when you go to the chandlery to buy some wire, you don't want to sound like a dummy, so be sure to pronounce the wire size correctly. For sizes smaller than 0 AWG, the size can be stated as “18 AWG wire” or “Size 18 wire” - no surprises there. But for sizes larger than 1 AWG the colloquial pronunciation of zero – aught - is used. The wire size is stated as the number of zeroes followed by “aught”, so a size 0 AWG would be called a “one aught wire”, and a size 000 AWG wire would be called a “three aught wire”.
The first piece of information needed when calculating wire size is the amount of current the wire will be carrying. If the only thing connected to the wire is a bilge pump, all I need to do is check the amperage of the pump, which is usually printed on the pump or in the manual for the pump. If there are several loads on the circuit, I would add up the current required by each of the electrical devices likely to be running at any given time. For example, a circuit might have two fans, several lights and an outlet that is used for charging Marcie's laptop, and adding up the current required for each device might total 12 amps.
For the batteries I installed last week, the calculation is slightly more complicated. The biggest load is, by far, the windlass (not counting the starter, which is on a different battery bank and only runs for a few seconds at a time). We might also be running the deck washdown pump, the nav instruments, a few lights, and perhaps the refrigerator is also running. Adding all these loads up, the total current would be around 180 amps. (This is actually quite unlikely, since we would almost surely be running the engine while doing all this, but let's assume we have an engine problem and we need to raise anchor without it).
On the other hand, we have a very large alternator with a maximum charging current of 200 amps. This is higher than the maximum load of 180 amps we would ever expect to draw from the batteries, so I'll use 200 amps as the maximum current the battery cables need to carry.
The next piece of information I need is the temperature rating of the insulation for the wire type I will be using. Good marine-grade wiring, which is what I plan to use for my cables, is usually rated for 105° C. If I use a different type of cable, I will need to know its temperature rating.
Finally, I need to think about where the wire will be routed. If it passes through the engine room or some other area that is significantly hotter than normal room temperature, the insulation is already closer to its melting temperature, and the wire can't carry as much current before the insulation becomes overheated.
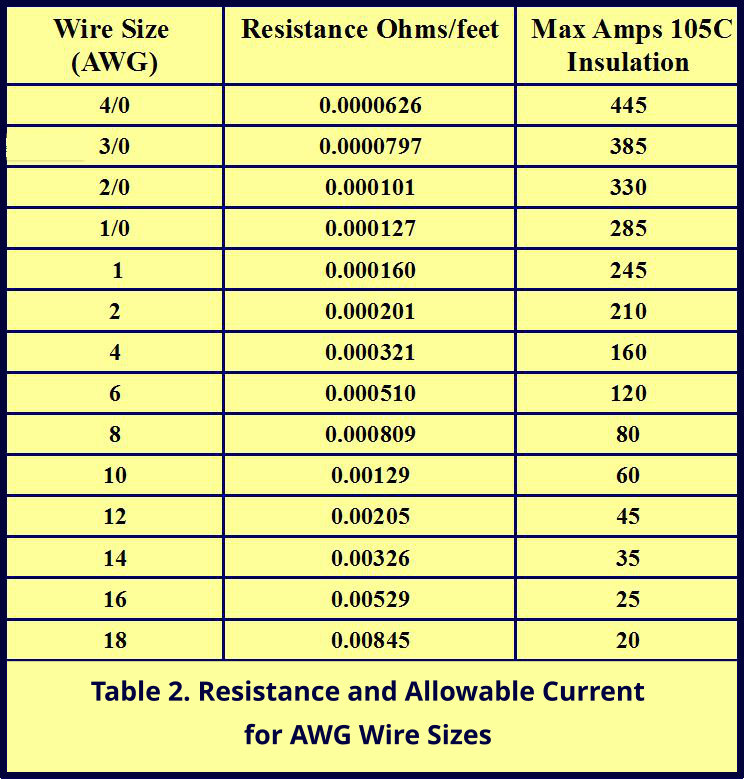
The first table below (which I extracted from the Code of Federal Regulations and modified slightly to make it easier, hopefully, to understand) lists the allowable current for cables of different sizes and types. It looks confusing at first glance, but is quite simple to figure out. My battery cables must be able to handle at least 200 amps, and I am using wire that has insulation rated for 105° C. The column for this type of wire is highlighted. If I look down the column until I find an allowable current of at least 200 amps, I see that I need a wire that is no smaller than 2 AWG. Just to be on the safe side, I actually decided to use cable size 0 AWG (“one aught”), which is rated for a current of 285 amps.

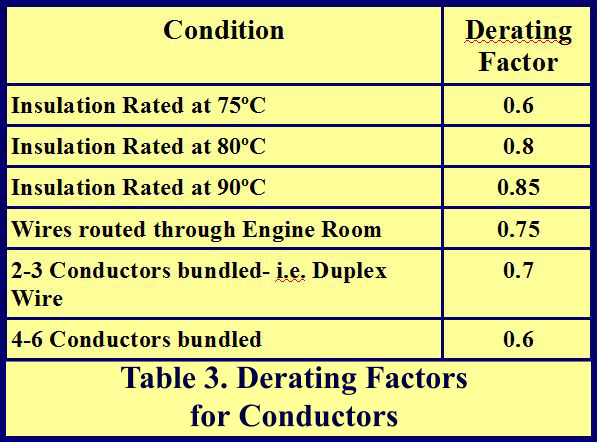
This cable doesn't pass through the engine room, but the cable from the alternator to my battery switch does. It should also be able to carry 200 amps safely, but this time, since the cable passes through a much hotter area, the same size cable cannot carry as much current before the insulation begins to overheat. The second table above shows how much I must derate the cable. Looking down the column for wire with insulation rated for 105° C, I see that the allowable current must be derated by a factor of 0.85. If I use the same size cable as I did for the batteries, which was rated for 285 amps, it will only carry 285 * 0.85 = 245 amps, which is safe for the maximum alternator output of 200 amps.
Next week, I'll discuss how to determine the right size fuse or circuit breaker for a circuit.


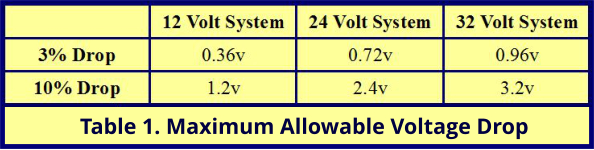
 Last week's blog discussed one aspect of determining the correct wire size for an electrical application – how much current a wire can safely carry. Another aspect that should be considered is the amount of voltage drop that will occur.