

The Blue View - Replacing the Fuel Tanks
/
BVFuelTanks Intro
When we bought Nine of Cups in 2000, we hired a marine surveyor to do a complete survey on our new home. He noted that our fuel tanks were constructed of black iron, and while there were no leaks at the time, this type of tank had a usual lifetime of about 20 years. Since Cups was then 14 years old, we probably had a few more years left in them before we started to see any leaks, but we knew it was something we should be expecting. Sure enough, in 2006 our starboard tank started leaking.
We were in Ecuador at the time, and the local boat repair expert assured us it could be successfully patched. We gave it a try, but the patch only lasted long enough to get us well offshore before the tank started leaking again.
A few months later when we returned to Ecuador, I decided to replace it with an epoxy tank. I cut access panels in the cabin sole, cut the top off the old tank and removed the baffles, then constructed a new epoxy tank. It fit well and has been doing its job with nary a leak ever since, but it was a lot of work and took about 4 times longer to build than I expected – not all that atypical of most of my projects actually.
Then in 2007, the port tanks started leaking. We put the project off until we were in Ecuador again, this time in Puerto Amistad near Manta. There was a steel fabricator not too far away who made tanks for the fishing fleet out of Manta and who came highly recommended. We decided to have them made by him rather than building it out of epoxy.

cutting the sole
I started by removing the saloon table and cutting out sections of the teak and holly sole. I borrowed a Fein tool, making it possible for even me to make reasonably straight, accurate cuts.

dressed
Next, I used a grinder with a cutting blade to cut the top off the old tank. This was a messy job, with sparks flying everywhere. I draped the entire area with old sheets and tarps, wore a respirator, eye protection, and enough clothing to avoid most of the burns. Once the top was cut off, I climbed inside the tank and cut the old baffles out – another messy, unpleasant job. Once I crawled back out of the tank and confirmed that I still had my nose and all ten fingers, I cleaned up the mess and hauled all the debris ashore.
The next task was to measure for the new tanks. It would have been nice to make one big tank that would fit into the old tank, but the size of the tank was limited by what would fit down through the hatch. Apparently, the original tanks were constructed and fitted before the decks were put in place.
In order to maximize fuel capacity, I decided to build three tanks, each of which would fit through the saloon hatch. The plan was to slide the new tanks into the old tank, bolt them in place, then plumb them all together. I spent several hours wiggling around inside the old tank making measurements. Then I sat at the Nav desk and sketched the three tanks.
Once the sketches were done and checked, I had a dilemma. Could I trust my measurements and sketches enough to hand them over to the fabricator or should I build models of the tanks to be sure they actually fit and to check for any mistakes? Given my propensity for mistakes and the possibility that the fabricator would misinterpret some aspect of the sketches, this was a no-brainer – I decided to build plywood mock-ups of the tanks.

making the mock ups
The local lumberyard (almacén de maderas) was happy to deliver a few sheets of 1/4” plywood, I had plenty of epoxy, glue-gun sticks and screws on hand, and Puerto Amistad, the yacht club we were renting a mooring from, was kind enough to let me use some space in a fenced area to work in. I found plastic plumbing fittings at the local hardware store (ferreteria). I transported all my supplies and tools ashore, and began building the mock-ups.
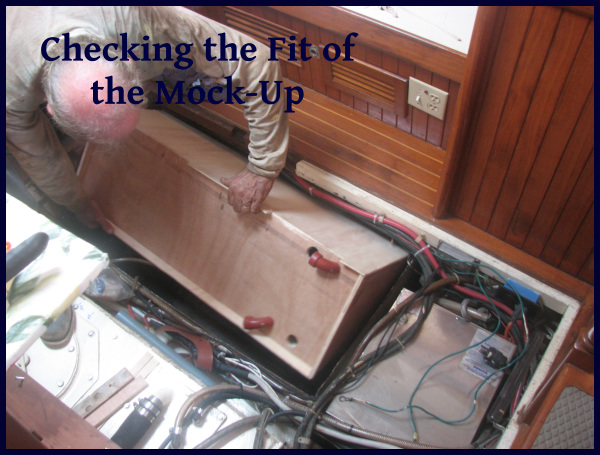
checking the fit
Under different circumstances, I'm sure this phase would have gone quicker, but given the equatorial heat, the ongoing discussions with the other sailors who wondered what the hell I was doing, and who were full of suggestions on how I might do it better, and the close proximity of the cool, air-conditioned bar, it took longer than I planned to build the mock-ups. In total, I spent three days building and checking the fit of the tanks, then another day tweaking them all to correct a few errors and miscalculations. In retrospect, however, making the mock-ups was worth doing since I would have had to send the tanks back for reworking had I not made the models.
As we've said so many times before “Nothing's ever easy on a boat.” I'll talk about testing and installing the new tanks in Part 2 of this blog. Stay tuned.