The Blue View - Whisker Pole Repair

On our last day en route from Geraldton, Western Australia to the Cocos Keeling Islands, we broke our whisker pole. It was entirely my fault. I was hand-steering Nine of Cups, something that is necessary when we are sending and receiving emails via HF radio (our autopilot causes too much radio interference). We were sailing almost downwind, and a combination of a moment's inattention coupled with a large, unexpected wave caused us to jibe. Before I could react, the poled out genoa started flogging, and in a flash, our 28-year-old whisker pole broke in half. BAM!  

broken whisker pole


A whisker pole attaches to the front of the mast on its inboard end and extends out either to the starboard or port side of the boat. It lets us “pole out” the head sail to windward on the opposite side of the boat from the mainsail when we are broad reaching or sailing downwind. Without a whisker pole, the mainsail blocks the wind, causing the head sail to flog uselessly. With the whisker pole, we can move the head sail out of the wind-shadow of the mainsail, and both sails pull effectively.

The optimal length of the whisker pole depends on the size of the head sail. Since we have two headsails that are different sizes, rather than have two whisker poles, we have one that telescopes. It has an inner tube that can be extended or retracted to change its length. Our whisker pole is a Forespar with an outer tube that is about 13.5 feet (4.2m) long. It has an inner tube that can be extended another 11 feet (3.4m). Depending on which headsail we are using, we usually extend the inner tube somewhere between 5 to 11 feet (1.5-3.4m). The two diagrams show a simplified external view of the pole, as well as an anatomical view. The 'extend/retract' line is attached to the outboard end of the inner tube, routed along the top of the pole and around a sheave on the inboard fitting. It is then led along the inside of the two tubes and around a sheave on the end of a long piece of small tubing, called a stinger tube, and then attached to the end of the inner tube. When everything is functioning properly, we can extend the inner tube by pulling on the 'extend/retract' line towards the outboard end of the pole. We retract the inner tube by pulling on the line in the opposite direction.


whisker pole anatomy


When it broke, I had this vision of the severed remains of the 24 foot (7m) aluminum pole swinging wildly about as the headsail flogged, puncturing the inflatable on the foredeck and generally wreaking havoc on the deck and topsides. Luckily,the control lines contained the broken pole until I could get the genoa furled. We lashed one part of the pole to the lifelines and the other to the mast. Then we dropped the mainsail and sailed on with only the genoa .

Once we arrived at Cocos Keeling, I assessed the damage. The inner aluminum tube had broken about 4 feet (1.2m) from the inboard end, and another foot (.3m) or so was bent. I thought that if I cut the damaged section off the inside tube and reattached all the bushings and fittings, I would have a shorter, but usable whisker pole.

I set about dismantling the whisker pole. Most of the fittings were riveted in place, so the disassembly process involved a lot of drilling. The inboard end-fitting was corroded to the larger tube, and no amount of heat and coaxing would break it loose. I finally cut another 2” (50mm) off the inboard end of the tube, then cut the corroded section of tubing into pieces, so it could be removed from the end-fitting.

Once everything was apart, I found a number of other issues besides the broken inner pole. The stinger tube was bent in several places. The sheave on the end of the stinger pole was frozen. A toggle fitting that attaches the inboard end of the pole to the mast was badly bent. I straightened the stinger tube as best I could and repaired the frozen sheave. The bent toggle on the end of the pole would have to wait until I could find a machinist – maybe Rodriquez or Mauritius. All the rest of the bushings and fittings were salvageable.


bent stinger tube


The inner tube was easy to cut. I used masking tape to mark the cut and then employed my trusty hacksaw to cut it.


cutting the whisker tube


Once the inner tube was shortened, it was fairly straightforward to reassemble the poles. The bushings on the ends of the poles were riveted in place, with new holes drilled as necessary. I used machine screws to attach the end of the stinger tube to the inner end of the large tube. The remaining pad eyes and cleats were attached, again, drilling new holes as required.

Once everything was back together, we mounted it on its track on the forward side of the mast, and made sure we could extend/retract the inner pole, and raise and lower the entire whisker pole. There are still a few issues. Because the stinger tube is still bent, until we can replace it, there is more friction than usual when extending the inner pole. With its shortened length, we will be limited to using it with the smaller Yankee jib rather than the genoa. That isn't a big problem – the genoa is now about 12 years old and has been repaired and patched a number of times – it is probably time to retire it anyway. One final issue is that, because of the bent toggle, it cannot be stored on the mast. We will have to remove it from the mast and stow it on deck when it's not in use.

The jury rigged repair is certainly not perfect, but it will get us the rest of the way across the Indian Ocean – if I can manage to keep from jibing with it again.

The Blue View - Replacing the Windlass

After making the decision to buy a new windlass, we contacted the dealer, Michael Date at McIntyre Marine (aka Southern Seas Marine) in Queensland. He gave us a great price on the new model, which supposedly had the same footprint and should fit the same holes as the old unit. He even went to the trouble to un-package the new unit and repackage it in two boxes so it could be shipped via the postal service – saving us almost $800 in shipping. A good man to work with! The new unit arrived on schedule, and the marina called to let us know the two 40 lb (18.4kg) packages had arrived. Now all that was left was the minor part – installing it.


old and new windlass


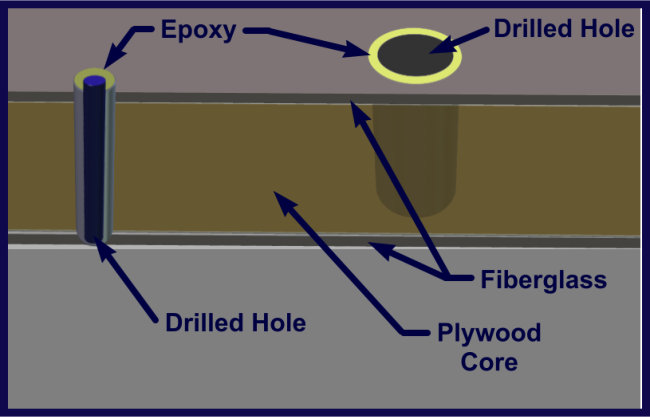
When we installed the previous windlass, it was quite a bit different from the original windlass. In order to mount the newer one, I had to first fill all the old holes with epoxy. Then I used the drill template provided by the manufacturer to mark the five small holes and two large holes required for the new windlass. The decks on Nine of Cups consist of two fiberglass layers with a core of plywood. When drilling holes in the deck, it is important that the outside diameter of each hole is sealed to prevent water from making its way into the plywood core. I drilled each hole considerably oversized, and then filled the five smaller holes with thickened epoxy. Once it kicked, I drilled the holes again in the correct size This not only stiffened the deck around the mounting bolts, but also provided a waterproof barrier to protect the plywood core.


filling holes


The finished size of the two larger holes was almost exactly the same as a can of tomatoes. I covered the bottom of each over-sized hole with cardboard, and taped it in place. Then I took two empty tomato cans, each with both ends removed, wrapped them in waxed paper, and set them in place in their respective holes. I used tape to keep them in place, then filled the area around each of the cans with epoxy, thickened to the consistency of catsup. Once the epoxy kicked, I used a hammer to collapse the two cans so they could be removed. Then I let the epoxy cure completely.

This whole process took a day or two, then required a couple more days for the epoxy to cure. If the new windlass did fit the old holes as advertised, none of this would be necessary and the new installation would be straightforward.


will it fit


I unwrapped the top half of the windlass and carried it forward. I aligned all the bolts with their respective holes and lowered it into place. It fit perfectly! I pulled it back up, then positioned the gasket, caulked underneath the entire assembly and lowered the top half back into place.

Mounting the bottom half was the part I was dreading. The motor and gearbox are quite heavy, about 40 lbs (18.4kg), and would have to be wrestled into the forepeak, then lifted with one outstretched arm, aligned with the mounting studs, and held in place until I could get a nut started with the other hand. I used a plank to slide the assembly into the forepeak as I wriggled my way in. Marcie handed me a nut, I gritted my teeth and I lifted the motor – and it slid right into place! I quickly started the nut to hold it, then took my time securing it with the remaining washers and nuts. This was going too well – surely some big setback was waiting for me.

The chain pipe was next. It fit around the new windlass without a problem, and I bolted it in place.

The new windlass also came with a new solenoid. The old one was working fine, but as long as I was upgrading the windlass, I might as well install the new solenoid and keep the old one as a spare. This, along with the replacement of a few wires that were showing corrosion took the remainder of the day.


replacing corroded wire


The following morning, I coated all the wire terminals, connections and the motor housing in Boeshield T9® to help prevent future corrosion, then routed the chain up through the chain pipe and re-connected it to the anchor. The only thing left to do was to test everything. I lowered and raised the anchor. I used the capstan to lift and lower the dinghy. I checked the chain counter, and it was working. I searched the deck, looking for some critical part I had forgotten to install, but found nothing. Everything appeared to be working.

This is extremely troubling. Never in the history of my boat projects has one gone so smoothly, nor can I ever remember completing a project ahead of schedule. Perhaps this was the exception that proves Murphy's Law. Perhaps the odds were finally in my favor – if it's a 1000:1 that everything will go as planned, then perhaps this was the one. Or perhaps I'll discover what I missed when we next try to anchor at Cocos-Keeling.


installed windlass

The Blue View - Whinging About the Windlass

When we arrived here in Geraldton, we anchored behind a small breakwater just off the town's foreshore. As we were dropping the anchor, Marcie observed that the windlass was making a new and unusual noise – never a good thing. Since we will be depending on the windlass in half a dozen anchorages during our crossing of the Indian Ocean, it seemed like a good idea to find the cause. Parts aren't always easy to get in a small town in Western Australia, but it is a lot easier to get them here than it will be at an island in the middle of the IO. Once we were settled in and convinced that the anchor was holding, I removed the capstan and gypsy. The shaft had quite a bit of movement in it – enough so that when a load was applied, the gypsy was binding against the base plate. This was the cause of the new grinding noise, and in fact, it had already started wearing a groove in the top of the base plate. Apparently, one or more of the internal bearings were beginning to wear. This was a repair that would be much easier to make if we were in a marina, and we arranged to move into the Batavia Coast Marina the next day. Then, I began my internet search to see how soon I could get the repair parts.


windlass symptom


The only Australian distributor for our Lofrans windlass is in the Brisbane area – on the other side of the continent. The good news, however, was that Michael Date at McIntyre Marine was someone we had worked with before when our Katadyn watermaker had problems, and our experience with him was quite good. He had the repair parts we would need and would air freight them to us – we should have them in 2-3 business days.


parts blow up view


The next day, we moved into the marina and I set about removing the windlass. This is a bit of an ordeal. To access the bolts holding the windlass, I have to climb down into the sail locker then crawl headfirst over the chain locker and into the forepeak. It takes several minutes to slither into place, over and around various obstacles. It is a very tight fit and quite uncomfortable once there. This is one of those times when I wish I was 5 feet tall and weighed 75 pounds. There is no place to set the tools I needed or the parts as they are removed, so Marcie patiently passed items back and forth to me – no easy feat in itself, since this required that she climb in and out of the sail locker each time I needed something.

After an hour or so of whinging and swearing, the windlass was almost ready to remove. Only several turns of one nut was holding it in place. Most of the weight, 50 lbs or so, is attached to the underside of the deck, and must be lowered down and removed from below. Since I was directly under it, I was hoping we could manage this in a controlled manner. I had a recurring image of the windlass falling on top of me, pinning me in the forepeak, and watching the local firemen use a chainsaw or the Jaws of Life to cut a hole in the deck large enough to extract me. I slid partially out from under the windlass, positioned a plank under it, and between Marcie holding the shaft above and me lifting from below, the last nut came off and we were able to ease the windlass down onto the plank. Then, as I crawled back out of the forepeak, I slid the windlass along the plank with me – no chainsawing required.


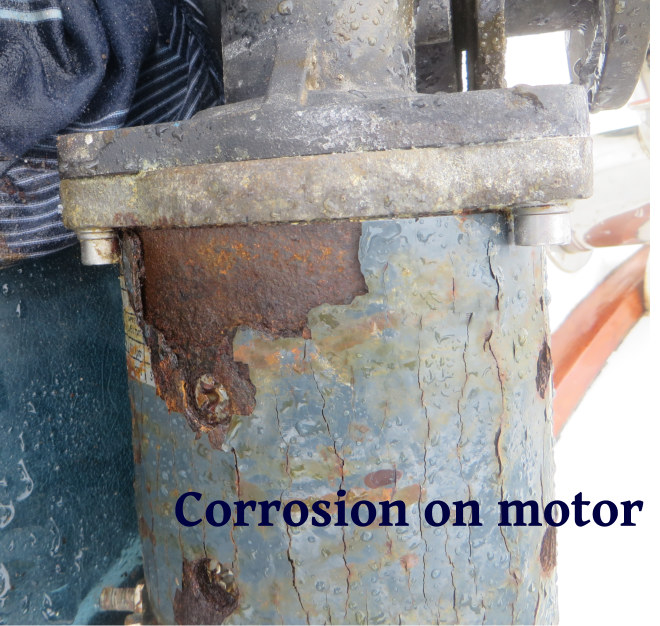
motor corrosion


Now that it was in the light, I could see that there was a lot of corrosion on the motor housing. It would take considerable work to grind, prep, prime and repaint it if it was going to last for any length of time.


gearbox corrosion


broken screw


A worse problem, however, was discovered as I began disassembling the gearbox. Apparently the deck seal above it had been leaking for awhile, and saltwater had made its way to the top of the unit, causing the alloy around the upper seal of the gearbox to corrode. The corrosion had gotten so bad that water had begun to make its way around the seal and into the gearbox. The gear grease was milky and the internal bearings were shot. On top of that, I broke three screws off in the housing while trying to get them out. I could replace the bearings, I could replace the seals, I could replace the gear oil, and I could find a machinist to extract the screws – but I couldn't repair the corrosion around the seal.

All told, it would cost about $500 for the parts, supplies, machinist's time and tools I would need, and I could maybe fix it well enough to last until South Africa, where I would most likely need to replace it. Or I could replace the whole windlass here.

Time to call Michael back...