

Blue View – Publishing Your Own Book, Part 8
/
Our freshly printed proof copy
Publishing the eBook
Last week we got the printed version of our new book off to the publisher – in this case Kindle Direct Publishing (KDP). This week, we’ll finish the job by creating the epub version of the book, which will also be published as a Kindle book on Amazon.

KDP makes it easy to publish your book
There are several steps to the process:
eBook Details. The first step is to enter the details about the new book – author, title, language, a short description of the book, what type of book it is, etc. KDP makes this part fairly simple with lots of help and guidance.
Converting and Uploading the Manuscript. The next objective is to convert the text, photos and images from LibreOffice (.odt format) to one acceptable by KDP. KDP accepts a number of formats: .doc, .docx, HTML, MOBI, ePub, RTF, Plain Text, and KPF to name a few, but .odt is not one of them.
There are a host of software tools and apps that ought to make the conversion process quite easy. Some work better than others, however. If we were publishing the Great American Novel with few, if any images and photos, most of these tools would probably accomplish the job. On the other hand, for Marcie’s new book, Las Vegas for Non-Gamblers, I struggled somewhat converting our photo intensive manuscript into a format KDP would accept without errors. (To describe it as ‘I struggled somewhat’ puts it rather mildly… I spent three full days swearing and pulling out what little hair I have left, trying to convert the file satisfactorily). I could easily devote a few pages to the things that didn’t work, but I’ll save you the ordeal and describe what finally worked for me.
First some suggestions on text and image formatting.
When inserting an image or photo, click on ‘Insert-Image’ and upload it rather than doing a copy and paste.
LibreOffice allows me to anchor an image to a page, to a paragraph or to a character. I now make sure to anchor each image to a paragraph – I introduced some very subtle and perplexing problems when I anchored images to a page.

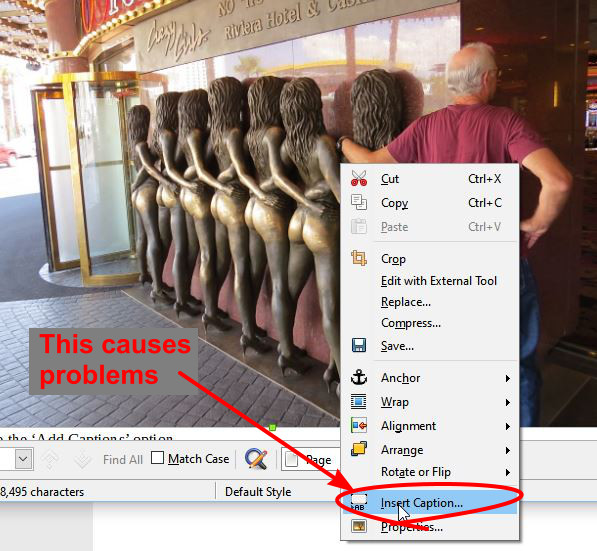
If I right click on an image, a dropdown menu appears. One of the options in this menu is to ‘Insert Caption’. I introduced more problems using this option and don’t recommend it. Instead, if I want a caption under an image, I create a new paragraph by pressing ‘Enter’ and anchor the image to it. Then I type the caption for the image as part of the same paragraph and center it.
I had all sorts of weird problems with the exported file – photos that disappeared, photos that I had deleted that appeared in random places in the exported file, html code that appeared as text, as well as several other baffling issues. I’m fairly certain that most of these problems were somehow introduced as I added, deleted or manipulated images. The only way I could find to eliminate these weird problems was to open a new text document, then copy and paste the entire book, chapter by chapter, from the corrupted version to the new document. Once I did that, I was able to export the new document successfully.
It took me half a day to manipulate the text and images, and 2.5 days to figure out how to correct all the bizarre problems that appeared. Next time, it will be much easier.
So, once I finally got rid of all those mysterious problems, how did I convert the document? LibreOffice does have the capability of exporting files in several different formats, but it seems to have issues exporting the images. There is a plug-in for LibreOffice, writer2epub, that exports a file in epub format that may work. The tool I like and which has worked well for me, however, is Calibre. This is a free program that converts files from one format to another, and also includes a file editor and a preview function that allows me to see what the document will look like if viewed on an eReader. I can import the file created by LibreOffice (.odt format), add a cover image and export it as an ePub file.
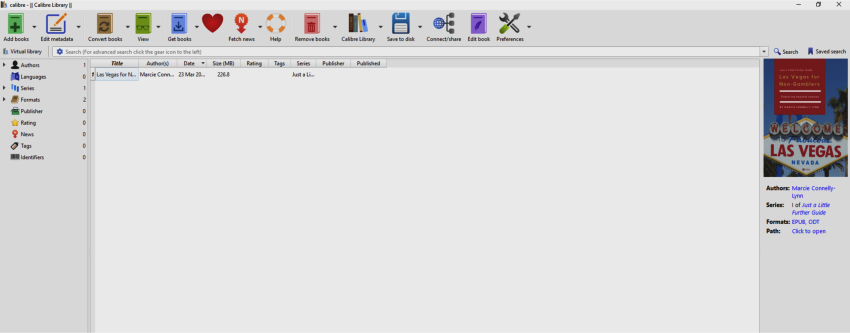
Calibre screen shot
As I mentioned above, Calibre has a viewer feature that allows me to see what the converted ePub file will look like on an eReader. I did several iterations of tweaking the LibreOffice text and images, then used Calibre to proof it. When I was happy with the ePub version of the manuscript, I uploaded it to KDP.

Our book as it would look on an eReader
KDP also provides a couple of tools that help, with the book and cover creation – Kindle Create and Cover Creator. I tried Kindle Create, but found it doesn’t work well with an image intensive manuscript. It may work just fine for a book with fewer pics and images. (KDP admits that it is a work in progress, so maybe the next version will work better). I used Cover Creator to tweak the cover image I already had, but it looks like it would be useful when making your own. The program provides a number of templates - you add the title, author’s name, description, etc.
Once the manuscript and cover are uploaded, KDP processes the file, checking for errors. If it passes, the next step is to use KDP Previewer to review the book. Even better than Calibre, this previewer shows how your book will look when viewed on different readers – tablets, smart phones and Kindle readers. KDP Previewer can be used online or downloaded and used on your computer. If you’ve already done your proofing using Calibre, this step shouldn’t present any surprises, and the online version might be preferable. If the manuscript still requires some tweaking, it’s probably more efficient to download KDP Previewer and use it offline, rather than uploading each iteration of the manuscript.
It isn’t necessary for a Kindle eBook, but you then have the option of having an ISBN number assigned to your book. KDP provides one for free, or you can use one purchased elsewhere. Now click Save and Continue to proceed to the next step – pricing and royalties.
Pricing and Royalties. KDP lets you choose the royalty program and book pricing you’d like to use. It goes without saying that if it is priced too high, the royalty is nice, but not as many books will sell. Priced too low, and you’re leaving money on the table. KDP provides some guidance and suggestions for finding the ‘sweet spot’. KDP also has a few other marketing and promotional plans that might be of interest, like Kindle Select, Kindle Matchbook and Kindle Lending. All have pros and cons, and KDP does a reasonable job of explaining each program. We opted out of Kindle Select, but enrolled in the latter two programs.

Choosing the pricing and royalty plan
Publish. All that’s left is to push the Publish button and your work is done. It takes a day or two for the book to become live, but it’s quite a thrill to see it on Amazon’s website.

All that’s left is to press the publish button
Hurray!

And it’s done!