The Blue View - Pre-Passage Rigging Check pt. 1

Upper Rigging

Before heading out on a major passage, I spend a day or two checking most of the systems aboard Nine of Cups. The engine, prop shaft seal, steering, bilge pumps, nav lights, thru-hulls, windlass, and a host of other items are all scrutinized and/or tested. Near the top of the list are the rigging checks.

up the mast

The rigging consists of all the lines, wires and metal parts that hold the mast upright (the standing rigging) and which hoist, move and control things (the running rigging). A single failure in the standing rigging will quite likely cause the mast to break. A failure in the running rigging will, at the very least, cause damage to the boat – a torn sail due to a chafed reefing line, for example. In the worst case, a running rigging problem can cause serious damage to the boat, or serious injuries to the crew – the combination of a jibe and a chafed boom preventer, for example, could cause the boom to swing with such force that it bends or breaks on hitting a shroud, and/or knocks a crew member overboard.

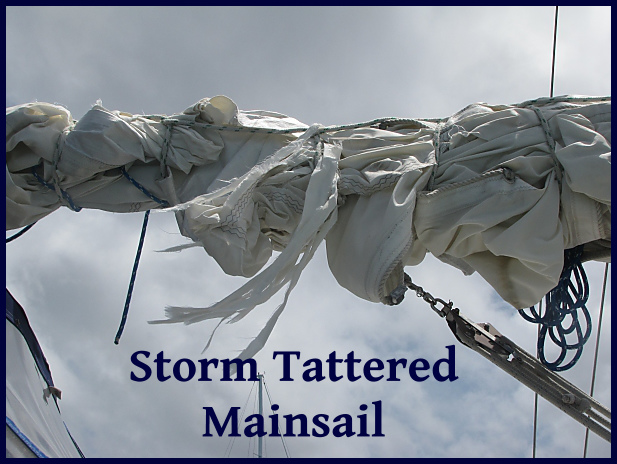
Even worse is that a problem with the rigging is most likely to occur when it is being stressed, like during a storm, causing even small problems to quickly become big ones. That small tear in the mainsail due to a chafed reefing line will, within seconds, cause the main to become totally shredded if it happens in the middle of a storm.

shredded sail

Thus, I think it is important to find and correct any problems before we leave. In this blog, I'll discuss the checks I do aloft, and in the next blog, I'll talk about the deck level checks.

Tools It is always a dilemma as to which tools to take up the mast with me. Take too many and it's hard to find the right one when it is needed. On the other hand, it's a hassle when I am up the mast and realize I need another tool. My compromise is to take the minimum I'm likely to need, and a small line, 60 feet (18m) or so, with a weight attached. If I need another tool, I lower the line, then tap on the mast to get Marcie's attention, and she attaches the tool to the line. Here are the basic tools and supplies I take with me: A large and medium sized screwdriver, both flat and Phillips; large needle nosed pliers, large pliers, adjustable wrench, metal polish or wax; rags, spray bottle of water; and a pencil and paper for taking notes. Sometimes I take a small digital camera to document potential problems  and take pictures for Marcie.

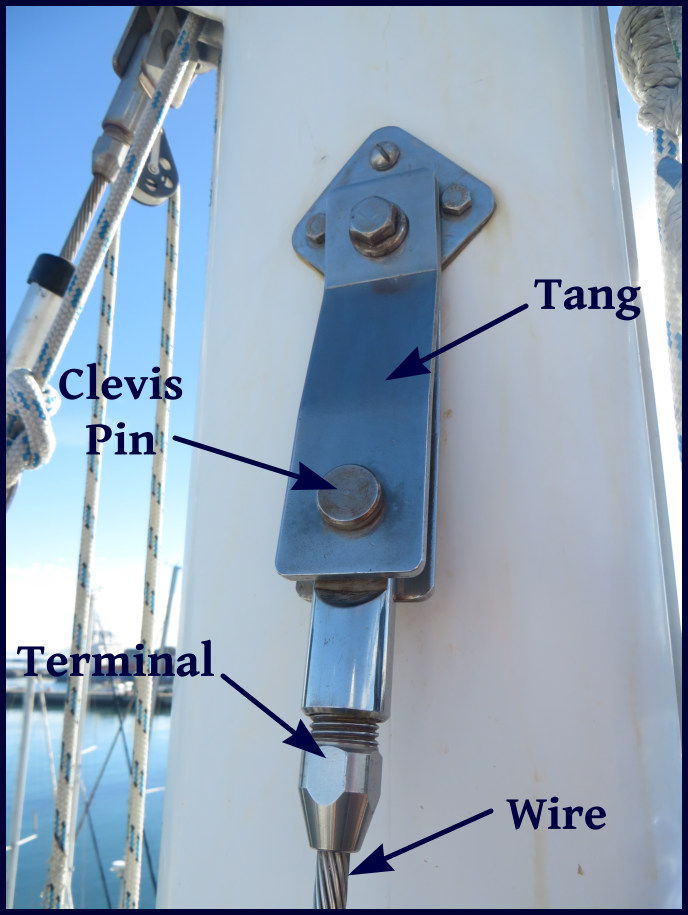
General Checks I usually go straight to the top of the mast and slowly work my way down. I do a close eyeball check on all the fittings and wire before cleaning the rust – sometimes the rust can point to a problem. Then I clean the fitting with a good metal wax (I like Collinite metal wax) and inspect the part again, looking for any cracks, distortions, worn or stressed parts, elongated holes, missing split pins, loose or missing bolts, etc. - in general, anything that doesn't look right. I also look closely at the wire for any strands that look cracked or broken. We have Stalock fittings throughout, but if we had swaged fittings, I would also check for cracked or swollen fittings. The aluminum (aluminium for you non-North Americans) mast probably has a hundred stainless screws attached to it, all of which are subject to galvanic corrosion, so I check each of these. A sure sign is bubbling or swollen paint around the screw head.

tang

Sailtrack Our sailtrack fits into a channel on the mast and is riveted in place. I check the track for loose rivets, especially where two sections join. I also clean the track as I work my way down. We often collect a lot of dirt and grime while in a marina, and Cape Town seems especially prone to it. I use a spray bottle of fresh water and a rag – nothing else. I used to use waxes and lubricants like SailKote, but I found that, while they make the track really slick for a short while, they seem to collect more dirt and gum the track up after a few weeks.

Lights I check all the lights for corrosion, questionable electrical connections and that they actually work. All our mast lights are now sealed LED lights, but when we had non-sealed lights, I opened them all up and checked for corrosion inside. Our tri-color and anchor lights at the top of the mast have an ambient light detector inside, and it is sometimes hard to fool it during the day. It is also difficult to see the LEDs in bright sunlight, so to check that these are working, I wait until dark, then turn them on, and either check them from the jetty or the dinghy.

Spreaders I check the welds and the connection to the mast. I look carefully at the ends where the shrouds contact the  spreaders – a good place for galvanic corrosion to occur.

furler

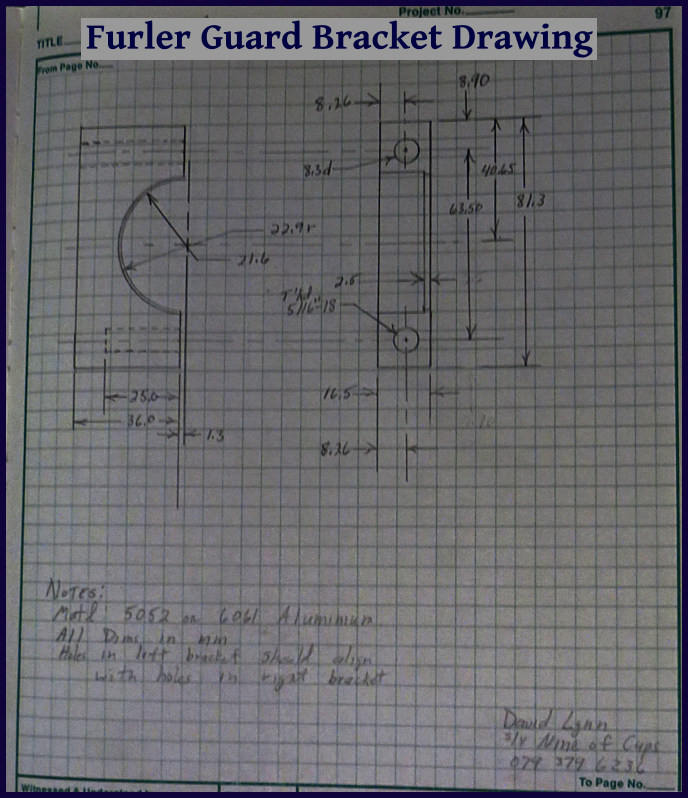
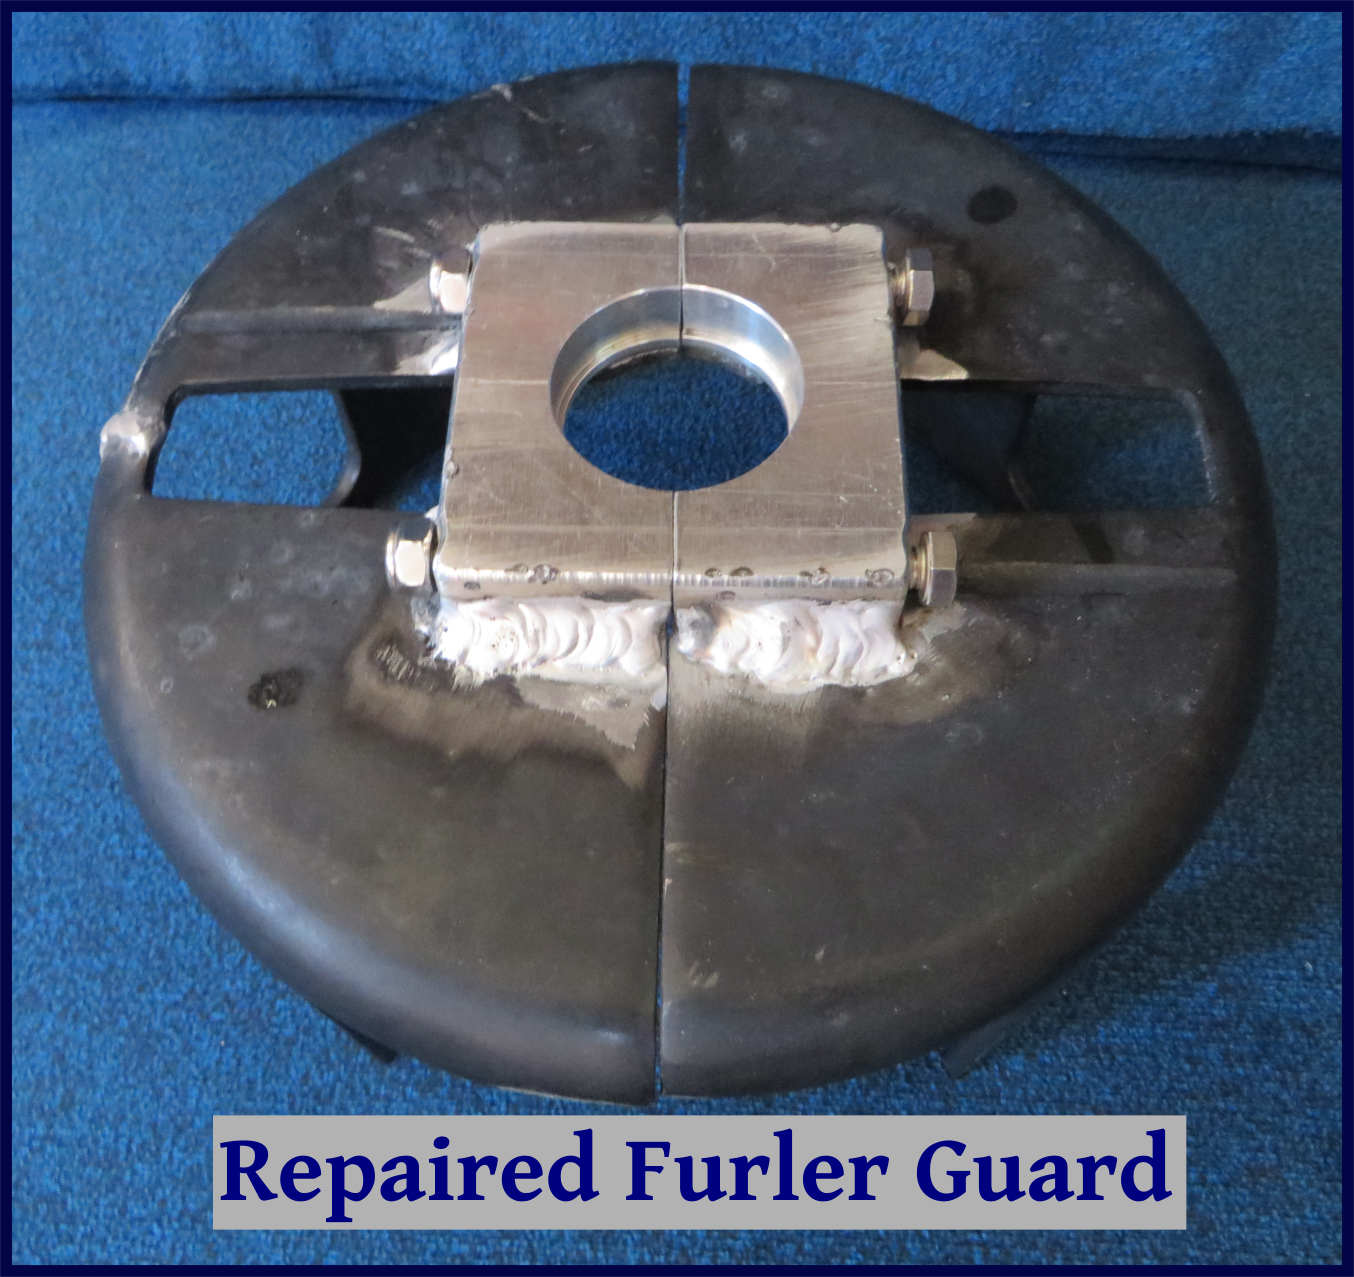
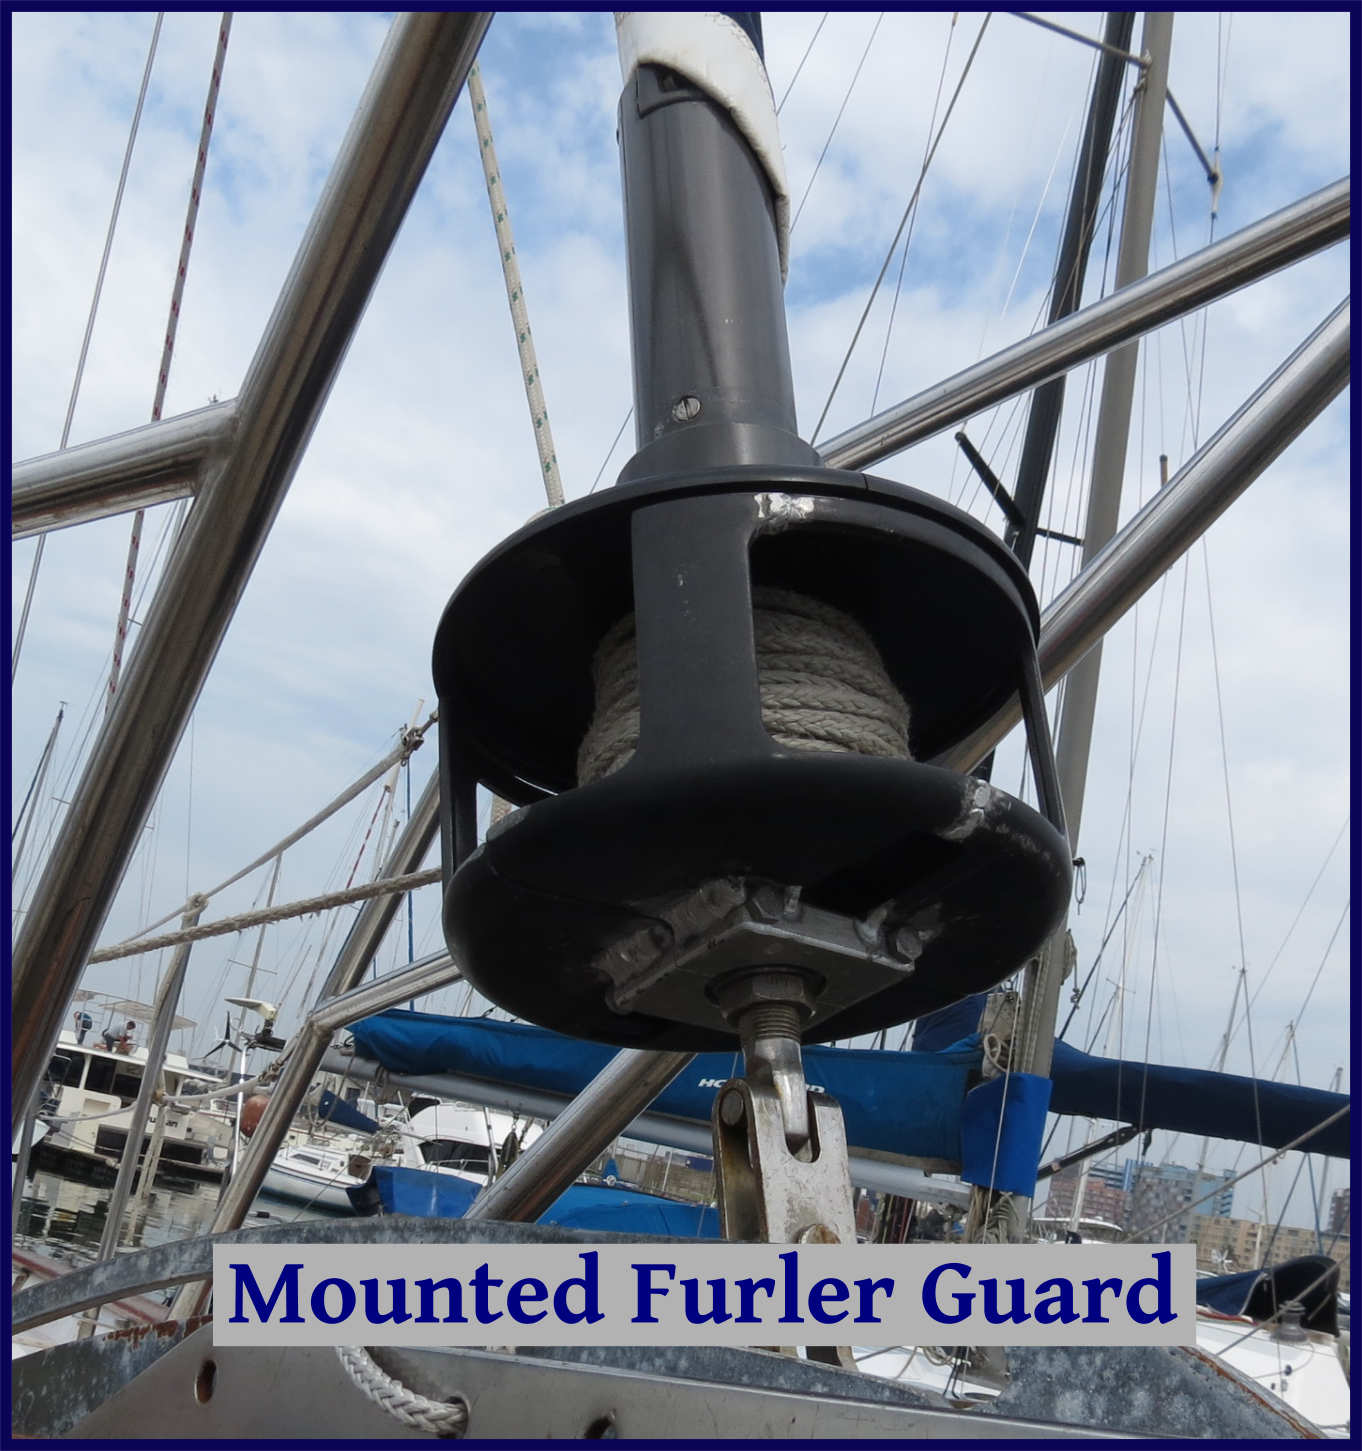
Furlers In addition to the general checks, I check the sheaves for cracks and the halyards for any chafing. If the upper furler bearings bind, the halyard will wrap around the furler, so I check that the upper swivels move freely. I check that all shackles are properly seized and that any knots look good.

shackle

Masthead All the general checks completed,  I then check the VHF antenna for corrosion and looseness, and inspect the wiring and coax connector. I check the wind instrument to make sure it turns freely and is not damaged, and disconnect the electrical connection to check for corrosion on the pins. I check all the masthead sheaves for burrs, and when possible, check that they turn freely.

The time required for all the checks aloft, including the time it takes to clean all the fittings and the sailtrack, is usually 2-3 hours for our double spreader rig. That's a long time to sit in a bosun's chair. I'm usually a little “stove-up” when I finally extract myself from the climbing gear and try walking again. Make sure you wear a hat and have applied lots of sunscreen – and don't forget to pee before going up.

Stay tuned for part 2 for the deck level rigging checks.

The Blue View - Atlantic Crossing Planning

We will soon begin our trek across the Atlantic. The plan is to sail from Cape Town to Norfolk, VA. We plan to make a few stops along the way if time and the winds permit: Lüderitz, Namibia, St. Helena, Ascension and Bermuda. planned atlantic route

As the tern flies, this is a distance of about 6700 nm (7705 statute miles or 12,408 km). If the tern was sailing Nine of Cups, however, the distance would be a bit more – something like 7200 nm. Often, the shortest line between two points is not the fastest or most comfortable route. For example, when Nine of Cups sailed from Ecuador to Puerto Montt, Chile, the shortest route was along the South American coast – about 2500 nm. The problem with following this route was that the boat would be fighting adverse currents and winds much of the way. On the other hand, taking a long offshore passage, added 1200 nm to the passage, but took fewer days and was a whole easier on the boat and crew.

So how do we plan the best route from point A to point B? Fortunately, sailing vessels have been plying the world for hundreds of years, and a great deal of information has been accumulated about the best sailing routes and times of year for passage making. We use several resources and references to plan our route.

Sailing Directions. This is a 42 volume reference compiled by the U.S. National Imagery and Mapping Agency that contains sailing information for virtually the entire world. The Planning Guide volumes, 4 of the 42 volumes, are especially helpful as they assist the navigator in planning an extensive oceanic voyage.

sailing directions

Pilot Charts. These are charts of the world's oceans, divided into 5 degree squares, that provide all sorts of useful information: Usual wind direction, likelihood of calms or gales, frequency of tropical storms, wave heights, currents and much more. The data is derived from many years of actual observations by vessels sailing the area. There is a set of pilot charts for each of the oceans, with a separate chart for each month of the year.

references

World Cruising Routes and World Voyage Planner by Jimmy Cornell. Jimmy has collected information from a multitude of sources and combined it into a couple of books that are well organized and extremely useful. World Cruising Routes has always been our bible for ocean passages. It provides most of the information necessary to plan a cruise or a crossing of any of the world's oceans.

wind chart

Charts. We plot the actual course on paper or electronic charts, making sure there are no hazards, reefs, islands, or continents in our way.

Using all these sources, we planned our route from Cape Town to Norfolk. We won't be following a straight line. One consideration is the best place to cross the equator. The latitudes around the equator, the doldrums, are known for their fickle, light winds. The width of the doldrums varies with the season and the longitude. We want to pick a place where the doldrums are minimal for this time of year, usually further west. Once across the equator, we will be entering the NE trade winds, and to get a good point of sail, we want to be further east. A good compromise is to cross the equator at about 25° W to 30° W.

pilot charts

No matter how well we plan our route, however, when all is said and done, it is still just a crap shoot. This might be the year that the doldrums are widest at our crossing point, or an unseasonable early hurricane might be heading for Bermuda – perish the thought. We still need a lot of luck and the good graces of Neptune, and you can be sure we will give him a good tot of rum as we head out of Cape Town.

The Blue View - Repairing the Furler Guard

furler One of the casualties during our Indian Ocean crossing was the furler guard for our headsail. This is a small cage that encloses the furler and prevents the furling line from falling off the drum. The line that secures the anchor when we are underway came loose, allowing the anchor to swing free. It took us several minutes to realize there was a problem, and in that short while, the waves and seas caused the anchor to create several divots in the topsides as well as wallop the underside of the furler guard. By the time we were able to secure the anchor again, the furler guard was broken in half.

broken furler guard

There was no replacement to be had in South Africa, but not to worry - Marcie was heading back to the states for a couple of weeks. We should be able to get the replacement guard delivered in plenty of time, and she would have room in her bags to carry it back to Nine of Cups. The part was ordered, it arrived in time, and both Marcie and the bags arrived in Durban on-time and intact.

It took a few days for me to get around to installing the furler guard, and it wasn't until then that I noticed one teeny-tiny glitch – the furler guard was the wrong size. I don't know whether I ordered the wrong size or the wrong size was shipped, but either way, the new guard was too small to fit our furler, and now there wasn't time to get a replacement shipped to South Africa.

It is possible to sail without the guard, as long as there is always tension on the furling line. If any slack occurs, however, the line will fall off the drum, making a tangled mess around the headstay. Once this happens, someone has to go forward and spend several minutes at the bow, untangling the line before the headsail can be reefed or furled. If the seas are big, the person going forward is sure to get drenched and probably banged up a bit – not something either of us would look forward to. Perhaps the old furler guard could be repaired?

I thought that if there was a good aluminum fabricator/welder around, perhaps a bracket could be welded to the bottom of the broken furler, and it, along with a couple of additional welds, might do the trick. I made a drawing and set out to find someone who could make the bracket and do the welding.

drawing

I found just the place ... a company called GW Industries located a few miles north of Durban. They build aluminum (or aluminium in SA) boats and certainly had the necessary expertise. In addition, even though the job was pretty small for them, they were more than happy to help us out. I delivered the broken furler and drawing, and a week later, they returned the repaired part.

repaired furler guard

The part needed a little tweaking – a little sanding here and a touch of grinding there (my fault, not theirs BTW) – and it fit in place nicely. The repair held with no problem from Durban to Cape Town.

mounted furler guard

Now if I can manage to keep the anchor secured in place, perhaps the repaired furler guard will stay in place on our Atlantic crossing. Stay tuned for some thoughts on a method of tensioning the anchor in the bow roller.