The Blue View - Chainplate Update

We are making some progress on the new chainplates. Now that the metal has been cut, the machinist  came down to look at Nine of Cups and take some measurements. Sort of like “Ready, Fire, Aim...” in my mind. There was some initial angst when we thought the chainplates had been cut too short, but after talking it through with the shipwright and with Dave, we all agreed the newly cut metal would work. will the metal work

The marine architect made an appearance as well. He did the original design based on photos, assuring us that he knew the boat quite well and that a trip to the yacht club to actually look at Cups was unnecessary. This was borne out, as you may remember, when his first iteration of the design was totally incorrect, having the chainplates bolted to the bulwark and into the core of the deck. We had a discussion, now moot since the metal was already cut, about how the chainplates might have been designed to look less industrial and more aesthetically pleasing. He gave us several less than compelling reasons why this wasn't done, such as “it would have added extra weight to the boat” (two pounds in extra metal would make a difference on our 21 ton boat?), “designs that bolted the chainplates into the bulwark wouldn't be as strong” (not something I was suggesting, and anyway, wasn't that exactly the way he first designed it???), blah, blah, blah … We weren't really impressed.

exploratory hole

The shipwright came shortly after, and following much measuring and discussion, he drilled a small exploratory hole through the hull to determine how thick it was and where the bolts would protrude into the interior. When the bit came into contact with the old chainplate, water started running out of the hole – maybe  a teaspoon or two. If water had made it that far into the hull, approximately two feet down from the cap rail, it was almost certain that the old chainplates would be suffering from crevice corrosion – more confirmation that we were doing the right thing. Another small hole was drilled alongside the chainplate, and no water came out, some assurance, at least, that the water ingress was confined to the column alongside the chainplate.

water in the hull

We are now waiting for the machinist to drill the holes in the chainplates and polish the stainless steel to a mirror finish, after which the hull drilling and cutting will begin in earnest. I sound quite negative, but in actuality, I am still optimistic that the project will turn out fine.

Stay tuned...

The Blue View - Chainplate Issues

The typical lifetime of the standing rigging on a sailboat is 10-15 years, while the typical lifetime for the chainplates is 20 years. We replaced the rigging in Colombia about 13 years ago, so it is now due to be redone. The chainplates, however, were never replaced, and are now well past their “use by” date. They are totally fiberglassed into the hull, making a thorough inspection impossible without removing a lot of interior  cabinetry and grinding out large sections of the hull. I routinely inspect the exposed portions, and while they never showed the least sign of internal corrosion or water ingress, I knew we were sailing on borrowed time. crevice corrosion

A few days ago, when I was doing our pre-passage rigging check, I noticed a salty, vinegar-smelling substance coming from the chainplate cover on one of the starboard shrouds – not a good sign. There was no doubt in my mind that it was now time to replace the old chainplates, and since the rigging was nearing the end of its life, I decided to replace it as well. In addition, if we were going to get everything done before our South African visas and the customs permit on the boat expired, we would have to hire the work out instead of doing it ourselves. This was going to be an expensive few weeks.

refit chainplate

Because it was not feasible to remove and replace the old chainplates, my plan was to attach stainless straps to the outside of the hull. Holes would be drilled all the way through the hull and the old chainplates, and the straps attached to the hull using bolts secured on the inside with nuts and washers. I've seen this done on another Liberty 458, as well as several similarly designed boats. If the straps are polished, the bolt heads countersunk flush, and the carpentry done right, the end result is, hopefully, not only be strong, but attractive as well.

Cape Town is a great place to get boat work done. They have an active boat building business, and there are hundreds, if not thousands, of local boats, as well as many more boats passing through, all of which support a number of skilled marine tradesmen. Once the decision was made to replace the chainplates, I wanted the advice of experts to make sure I did it right. I talked with the local marine services expert, who quickly contacted a marine architect (to evaluate and design the chainplates), a rigger (to  replace the standing rig), a stainless steel fabricator (to make the chainplates), a marine carpenter (to modify the cap rail, rub rail and interior cabinetry with minimal damage), and a shipwright (who will be drilling the holes). With all these experts, what could possibly go wrong?

Photos were taken and sent to the marine architect, and the various experts conferred with each other. A few days later, Dave, who owns the marine services company called to say the plans were done and the quote prepared. If I came by and signed off on it, we could get started. I checked the quote and the drawings, and thought the price was quite reasonable. But then I noticed there weren't enough chainplates in the quote – we need eight and there were only six in the quote. Dave thought about it, made a trip down to Nine of Cups, and agreed that the quote was wrong. He said he would get it redone and get back to me.

The next day Dave called again and said the quote was revised. I stopped into his office and looked everything over. The price, as expected, had gone up because of the added chainplates. In South Africa, as well as most of the world outside the U.S., everything is done in metric. I'm used to seeing things in millimeters and centimeters, but I still have to convert a dimension to feet and inches to get a feel for the size. While I was checking the drawings, I saw that they were 350mm long, and mentally estimated that that would be equivalent to about 13-14 inches. This just didn't seem long enough to me, so I asked for a copy of the drawing to take to the boat and make some rough measurements, just to convince myself everything was right. Sure enough, the chainplates were too short. Some of the bolts would have passed through the bulwarks instead of the hull, and two holes in each chainplate would have been drilled right into the deck.

Dave apologized again, and conferred with the marine architect who lengthened the chainplates and reworked the drawings. The new quote was considerably higher, and had yet another problem. The fourth quote appeared correct, but was just about double the first quote - not so reasonable anymore. I signed off on it and the stainless fabricator was given the go-ahead.

carpenter delivers the news

That was Thursday. Friday was a holiday, and on Saturday the carpenter stopped by. I told him about the lengthened straps, and he pointed out yet another problem. The hull has a small step just under the rub rail. It isn't obvious because the rub rail hides it. If the chainplates are lengthened, we will need a spacer behind each chainplate, which may or may not be a problem. Dave will need to check with the marine architect on Monday, and hopefully, the machinist hasn't started on the chainplates in case there is another change needed.

Other than that, everything is going just fine.

The Blue View - Pre-Passage Rigging Check pt. 2

Deck Level

Note: this is Part 2 of our pre-passage rigging checks – the deck level checks. Part 1, in the last Blue View, detailed the checks I do aloft.

wire terminals

General Checks These are much the same as the general checks when going aloft. I do a close eyeball check on all the fittings and wire before cleaning the rust – sometimes the rust can point to a problem. Then I clean the fitting with a good metal wax and inspect the part again, looking for any cracks, distortions, worn or stressed parts, elongated holes, missing split pins, loose or missing bolts, etc. - in general, anything that doesn't look right. I also look closely at the wire for any strands that look cracked or broken. We have Stalock fittings throughout, but if we had swaged fittings, I would also check for cracked or swollen fittings. I renew any worn or loose whipping on line ends.

turnbuckles

Mast, Shrouds and Stays I first check the mast alignment. It should be straight side to side, but may have a slight curve aft towards the top. I check the tension in the stays and shrouds – they should all be tight and there should be minimal or no sag in the forestay and staysail stay. I closely check all the turnbuckles to make sure none are cracked or galled, and that the legs of all the split pins are inboard. I remove the cover over the mast boot and check for cracks or deterioration in it, as well as the mast collar. I check all the blocks at the mast base.

Chain Plates 
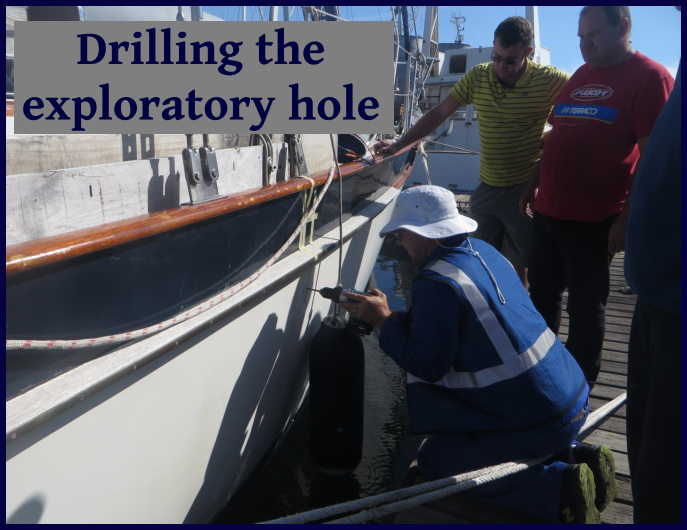
The chain plates attach the standing rigging to the hull. Ours pass through the caprail and are glassed into the hull. Except for the very tops, which are exposed, they are virtually impossible to inspect. I check them closely, looking for any hairline cracks, elongated holes, or signs of moisture that might be making its way downward.

chainplate

Boom Like the mast, the boom is aluminum and has a number of stainless screws attached to it, all of which are subject to galvanic corrosion, and I check each of these. A sure sign is bubbling or swollen paint around the screw head. I check the ends, connections, sheaves and welds for corrosion and cracks. I check the outhaul and reefing lines for smooth operation and any signs of chafe. I spend a few minutes examining the gooseneck for cracks and tightness.

gooseneck

Halyards, Topping Lift, Sheets My checklist for halyards, topping lift and sheets includes: Check all for chafing Check all fairleads, blocks and sheaves Check the mainsheet traveler for cracks and general operation.

Furlers Furler checks are a bit time-consuming, but I'd rather fix a problem here in port than at sea. Remove the sails and check both furlers for smooth operation. Flush the bearings with fresh water. Inspect the lower swivel, furler drum, etc. for any signs of corrosion, especially around the stainless screws. On our Harken furlers, I loosen and re-tighten each screw, adding Tef-Gel to any that show signs of seizing or corrosion. Check that all shackles are in good shape and properly seized. Check the furling lines for chafe, and inspect the fairleads and blocks.

Rope Stoppers, Clutches and Cleats I check all for burrs and tightness and check the operation of stoppers and clutches.

Tracks and Cars I check all tracks for corrosion, burrs, etc. Then, I check that all cars are secure and move freely.

Whisker and Spinnaker Poles Since I just reworked the whisker pole, I gave this check a pass. Usually, I would check both ends for cracks, deterioration, missing or loose rivets. Check the outhaul, topping lift and guys for chafe and insure smooth operation. I'd extract and retract the pole to check operation.

Lifelines We have Dyneema (actually Amsteel) lifelines, and really like them. (Here is a link to an article in Good Old Boat magazine on the subject – although I doubt this particular author knows what he is talking about.) They have two issues, however. First, Dyneema exhibits creep, which means the lifelines continue to slowly stretch over time and need to be re-tensioned every few months.  Second, the Dyneema should be replaced every 3-5 years, due to UV degradation. The degradation is not readily apparent, so it is important to keep track of how long they have been in place and when they should be replaced. I also check for any wear at the stanchions, and check all turnbuckles, pelican hooks and shackles for cracks. All split rings should be in good shape and facing inboard. Inspect the stanchions for cracks or looseness.

lifeline

So, what did I discover from our rigging check? Several small issues were corrected: Lifelines re-tensioned; several split rings needed replacing; first reef line, port side was chafed -  I was able to remove a few feet from the end and re-use it; a few screws were missing or loose on the stanchion bases; several lines needed re-whipping.

Unfortunately (or perhaps fortunately), a potential show stopper was discovered. The chainplates on the starboard side are showing some evidence of water ingress and possible corrosion. The chainplates are stainless steel, which is generally very corrosion-resistant and performs quite satisfactorily in marine environments.  It is very susceptible, however, to something called crevice corrosion. Crevice corrosion is a localized form of attack which is initiated when the metal comes in contact with moisture when there is a low availability of oxygen – such as in a crevice.  If moisture, especially saltwater, makes its way past the caulking around a chainplate and lies against the stainless, a perfect environment for crevice corrosion develops. Since the internal chainplates on Nine of Cups cannot be inspected without literally dismantling the cabinetry in the saloon, there is no easy way to determine how much corrosion has developed.

Losing a chainplate will almost certainly lead to losing the mast – not a pleasant prospect anywhere, least of all in the middle of a major ocean crossing. Many sailboats of the same vintage as Nine of Cups  that have glassed in chainplates have replaced them with external versions, heavy duty stainless steel straps that are bolted through the hull. We need to call in an expert or two to confirm our suspicions, but we are now thinking our departure from Cape Town, will likely be delayed.

Stay tuned...