The Blue View - Chainplate Update

We are finally making some progress on the chainplates, although it has been one step backwards for each two slow steps forward. The most recent setback was when I discovered, after the stainless for the chainplates was all cut, drilled and polished, that the metal for the backstays was the wrong thickness – 3/8” (10mm) instead of 1/2” (12mm). We will lose another week while they are redone. wrong size backstays

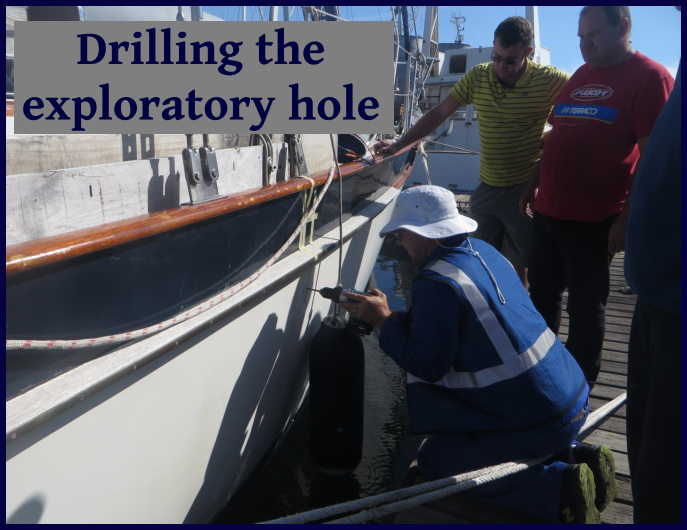
There are two bends that need to be made in each chainplate, but determining the location of each bend has to wait until the part is attached to the hull. Once attached, the precise location and angle of the first bend can be measured and marked, then the chainplate must be removed and taken back to the machinist to be bent. Next the parts will be reattached to the hull, the second bend measured and marked, and again sent to the shop to be bent. All this has to wait until the holes have been drilled in the hull.

chainplate attachment

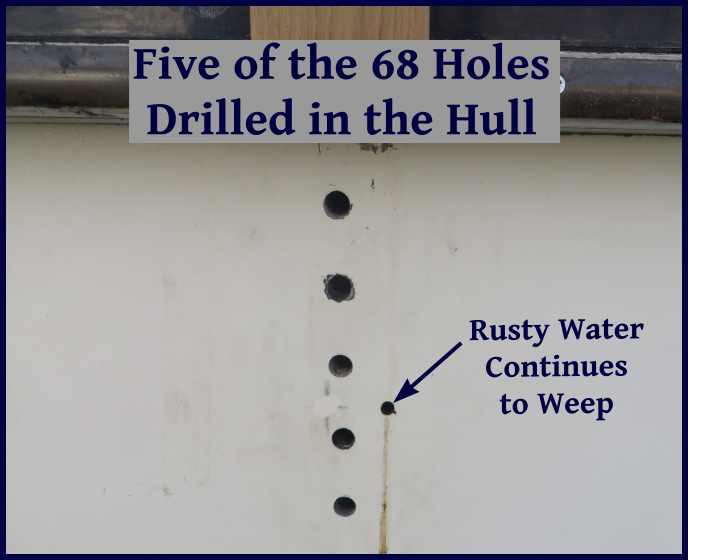
Most of the holes in the hull have now been drilled, which was a major undertaking. A total of 68 holes needed to be drilled, most of which pass not only through the hull, but the old stainless chainplates as well. All but eight of these have been drilled, and these remaining holes will wait until the first bend is made and the chainplates reattached. One thing we noticed as the holes were drilled was that rust colored water continues to seep out from the old chainplates – continued confirmation that we are doing the right thing here and didn't wait any longer.

holes in the hull

The exterior carpentry is done. The last phase was fabricating and attaching the teak spacers to the hull, and this has now been completed.

attaching the teak spacers

The interior cutouts have all been made, luckily, except for one in the forward berth, they are all inside bookshelves or lockers. I used my Ryobi version of the Fein tool to make the cuts. I will make teak pieces to cover the holes – a few in the next few days with the teak I have on hand and some later when I can get  less expensive teak elsewhere. I want to be able to easily remove the hole covers later so that the new chainplates and bolts can be inspected periodically.

interior cuts

Progress is being made, although painfully slow. Maybe another week until the project is complete – assuming no more major setbacks. Using Marcie's project formula, it'll be another two weeks.

The Blue View - International Electrical Connections

I was planning to give an update on the chainplate progress, but there hasn't been much progress to write about. The chainplates themselves have been cut, drilled and polished, and are sitting in Dave's office waiting for the carpenter to make the cuts on the cap and rub rails. He was supposed to come last week, but was delayed because of another project. He did arrive around 10am on  Monday of this week (he doesn't like to start too early), got all unpacked and set up, made several measurements, and discussed the plan with me. We figured out the optimal angles, measured the sections to be cut – twice – then he plugged in his saw and turned it on and … nothing. typical marina connection

As is typical in most marinas the world over, an electrical connection is never made by plugging an extension cord directly into an outlet. It almost always requires an adapter or two at the shore power end. Here in South Africa, since there are two different plug sizes commonly used for appliances and tools, it gets more complicated. Our carpenter had two adapters between the extension cord and the shore power outlet, then two more adapters between the extension cord and the power strip that his saw was plugged into. Apparently, there was a short somewhere in the system, because we discovered that as soon as everything was plugged into the shore power outlet, the GFCI breaker would open.

It took about 45 minutes to find and correct the problem (saltwater inside one connector of the extension cord) before he was able to start cutting. He will spend most of today and tomorrow making the cuts and fabricating backing pads, and I'll write about that in the next blog.

bag of connectors

Meanwhile, I thought I'd talk about the various adapters we've collected for connecting to shore power around the world.  Just for starters, the USA uses three connector types for shore power: 15A/125v, 30A/125v and 50A/125v. We have no need for the 50 amp version, but we do carry a couple of cords and adapters with connectors for the 15 amp and 30 amp circuits. These also work in most countries other than the USA that use 110-125 volts.

us connectors

Once we started cruising in the countries that use 220v/50 hz power, our adapter collection started growing. We must have encountered 10 or 12 different connector types. Initially, we would try to find an adapter that we could use to connect our American shore cable to the local shore power circuit, but these were often hard to locate and expensive. We now use a 10A/220 volt, 30m (100')  outdoor extension cord. I removed one end and replaced it with a connector that mates with our American shore power cable. The other end is removed as needed and replaced with the local connector. My inventory of connectors is pretty extensive now, and I often have one that will work in each new country, but if not, I make a quick trip to the local hardware or electrical supplier to get what I need.

internationl connectors

Converting the 220 volt/50hz shore power to our 120v/60hz world is a whole other topic for another blog.

The Blue View - Chainplate Update

We are making some progress on the new chainplates. Now that the metal has been cut, the machinist  came down to look at Nine of Cups and take some measurements. Sort of like “Ready, Fire, Aim...” in my mind. There was some initial angst when we thought the chainplates had been cut too short, but after talking it through with the shipwright and with Dave, we all agreed the newly cut metal would work. will the metal work

The marine architect made an appearance as well. He did the original design based on photos, assuring us that he knew the boat quite well and that a trip to the yacht club to actually look at Cups was unnecessary. This was borne out, as you may remember, when his first iteration of the design was totally incorrect, having the chainplates bolted to the bulwark and into the core of the deck. We had a discussion, now moot since the metal was already cut, about how the chainplates might have been designed to look less industrial and more aesthetically pleasing. He gave us several less than compelling reasons why this wasn't done, such as “it would have added extra weight to the boat” (two pounds in extra metal would make a difference on our 21 ton boat?), “designs that bolted the chainplates into the bulwark wouldn't be as strong” (not something I was suggesting, and anyway, wasn't that exactly the way he first designed it???), blah, blah, blah … We weren't really impressed.

exploratory hole

The shipwright came shortly after, and following much measuring and discussion, he drilled a small exploratory hole through the hull to determine how thick it was and where the bolts would protrude into the interior. When the bit came into contact with the old chainplate, water started running out of the hole – maybe  a teaspoon or two. If water had made it that far into the hull, approximately two feet down from the cap rail, it was almost certain that the old chainplates would be suffering from crevice corrosion – more confirmation that we were doing the right thing. Another small hole was drilled alongside the chainplate, and no water came out, some assurance, at least, that the water ingress was confined to the column alongside the chainplate.

water in the hull

We are now waiting for the machinist to drill the holes in the chainplates and polish the stainless steel to a mirror finish, after which the hull drilling and cutting will begin in earnest. I sound quite negative, but in actuality, I am still optimistic that the project will turn out fine.

Stay tuned...