The Blue View - A Simple Project?

faucets One of the items on my to-do list was to replace the galley freshwater foot pump. We have pressurized water for the freshwater system, but fresh water aboard the boat is precious, and we try hard to conserve it. When a constant stream of water is not required, like when brushing teeth or washing hands, a pump or two on the foot pump sends a long squirt of water to the faucet above, and provides just the right amount of water without wasting much at all. Our foot pump died while enroute from Puerto Rico to St. Augustine, FL, and it's been on the repair list since then. Now that we are tied up next to a boatyard in Chesapeake, VA, I am finally getting to it.

It shouldn't have been much of a problem – just disconnect the hoses and remove four screws to take the old pump out, then reverse the process to install the new one. Simple – an hour, maybe two at most. Except, as our readers have heard on more than a few occasions, nothing's ever easy on a boat.

pump differences

To begin with, the old pump is original equipment on Nine of Cups, and the same model is no longer available. The newer models are almost the same size, but the hose connections are not in the same place. Okay, add an hour or two to re-plumb the hoses.

mouth light

As I was removing the pump. I discovered a couple of things: 1. The bulb in my task light had burned out. No problem – I'll order a new one on Amazon and use my “mouth-operated” task light in the meantime, and 2. there were several hose clamps that were overdue to be replaced. After checking my stock on-board, it became evident a trip to the chandlery was in my future. May as well replace the hoses at the same time. Add another hour and $35 to the job.

While removing the screws, it became apparent that the mounting block under the pump was somewhat dodgy. I probed it with a screwdriver and discovered it was wet through-and-through and delaminated, so it would need replacing. We also have a seawater foot pump mounted next to the freshwater pump. It is currently working, but the block supporting it also appeared to be deteriorating. Add four hours to R&R the other pump, then fabricate, seal and paint both mounting blocks.

into the cave

But wait... as I was removing the mounting blocks, I noticed that the floor under the sink had a few soft spots. I investigated this to find some delamination problems with it as well. I could just ignore it and plan on doing it in a year or two, but since I now had the pumps and mounting blocks all removed, I might as well do it all now. Add a couple of hours to remove the old floor, then a couple more to fabricate and fit a new piece of plywood, plus a couple of hours to epoxy it in place, then seal, prime and paint it with two coats of marine enamel.

sawing wood

And as long as I'm painting the floor and the mounting blocks, I should repaint the rest of the area under the sink as it's starting to look a bit worn. Of course, I'll have to remove a few more things before repainting, like the filter assembly for the watermaker, and, oh, look there – the bracket holding the filter in place is all corroded underneath. Shouldn't take more than 2-3 hours to locate or fabricate a new bracket and fit the filter to it.

Finally, to add injury to insult – literally – I cut my head on a hose clamp on the sink drain as I was leaning in to remove the filter bracket. But that's to be expected; rarely is a project completed aboard Cups without shedding at least a little blood.

So now we're up to 18-20 hours – if nothing else goes wrong – for this simple, 1 or 2 hour job, and it's definitely cutting into my afternoon nap time. I'm really glad this wasn't anything complicated

finished

The Blue View - Replacing Fuel Tanks Pt. 2

the hole 
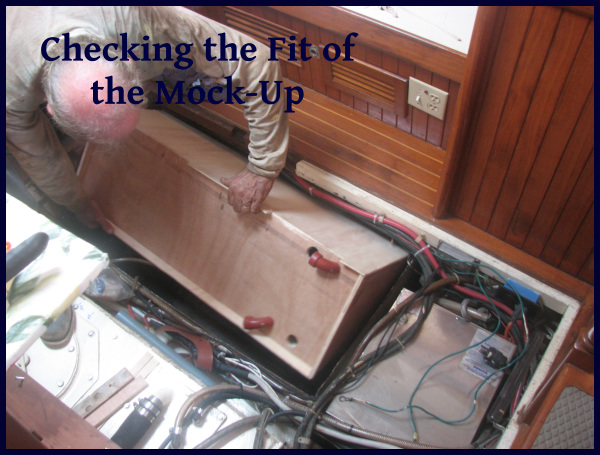
In last week's Blue View, I talked about removing the tops from the old fuel tanks, making the drawings for the new tanks, then building mock-ups out of plywood. Once I was happy with the fit and the drawings, I hired a “flete”, sort of a combination small truck and taxi driver, and made the trip to the metal fabricator. After a lengthy discussion that required Marcie's reasonable Spanish, my crappy Spanish enhanced with a great deal of hand gestures, the drawings and the mock-ups, the fabricator assured us he understood what was needed. He gave us a quote and promised delivery in about a week.

Sure enough, 8 days later I got a message that the new tanks were ready. We rounded up several hundred dollars (Ecuador uses the U.S. dollar as its currency), stuffed them into our pockets and hired a taxi to take us back to the fabricator. The shiny new tanks were lined up alongside the mock-ups, and looked identical. I asked the manager if they had been pressure-checked, and his response was “Si claro, Señor, claro”, which meant “Yes certainly, sir, of course”. I paid him the remaining amount due and arranged to have the tanks transported to Nine of Cups.

hoisting the tanks aboard

They arrived the next morning, all carefully wrapped to protect them during the trip. We loaded the first one into the dinghy and transported it out to Cups. I made a small harness and attached a spare halyard to the tank, then Marcie cranked away at a cockpit winch while I guided the tank up out of the dinghy, down the hatch and into the saloon, trying very hard not to damage the varnished teak in the process. Once it was below deck, I guided it into the old, cut-away fuel tank, and then slid it into place, securing it temporarily with a couple of bolts.

lowering tank

This process was repeated with the second tank, but when we tried to install the third tank, it wouldn't fit into place. We found that the hose fittings were not to specification...something we hadn't noticed when we looked at them at the fabricators...and thus wouldn't fit. Out they came, and we hauled them back one by one to shore in the dinghy, hired a flete once again and took them back to the fabricators. Oh, man!

By the end of the week, they had fixed the problem and the tanks were re-delivered to us. We got them all in, plumbed and ready for the final pressure testing. They had been tested at the fabricators, of course, but this was the final check before filling them with fuel. Leaks...leaks...leaks! It was hard to identify them all in-situ, but there were a lot of pinhole leaks in the welds! So much for the fabricator's assurance that they had been pressure tested. We were sick about it.

pressure test

Out they all came, and we transported them ashore once again, one at a time. I also hauled my compressor and extension cords as well as several hoses and fittings ashore. We pressure checked all three tanks and found more than 30 leaks in all! We marked each leak and worked with a local welder to make the repairs. It was cheaper and quicker than hiring a flete and returning the tanks to the fabricator. After a new coat of paint, the tanks were ready to go back aboard – for the third iteration.

the leaks

This time, after the tanks were installed and plumbed, they passed the final pressure check. I secured each in place with bolts, then reinstalled the floor stringers, floorboards and table. Hoorah!

securing the tanks

All-in-all, the fuel tanks turned out well, and I was quite pleased with the results. Like most of my boat projects, however, building the new tanks took about three times as long as I planned. On the other hand, I was quite pleased with the cost – looking at the bright side, it came in at only about 50% over budget as opposed to the usual double or triple.

The Blue View - Replacing the Fuel Tanks

BVFuelTanks Intro

When we bought Nine of Cups in 2000, we hired a marine surveyor to do a complete survey on our new home. He noted that our fuel tanks were constructed of black iron, and while there were no leaks at the time, this type of tank had a usual lifetime of about 20 years. Since Cups was then 14 years old, we probably had a few more years left in them before we started to see any leaks, but we knew it was something we should be expecting. Sure enough, in 2006 our starboard tank started leaking.

We were in Ecuador at the time, and the local boat repair expert assured us it could be successfully patched. We gave it a try, but the patch only lasted long enough to get us well offshore before the tank started leaking again.

A few months later when we returned to Ecuador, I decided to replace it with an epoxy tank. I cut access panels in the cabin sole, cut the top off the old tank and removed the baffles, then constructed a new epoxy tank. It fit well and has been doing its job with nary a leak ever since, but it was a lot of work and took about 4 times longer to build than I expected – not all that atypical of most of my projects actually.

Then in 2007, the port tanks started leaking. We put the project off until we were in Ecuador again, this time in Puerto Amistad near Manta. There was a steel fabricator not too far away who made tanks for the fishing fleet out of Manta and who came highly recommended. We decided to have them made by him rather than building it out of epoxy.

cutting the sole

I started by removing the saloon table and cutting out sections of the teak and holly sole. I borrowed a Fein tool, making it possible for even me to make reasonably straight, accurate cuts.

dressed

Next, I used a grinder with a cutting blade to cut the top off the old tank. This was a messy job, with sparks flying everywhere. I draped the entire area with old sheets and tarps, wore a respirator, eye protection, and enough clothing to avoid most of the burns. Once the top was cut off, I climbed inside the tank and cut the old baffles out – another messy, unpleasant job. Once I crawled back out of the tank and confirmed that I still had my nose and all ten fingers, I cleaned up the mess and hauled all the debris ashore.

The next task was to measure for the new tanks. It would have been nice to make one big tank that would fit into the old tank, but the size of the tank was limited by what would fit down through the hatch. Apparently, the original tanks were constructed and fitted before the decks were put in place.

In order to maximize fuel capacity, I decided to build three tanks, each of which would fit through the saloon hatch. The plan was to slide the new tanks into the old tank, bolt them in place, then plumb them all together. I spent several hours wiggling around inside the old tank making measurements. Then I sat at the Nav desk and sketched the three tanks.

Once the sketches were done and checked, I had a dilemma. Could I trust my measurements and sketches enough to hand them over to the fabricator or should I build models of the tanks to be sure they actually fit and to check for any mistakes? Given my propensity for mistakes and the possibility that the fabricator would misinterpret some aspect of the sketches, this was a no-brainer – I decided to build plywood mock-ups of the tanks.

making the mock ups

The local lumberyard (almacén de maderas) was happy to deliver a few sheets of 1/4” plywood, I had plenty of epoxy, glue-gun sticks and screws on hand, and Puerto Amistad, the yacht club we were renting a mooring from, was kind enough to let me use some space in a fenced area to work in. I found plastic plumbing fittings at the local hardware store (ferreteria). I transported all my supplies and tools ashore, and began building the mock-ups.

checking the fit

Under different circumstances, I'm sure this phase would have gone quicker, but given the equatorial heat, the ongoing discussions with the other sailors who wondered what the hell I was doing, and who were full of suggestions on how I might do it better, and the close proximity of the cool, air-conditioned bar, it took longer than I planned to build the mock-ups. In total, I spent three days building and checking the fit of the tanks, then another day tweaking them all to correct a few errors and miscalculations. In retrospect, however, making the mock-ups was worth doing since I would have had to send the tanks back for reworking had I not made the models.

As we've said so many times before “Nothing's ever easy on a boat.” I'll talk about testing and installing the new tanks in Part 2 of this blog. Stay tuned.

Go to Part 2 of Replacing Fuel Tanks